Stayntouch PMS
Release Notes (v5.59)
Effective:
- 12 January 2023 for customers using https://app.us2.stayntouch.com/
- 17 January 2023 for customers using https://app.eu1.stayntouch.com/
- 23 January 2023 for customers using https://app.us1.stayntouch.com/
TABLE OF CONTENTS
- Change to Stayntouch PMS Login Screen
- Single Login Email For Super Users Accessing Multiple Hotels Of Different Chains
- Only Rates Associated With Selected Rate Type Returned In Rate Manager
- Add-On Count Recorded In Activity Log
- Edit Check-Out Time After Late Check-Out Add-On Is Purchased
- Actions “Created” Field Correctly Reflects Person Who Created Action
- New Rate Codes Using Based On/Copy From Functionality
- “Other” Added as a Gender Option on Guest Card
- Inactive Origin Codes Not Available In CRS Configuration
- Allotment Data Now Sent To Duetto
- Automatically Trigger Invoices To Guests At Check-Out
- Stayntouch Guest Kiosk: Manually Enter ID Information If ID Scanning Fails To Capture Data
- Stayntouch Guest Kiosk: Bypass Secondary Authentication
- Allowance Forecast Report Added To Scheduled Reports

ⓘ We'd like to call out a few special items that have been long-awaited and will make many of our customers happy:
- We now allow for single login emails for super users accessing multiple hotels of different chains. This will eliminate the need for multiple logins for ownership groups.
- We’ve added OTHER as a gender option for selection on the guest card.
- Stayntouch PMS now sends allotment data to Duetto upon allotment creation, modification, cancellation, and data sync the same way it does for groups.
PRODUCT ENHANCEMENTS
Change to Stayntouch PMS Login Screen
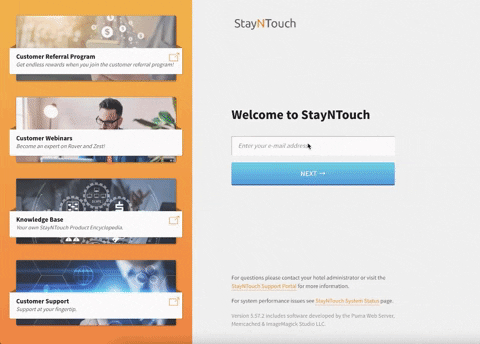
Starting with the deployment of Release v5.59 of Stayntouch PMS, the Stayntouch PMS login screen will be changing in order to provide additional security. Going forward, when you log into Stayntouch PMS via https://app.us1.stayntouch.com/, https://app.eu1.stayntouch.com/, or https://app.us2.stayntouch.com/, you will first be prompted to enter your login email address and then click NEXT, as per the screenshot below.

Once you have entered your login email address, your email address will be pre-populated on the next screen, which will then prompt you to enter your password, as per the screenshot below.

You can then sign into Stayntouch PMS as per usual. You can view the full login process in the GIF below.
Single Login Email For Super Users Accessing Multiple Hotels Of Different Chains
A hotel can now be subscribed to multiple service providers. Please note, service provider selection must be done by Stayntouch Admin. Please contact Customer Support to subscribe a hotel to multiple service providers. A service provider user (or super user) is able to search and log into hotels associated with their service provider only. You can view the selected service providers for your hotel from Settings > Hotel & Staff > Hotel Details > Hotel Services.

With this functionality, hotels in different chains can be made accessible to one designated user. Please contact Customer Support to have a service provider user created for accessing hotels across multiple chains. In the example GIF below, the three hotels searched by this user each belong to a different chain.

ITEMS TO NOTE:
- This feature is only available to current designated Hotel Admin or Chain Admin users of hotels from different chains.
- The service provider user will not be able to use this account to perform payments.
Only Rates Associated With Selected Rate Type Returned In Rate Manager
In Revenue Management > Rate Manager > FILTER OPTIONS > RATE TYPE, when selecting a rate type from the FILTER INDIVIDUAL RATE TYPE(S) dropdown (and no specific rate codes within that type are selected from FILTER OPTIONS > RATES > FILTER INDIVIDUAL RATE(S) dropdown), only rates associated with that rate type will be returned in the Rate Manager.


Add-On Count Recorded In Activity Log
When an add-on is attached to a reservation, the stay card Activity Log will record the count for the add-on. This will be updated accordingly in the Activity Log when the add-on count is changed.
Add-On Created

Add-On Edited

Edit Check-Out Time After Late Check-Out Add-On Is Purchased
When a guest purchases a late check-out add-on, the late check-out time field can be edited, as per expected functionality. The same also applies when a guest purchases a late check-out add-on during Stayntouch Guest Kiosk/Mobility check-in. This enhancement is to address the scenario where the late check-out time could not be edited after a late check-out add-on was purchased.


Actions “Created” Field Correctly Reflects Person Who Created Action
When Actions are accessed from either the stay card or Actions > Action Manager, the “Created” field will accurately reflect the person who created the action. This enhancement is to address the scenario where the “Created” field was showing the person who completed the action.


New Rate Codes Using Based On/Copy From Functionality
When a rate code is created, and the user chooses to base the rate on another rate, only the room types from the original rate will show, and the rate amounts will be locked. If the user chooses to copy the new rate from another rate, the user can add or remove room types as they choose, and they can also update the rate if applicable. If the user wants to add a room type to the BASED rate, the rate would either need to be added to the original rate, or you'll need to recreate the rate and select COPY FROM instead (you can't change a rate from BASED to COPY FROM after it has been created). This enhancement is to address the scenario where the BASED ON/COPY FROM functionality was not working correctly.
Based Rate


Copy From Rate


“Other” Added as a Gender Option on Guest Card
We’ve added OTHER as a gender option for selection on the guest card.


Inactive Origin Codes Not Available In CRS Configuration
Inactive origin codes are no longer available for selection as DEFAULT BOOKING ORIGIN from Settings > Integrations > Central Reservation System > Select CRS > Reservation Settings.

Furthermore, inactive origin codes are no longer available for mapping Settings > Integrations > Central Reservation System > Select CRS > MAPPINGS > + ADD NEW > SNT VALUE.

Please note, this does not apply to Pegasus, Derbysoft, and STAAH, as origins are not part of the configuration.
Allotment Data Now Sent To Duetto
Stayntouch PMS now sends allotment data to Duetto upon allotment creation, modification, cancellation, and data sync the same way it does for groups. As part of this update, we’ve added an ALLOTMENT checkbox to the Synchronize Data section within Settings > Integrations > Revenue Management System > Duetto. Selecting this checkbox will include allotments in a data sync.

Automatically Trigger Invoices To Guests At Check-Out
Invoices will automatically be triggered to guests upon check-out when the EMAIL BILL ON CHECK OUT toggle is enabled from Settings > Hotel & Staff > Stationery > Invoices > Guest Invoice. Furthermore, if AR AUTO EMAIL INVOICE is enabled from Settings > Guest Mobility > Check Out > AR AUTO EMAIL INVOICE, the guest bill will be automatically emailed to the Company/Travel Agent.


Stayntouch Guest Kiosk: Manually Enter ID Information If ID Scanning Fails To Capture Data
During Stayntouch Guest Kiosk check-in, if the ID information is not captured successfully after scanning the ID, guests can now manually enter the ID information.
Items to Note:
- Default first and last name should be the reservation name or accompanying guest name.
- The stay card Activity Log will show that the data capture was unsuccessful.
- The most recently scanned image of the ID will be saved to the guest card, even if the data was not captured during ID scan.
- The data entered manually should include the ID number.


Stayntouch Guest Kiosk: Bypass Secondary Authentication
From Settings > Kiosk > Check In > Primary Authentication, you’ll now see a Bypass Secondary Authentication below the Confirmation option. When selected, users will NOT be prompted for secondary authentication during the Stayntouch Guest Kiosk check-in process.
Items to Note:
- Confirmation must be selected from Primary Authentication for secondary authentication to be bypassed. The guest must also enter the confirmation number as the method of primary authentication.
- If Last Name and Confirmation are selected from Primary Authentication, along with Bypass Secondary Authentication, and the guest selects Last Name, the guest WILL be prompted for secondary authentication.
- If Last Name and Confirmation are selected from Primary Authentication, along with Bypass Secondary Authentication, and the guest selects Confirmation, the guest will NOT be prompted for secondary authentication.

ALLOWANCES
Allowance Forecast Report Added To Scheduled Reports
To set up a scheduled report for the Allowance Forecast Report, navigate to Reports > Schedule a Report/Export > Scheduled Reports > + NEW REPORT SCHEDULE > Allowance Forecast Report. This will generate a report showing an allowance forecast for the date range selected. For more details about this report, you can see our Report Guide.


The first step is to select a TIME PERIOD from within Schedule Parameters. You can select from Tomorrow, Next 7 Days, Next 10 Days, or Next 30 Days.


Then, you can make selections from the following parameters:
- SORT BY: Choose to sort by Allowance or Date.


- GROUP BY: Choose to group by Allowance Code or Date.


Next, you can choose a FILE FORMAT of either PDF or CSV. If you choose CSV, then you can select whether or not to INCLUDE CSV HEADER. Selecting INCLUDE CSV HEADER will show the Hotel Code, Hotel Name, Generated Date, Generated Time, and Report Name.


You can now move onto Schedule Details, where you can indicate how often the report REPEATS. Select from Hourly, Daily, Weekly, Monthly, or Run During EOD.


If you select Hourly, you'll be prompted to enter information for the following fields:
- REPEATS EVERY: Indicate a number of hours. This is how often you want the report to repeat. This must be 1 or greater. If you enter 0 or leave it blank, it will never send.
- STARTS ON: Choose a date for when the report starts.
- STARTS AT: Choose a time for the report to start.
- ENDS ON: Indicate when the report ends.
- AFTER NO. HOUR: Ends after a specified number of hours.
- ON: Ends on a specific date.
- NEVER: The report delivery never ends.

If you select Daily, you'll be prompted to enter information for the following fields:
- REPEATS EVERY: Indicate a number of days. This is how often you want the report to repeat. This must be 1 or greater. If you enter 0 or leave it blank, it will never send.
- STARTS ON: Choose a date for when the report starts.
- STARTS AT: Choose a time for the report to start.
- ENDS ON: Indicate when the report ends.
- AFTER NO. DAY: Ends after a specified number of days.
- ON: Ends on a specific date.
- NEVER: The report delivery never ends.

If you select Weekly, you'll be prompted to enter information for the following fields:
- REPEATS EVERY: Indicate a number of weeks. This is how often you want the report to repeat. This must be 1 or greater. If you enter 0 or leave it blank, it will never send.
- STARTS ON: Choose a date for when the report starts.
- STARTS AT: Choose a time for the report to start.
- ENDS ON: Indicate when the report ends.
- AFTER NO. WEEK: Ends after a specified number of weeks.
- ON: Ends on a specific date.
- NEVER: The report delivery never ends.

If you select Monthly, you'll be prompted to enter information for the following fields:
- REPEATS EVERY: Indicate a number of months. This is how often you want the report to repeat. This must be 1 or greater. If you enter 0 or leave it blank, it will never send.
- STARTS ON: Choose a date for when the report starts.
- STARTS AT: Choose a time for the report to start.
- ENDS ON: Indicate when the report ends.
- AFTER NO. MONTH: Ends after a specified number of months.
- ON: Ends on a specific date.
- NEVER: The report delivery never ends.

If you select Run During EOD, you'll be prompted to enter information for the following fields:
- STARTS ON: Choose a date for when the report starts.
- STARTS AT: Choose a time for the report to start.
- ENDS ON: Indicate when the report ends.
- AFTER NO. PER: Ends after a specified number of End of Day cycles.
- ON: Ends on a specific date.
- NEVER: The report delivery never ends.

Finally, you can move onto Distribution List, where you can select a DELIVERY METHOD. Choose from either Email Export Delivery Type, SFTP Export Delivery Type, Google Drive, or Dropbox.


If you select Email Export Delivery Type, enter email addresses to receive the report from the ADD RECIPIENT field. Type the email address. Pause. Then hit enter. Email addresses will then appear below.


If you select SFTP Export Delivery Type, select a SFTP RECIPIENT.

If you select Google Drive, choose from a pre-configured Google Drive account. You can learn how to configure a Google Drive account here.


If you select Dropbox, choose from a pre-configured Dropbox account. You can learn how to configure a Dropbox account here. Please note, as of the v5.54 release, we have implemented changes to the existing workflow of Dropbox account settings. If you have any existing scheduled reports with a delivery method of Dropbox, and you fail to receive reports, please remove the old Dropbox account from Settings > Hotel & Staff > Dropbox and create a new Dropbox account.

Once you've selected a delivery method, you can click CREATE SCHEDULE to begin receiving the scheduled report.

The scheduled report will appear in your list of scheduled reports from Reports > Schedule a Report/Export > Scheduled Reports, and you can edit it from here if desired.


The scheduled report you receive to the selected delivery method will be in the file format chosen and will look something like the below screenshot depending on the parameters set.
