 Stayntouch PMS
 Stayntouch Guest Kiosk: Manage Languages and Update Screen Titles and Text
The following settings should be (1) configured from a back office computer and (2) from the Chrome or Safari Browser (not Internet Explorer, Mozilla, etc.).
MULTIPLE LANGUAGES: OVERVIEW
- Stayntouch Guest Kiosk supports multiple languages.
- To enable this multi-language functionality, a specific JSON language file needs to be uploaded in Stayntouch PMS (this can be performed by a Stayntouch Installer, as well).
- Different languages will appear for selection at the bottom of the Stayntouch Guest Kiosk home screen (see below).
- Guests can choose a different language before proceeding with check-in, check-out, or key creation.

Above: An example of selecting French for the Stayntouch Guest Kiosk language.
Required: Assign Stayntouch Guest Kiosk User Role
- In order to access the Settings > Station section in Stayntouch PMS, the correct user role needs to been assigned to the user.
- You can do so from Settings > Hotel & Staff > User Setup. Learn more here.
- Drag and drop the Zest Station user role to assign/unassign accordingly.
- Stay logged in to Stayntouch PMS.
- Navigate to Settings > Hotel & Staff > Permissions and select the appropriate user role.
- Drag and drop the Settings - Station permission so it appears in the Assigned Permissions column (see below).
- Without this permission, you won’t be able to configure the additional Stayntouch Guest Kiosk settings in Stayntouch PMS.

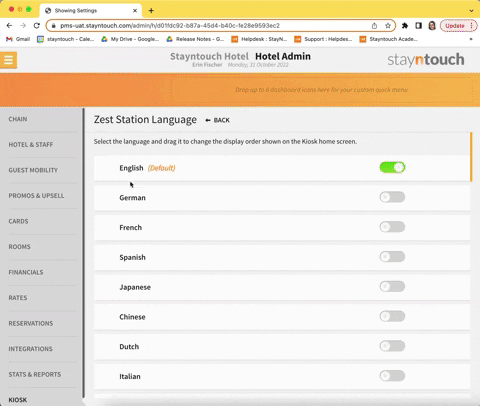
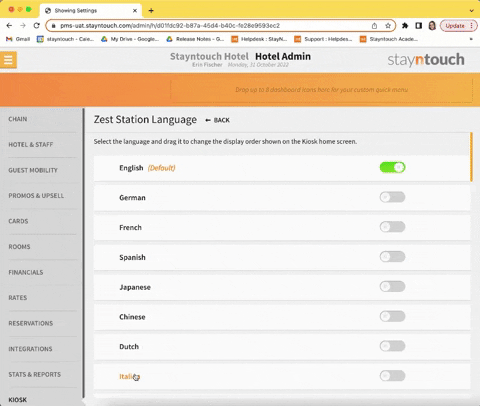
LANGUAGE FILE IMPORT
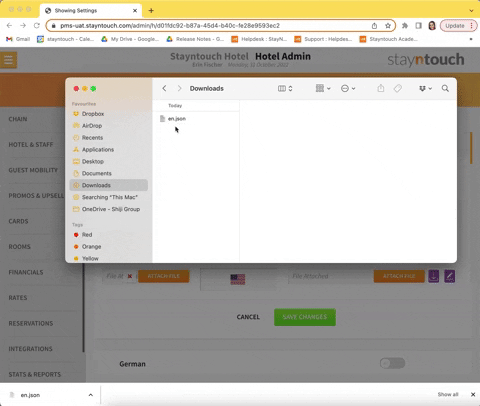
From Settings > Station > Languages, you will need to upload a specific JSON language file into Stayntouch PMS. The default attached language file is for English (see file attached to the bottom of this article). You can click the downward-facing arrow next to the file to download the file. If you need another language enabled, rename this downloaded file to the language of choice, upload it to that language, make edits to complete the translation in your desired language, and save your changes to enable the language.

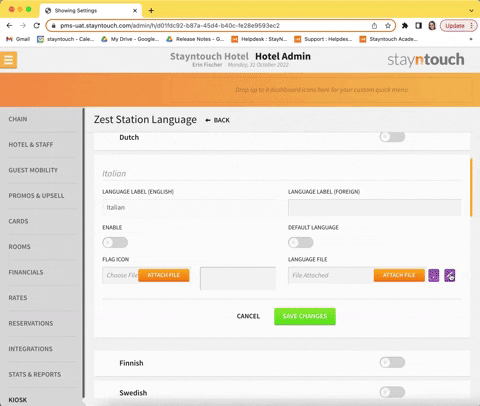
Start by selecting the language to upload the file, and you'll see an option to ENABLE the language and upload an image of the FLAG ICON. Here, we recommend uploading an image of the flag that represents the language selected.

You can also enter a LANGUAGE LABEL (FOREIGN), which is a translation option if you wish to enter the translated language name.

If you wish to make the language your default, turn ON the DEFAULT LANGUAGE toggle.

Click the ATTACH FILE button under LANGUAGE FILE to upload the language file for this particular language. Please note the following:
- Language files are saved as JSON files.
- Each language has a unique JSON file.

Once the language file has been imported, you can edit the language file by clicking the purple pencil icon next to the language file that has been uploaded. You'll then have the option to look through different language tags and update any of the text that appears during any of the experiences guests will go through (i.e., check-in, check-out, key pick-up, and walk-in reservations). Be sure to click ACCEPT CHANGES after editing text for any of the tags. Furthermore, you'll also need to click SAVE CHANGES to apply the changes to the language file.


You can also activate multiple languages from Settings > Station > Languages once you've attached the language files for the languages that will be available to guests at the kiosk.

Once you've completed adding your languages, they'll be saved and available to your guests to utilize during any one of the experiences activated for the kiosk.
Please note, if you’d like to use multiple languages, be sure to turn ON MULTI-LANGUAGE SUPPORT from Settings > Station > General > Language Support.

ADD-ON DESCRIPTIONS: DISPLAY IN ANOTHER LANGUAGE
- When translations are configured, guests will see translated text for the add-on pop-up.
- Translated sections include the add-ons:
- Name
- Description
- Suffix

ENABLE TRANSLATED TEXT: ADD-ONS
Step 1. Verify Multiple Languages are Enabled
- While logged in to Stayntouch PMS, navigate to Settings > Hotel & Staff > Languages.
- Toggle ON the various languages you’d like to use with Stayntouch Guest Kiosk.
- Then toggle ON each individual language you want to use.

Step 2. Translate Add-On Name & Description
- Under Settings > Rates > Add-Ons, select a specific add-on.
- You can select an ADD-ON LANGUAGE here.
- Select a language; this will translate the name, description, and suffix of the add-on.
- You will need to repeat this step for each add-on that needs to be translated.

Step 3. Translate Amount Type/Post Type
- Under Settings > Promos & Upsells > Upsell Add Ons, there is a language field in the upper right hand corner of the page.
- Select a language; this will translate the amount type/post type fields.
- You will need to repeat this step for each add-on that needs to be translated.
