
 Stayntouch PMS
 Stayntouch Guest Messaging Onboarding Via WhatsApp
TABLE OF CONTENTS
- Prerequisites: Getting Your Communication Channel Ready
- Creation of Your Guest Messaging Environment
- Onboarding Sessions
- Configuration
- Post Go Live Follow-Up
Prerequisites: Getting Your Communication Channel Ready
To ensure everything runs smoothly at go live, we’ll prepare your communication channels alongside your messaging account. This is a straightforward process, and we’ll guide you through it.
We’ll connect your WhatsApp Account to Guest Messaging. To connect your WhatsApp Account, the property must have a verified Meta Business Account (Facebook Business). Having your verified Meta Business Account up-to-date will help to integrate your WhatsApp channel into our Guest Messaging tool quickly and seamlessly.
- For First-Time Users: Ensure all information in your Meta Business Suite is complete and up-to-date. A verified account significantly speeds up the WhatsApp onboarding process.
- For Existing Users (Migration): If you are currently using another guest messaging tool with WhatsApp, please notify us. Both Stayntouch Guest Messaging and the property must coordinate to initiate the migration process.
View the WhatsApp setup best practices here.
Getting these elements ready in advance helps ensure a smooth and timely launch—so you can start communicating with your guests without any hiccups.
Creation of Your Guest Messaging Environment
Once your Guest Messaging contract is finalized, we will begin building your dedicated environment. To ensure the platform aligns with your brand identity, please provide the following assets:
- Property Logo
- Favicon
Once this is active, you can access the settings under Settings > Integrations > Guest Communications > Guest Messaging:
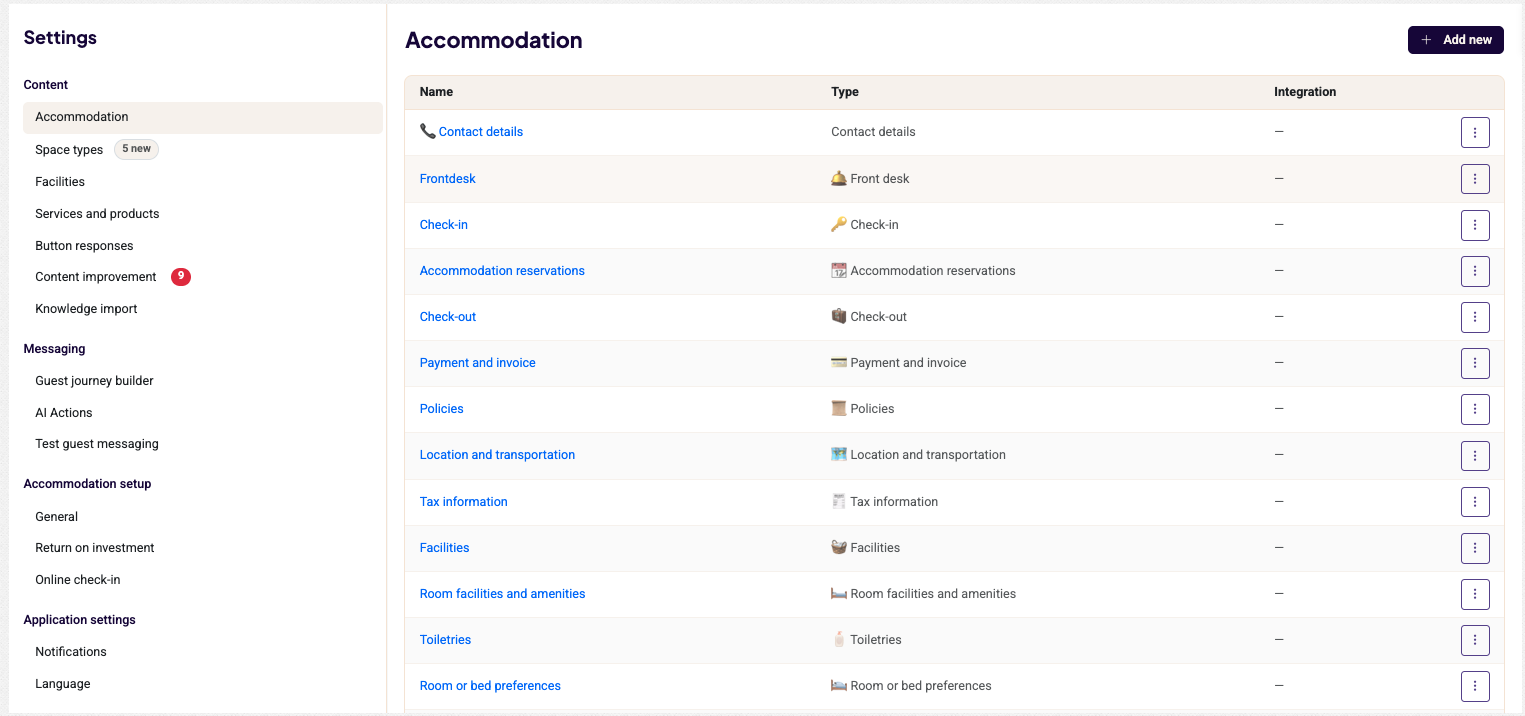
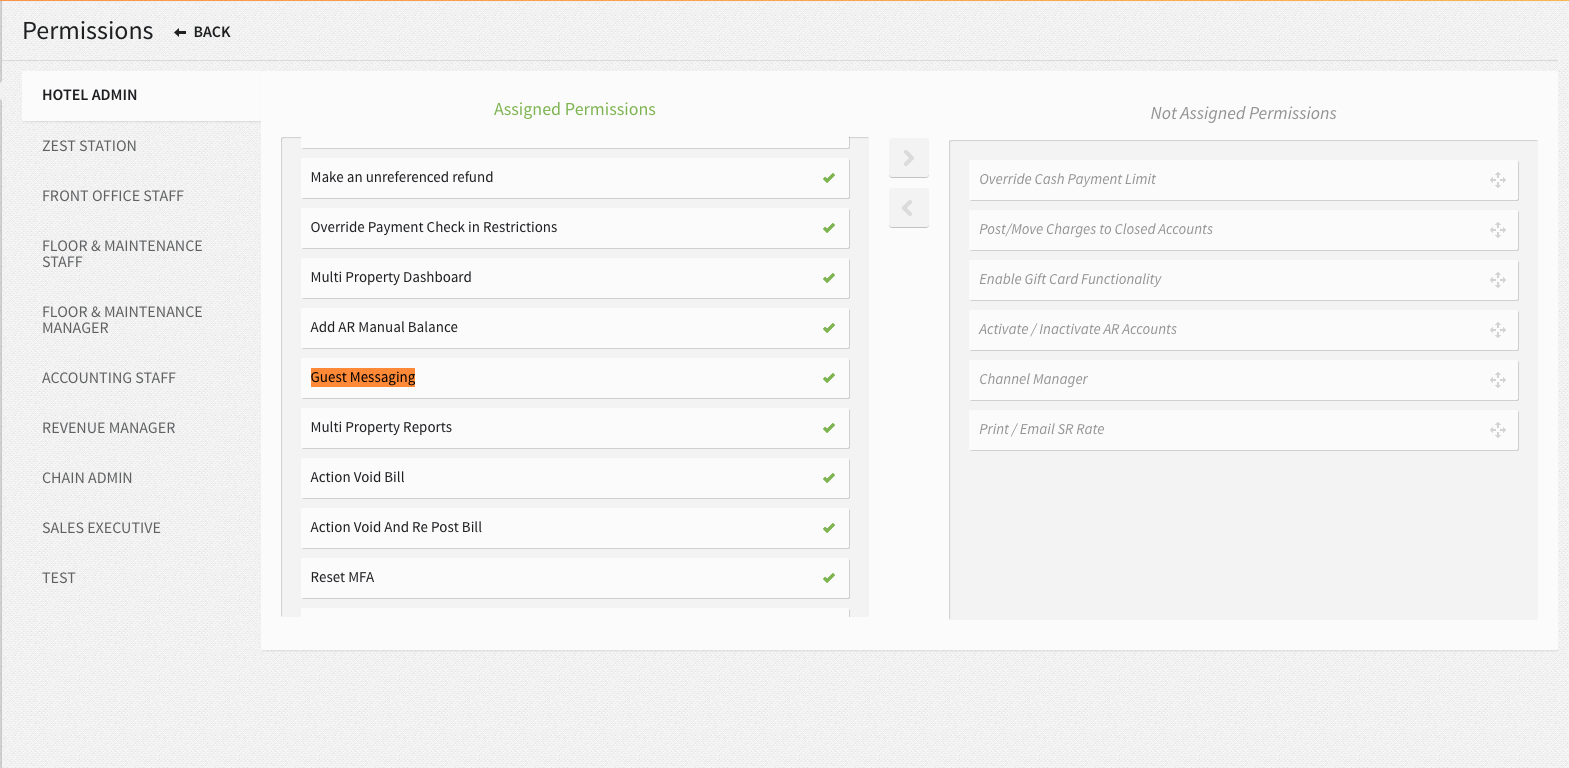
Please ensure the Guest Messaging user permission is assigned to grant users access to guest messaging conversations. This can be done via Settings > Hotel & Staff > User Setup > User Permissions.
Onboarding Sessions
Configuration is done in three sessions.
- Session 1: We’ll review and confirm your setup, and walk you through the answer library settings that will power the AI. Between sessions: You’ll have time to complete and refine the answer library at your own pace.
- Session 2 (optional): If you plan to use WhatsApp for international guests, we’ll schedule a dedicated call to connect your WhatsApp account before going live.
- Session 3: We’ll review your configuration together before switching your property live on Guest Messaging.
Configuration
Step 1: Knowledge Import
During the first onboarding session, we’ll review all necessary setup steps for the guest messaging tool, including the Answer Library (Content). You can then begin completing and refining the content.
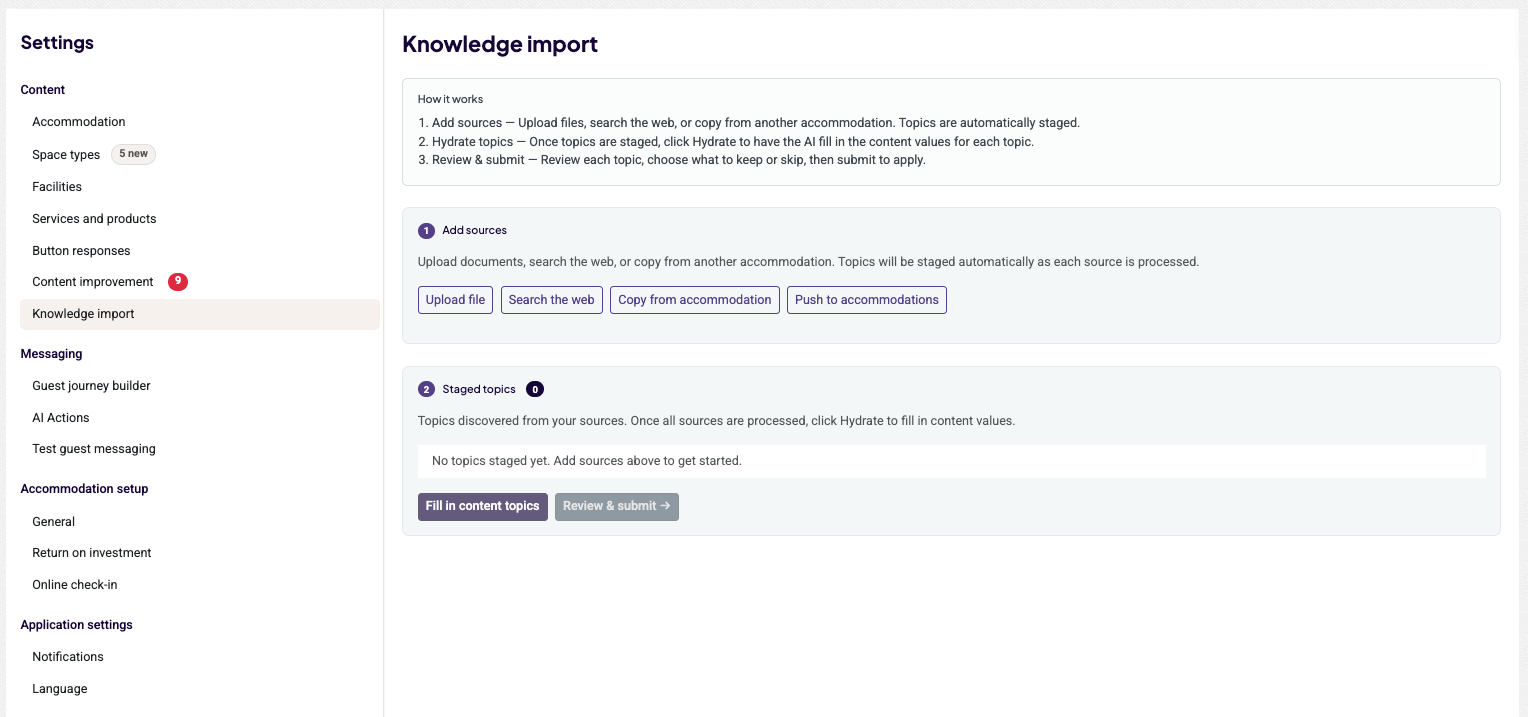
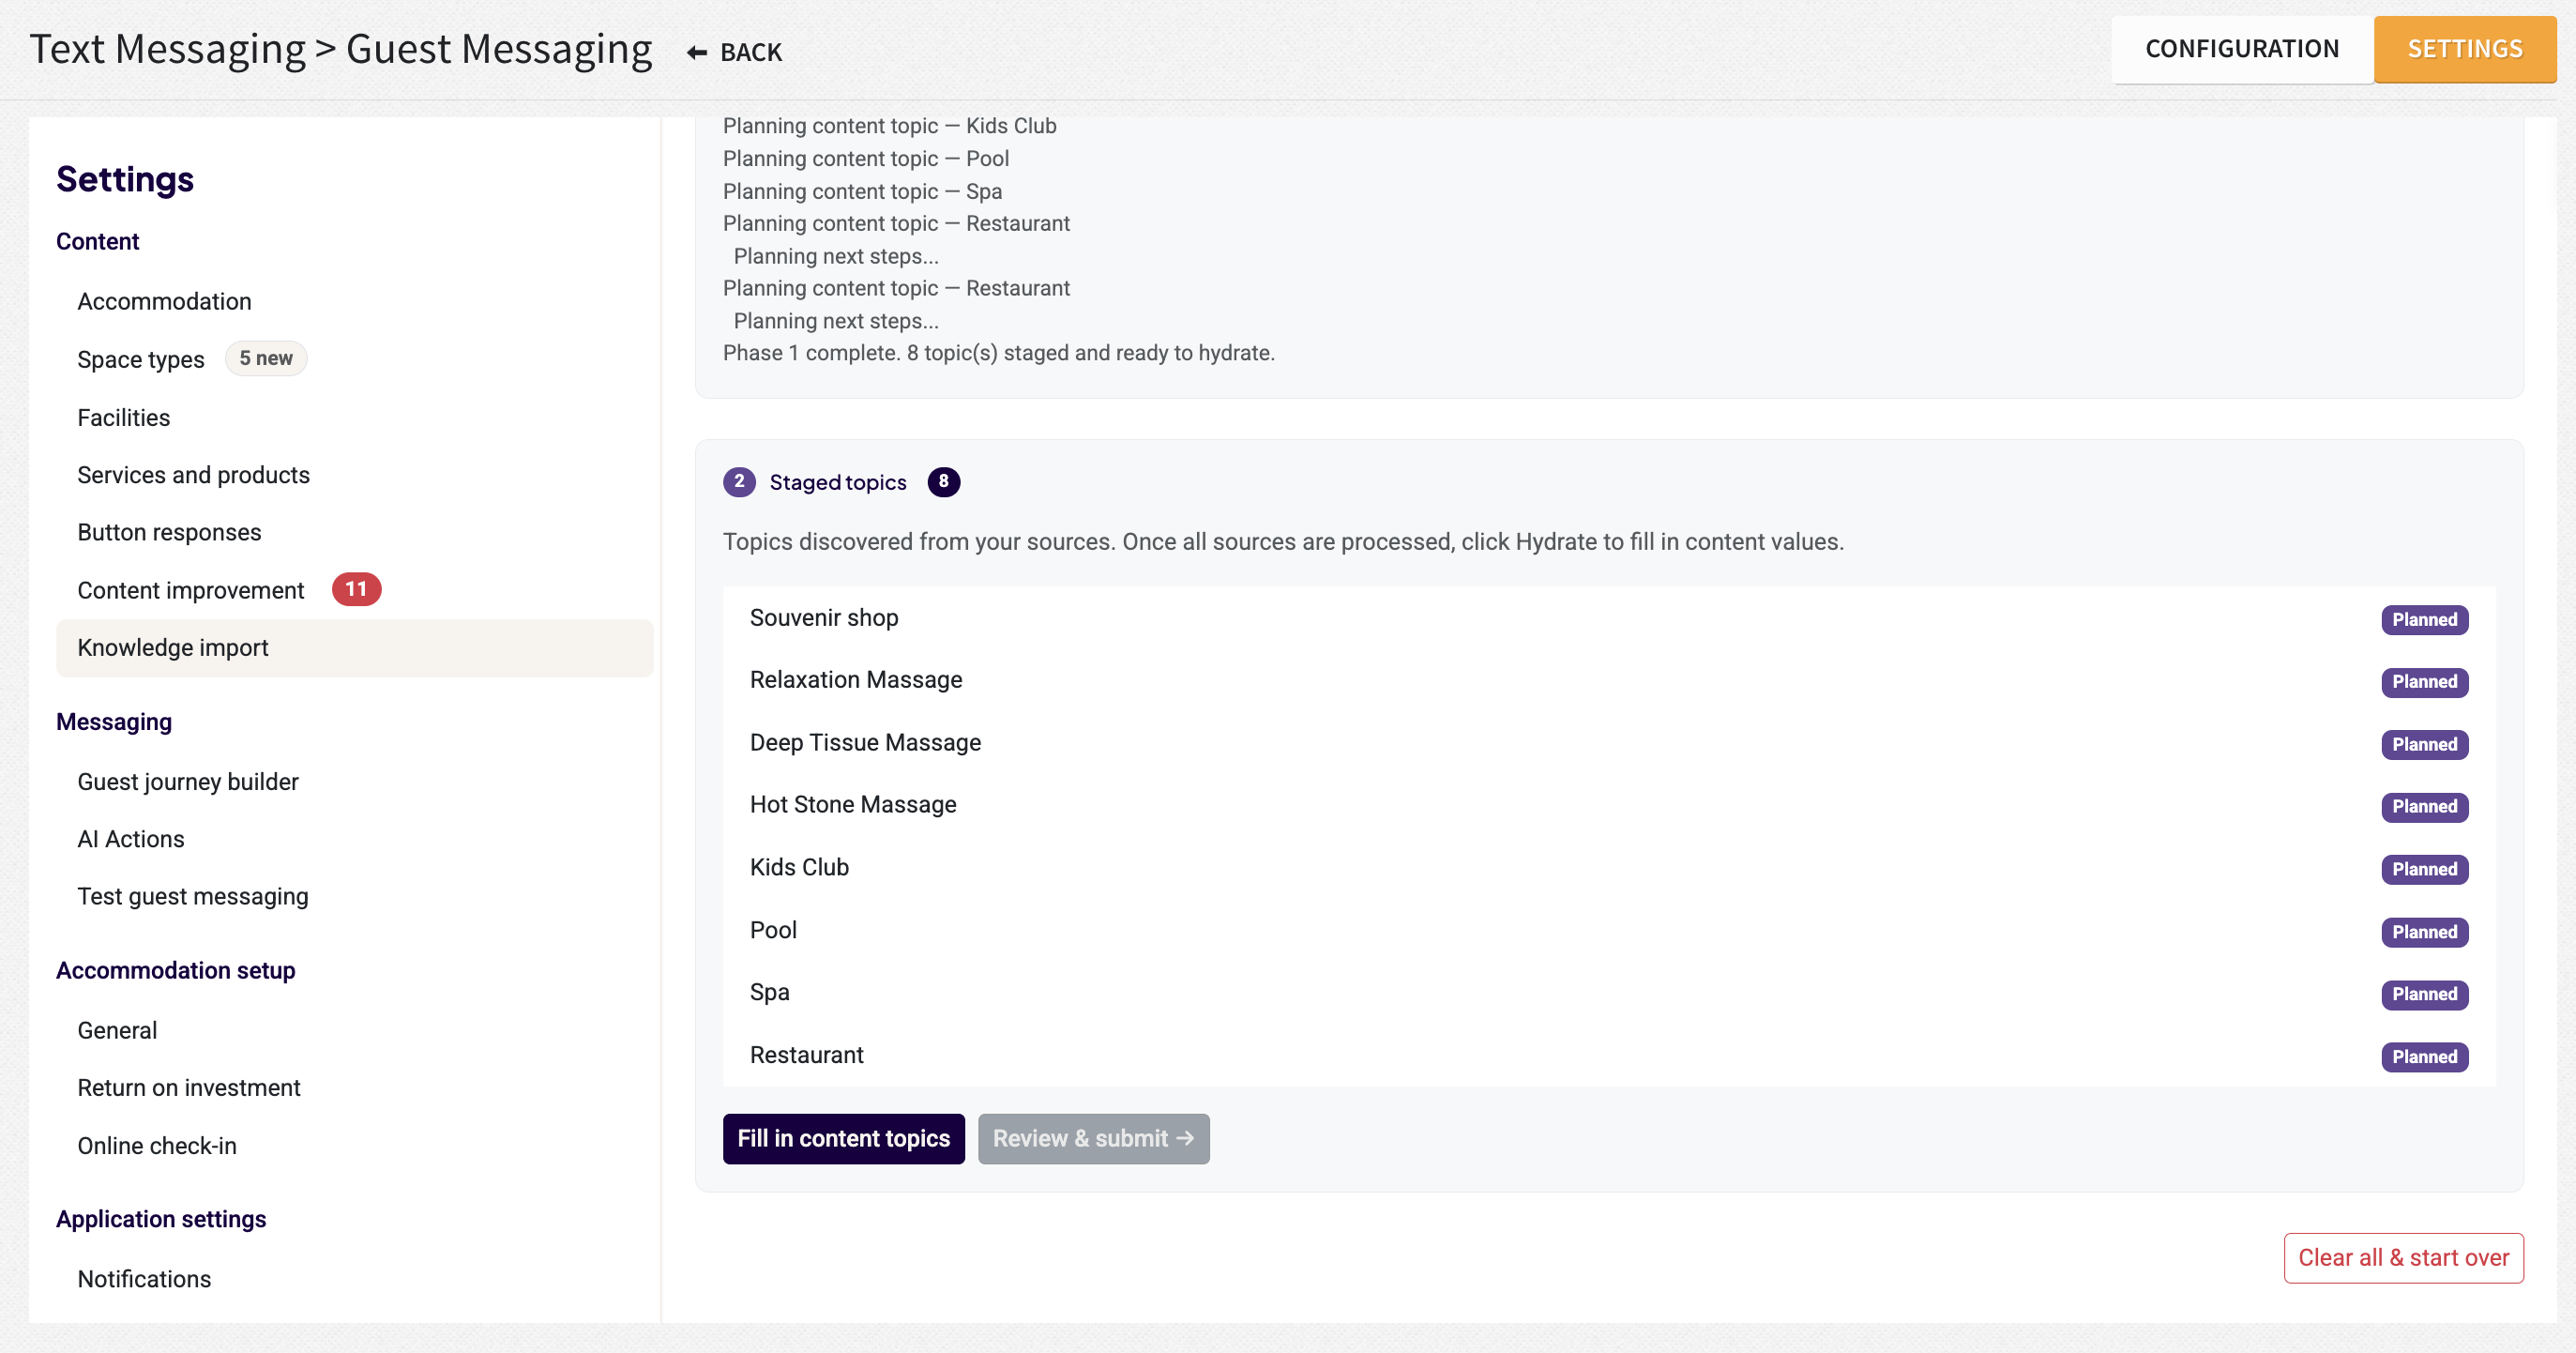
As a first step, we recommend running a Knowledge Import. This scans your existing information and automatically pre-populates the Answer Library with as much relevant content as possible.
You can import information from the following sources:
- Upload File – Upload PDF documents, such as digital brochures, guest directories, or other property information.
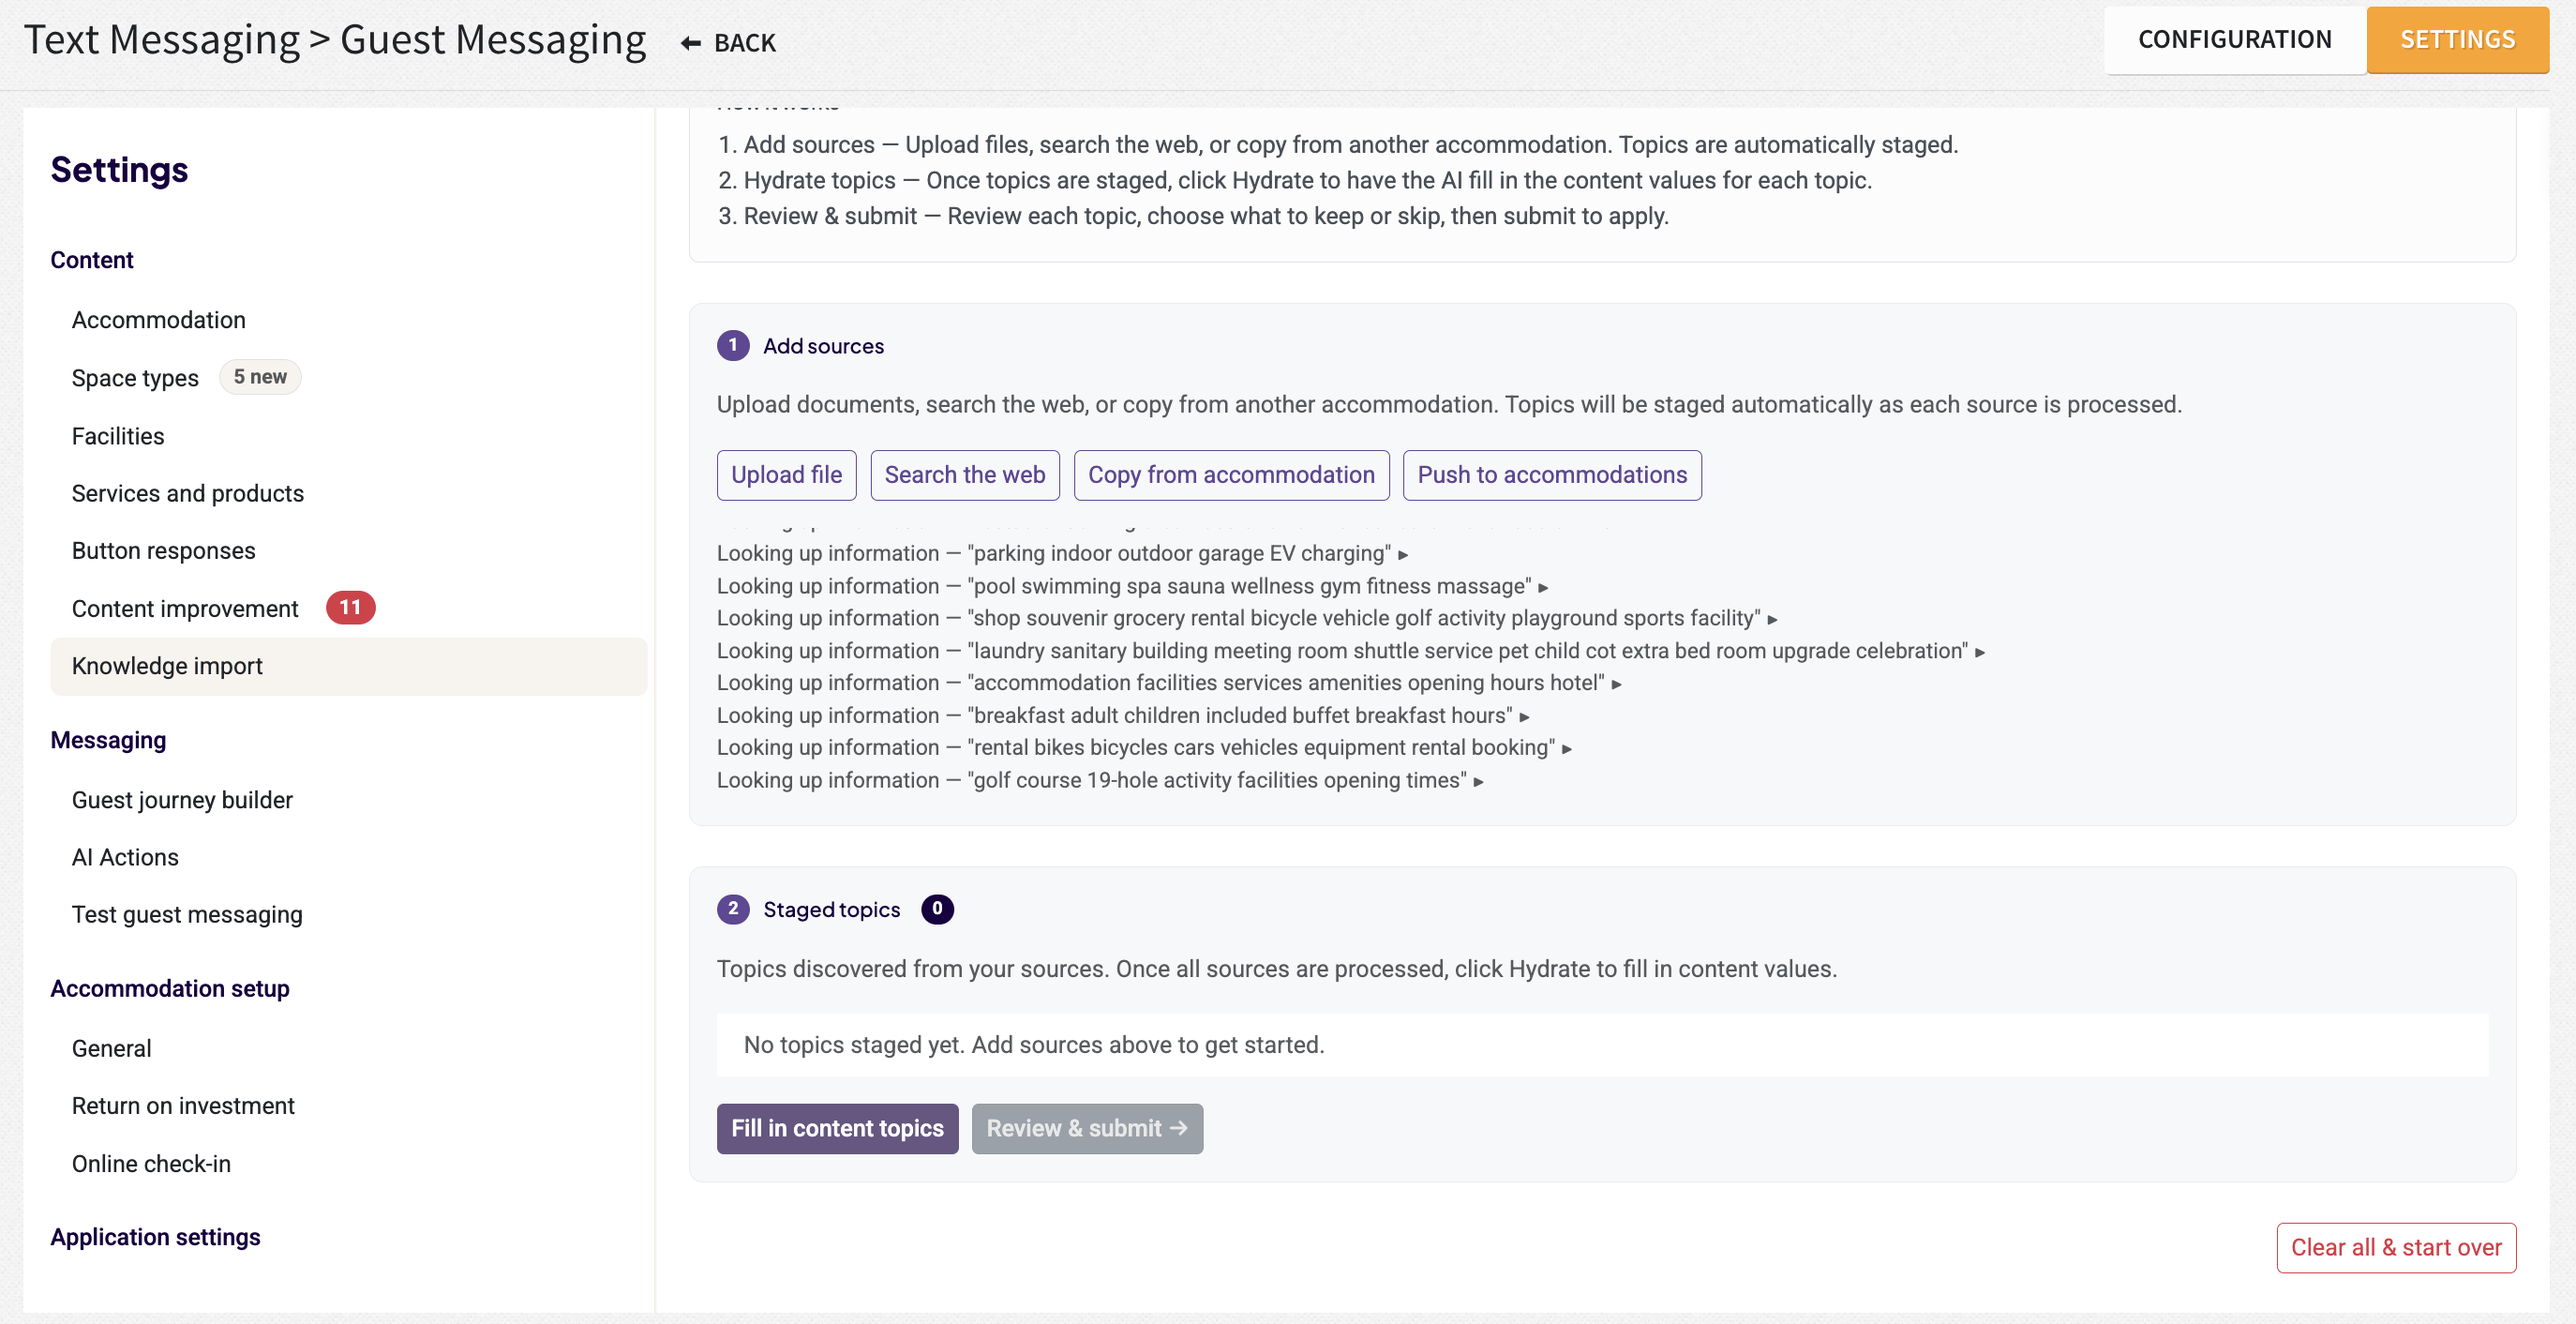
- Search the Web – Scan any available online sources to import relevant guest-facing information.
- Copy From/Push To Accommodations – For hotel groups or chains, copy content from a sister property or push content to other properties to maintain consistency across locations.
Steps to proceed:
- Select a Source – Choose the source you want to import content from.
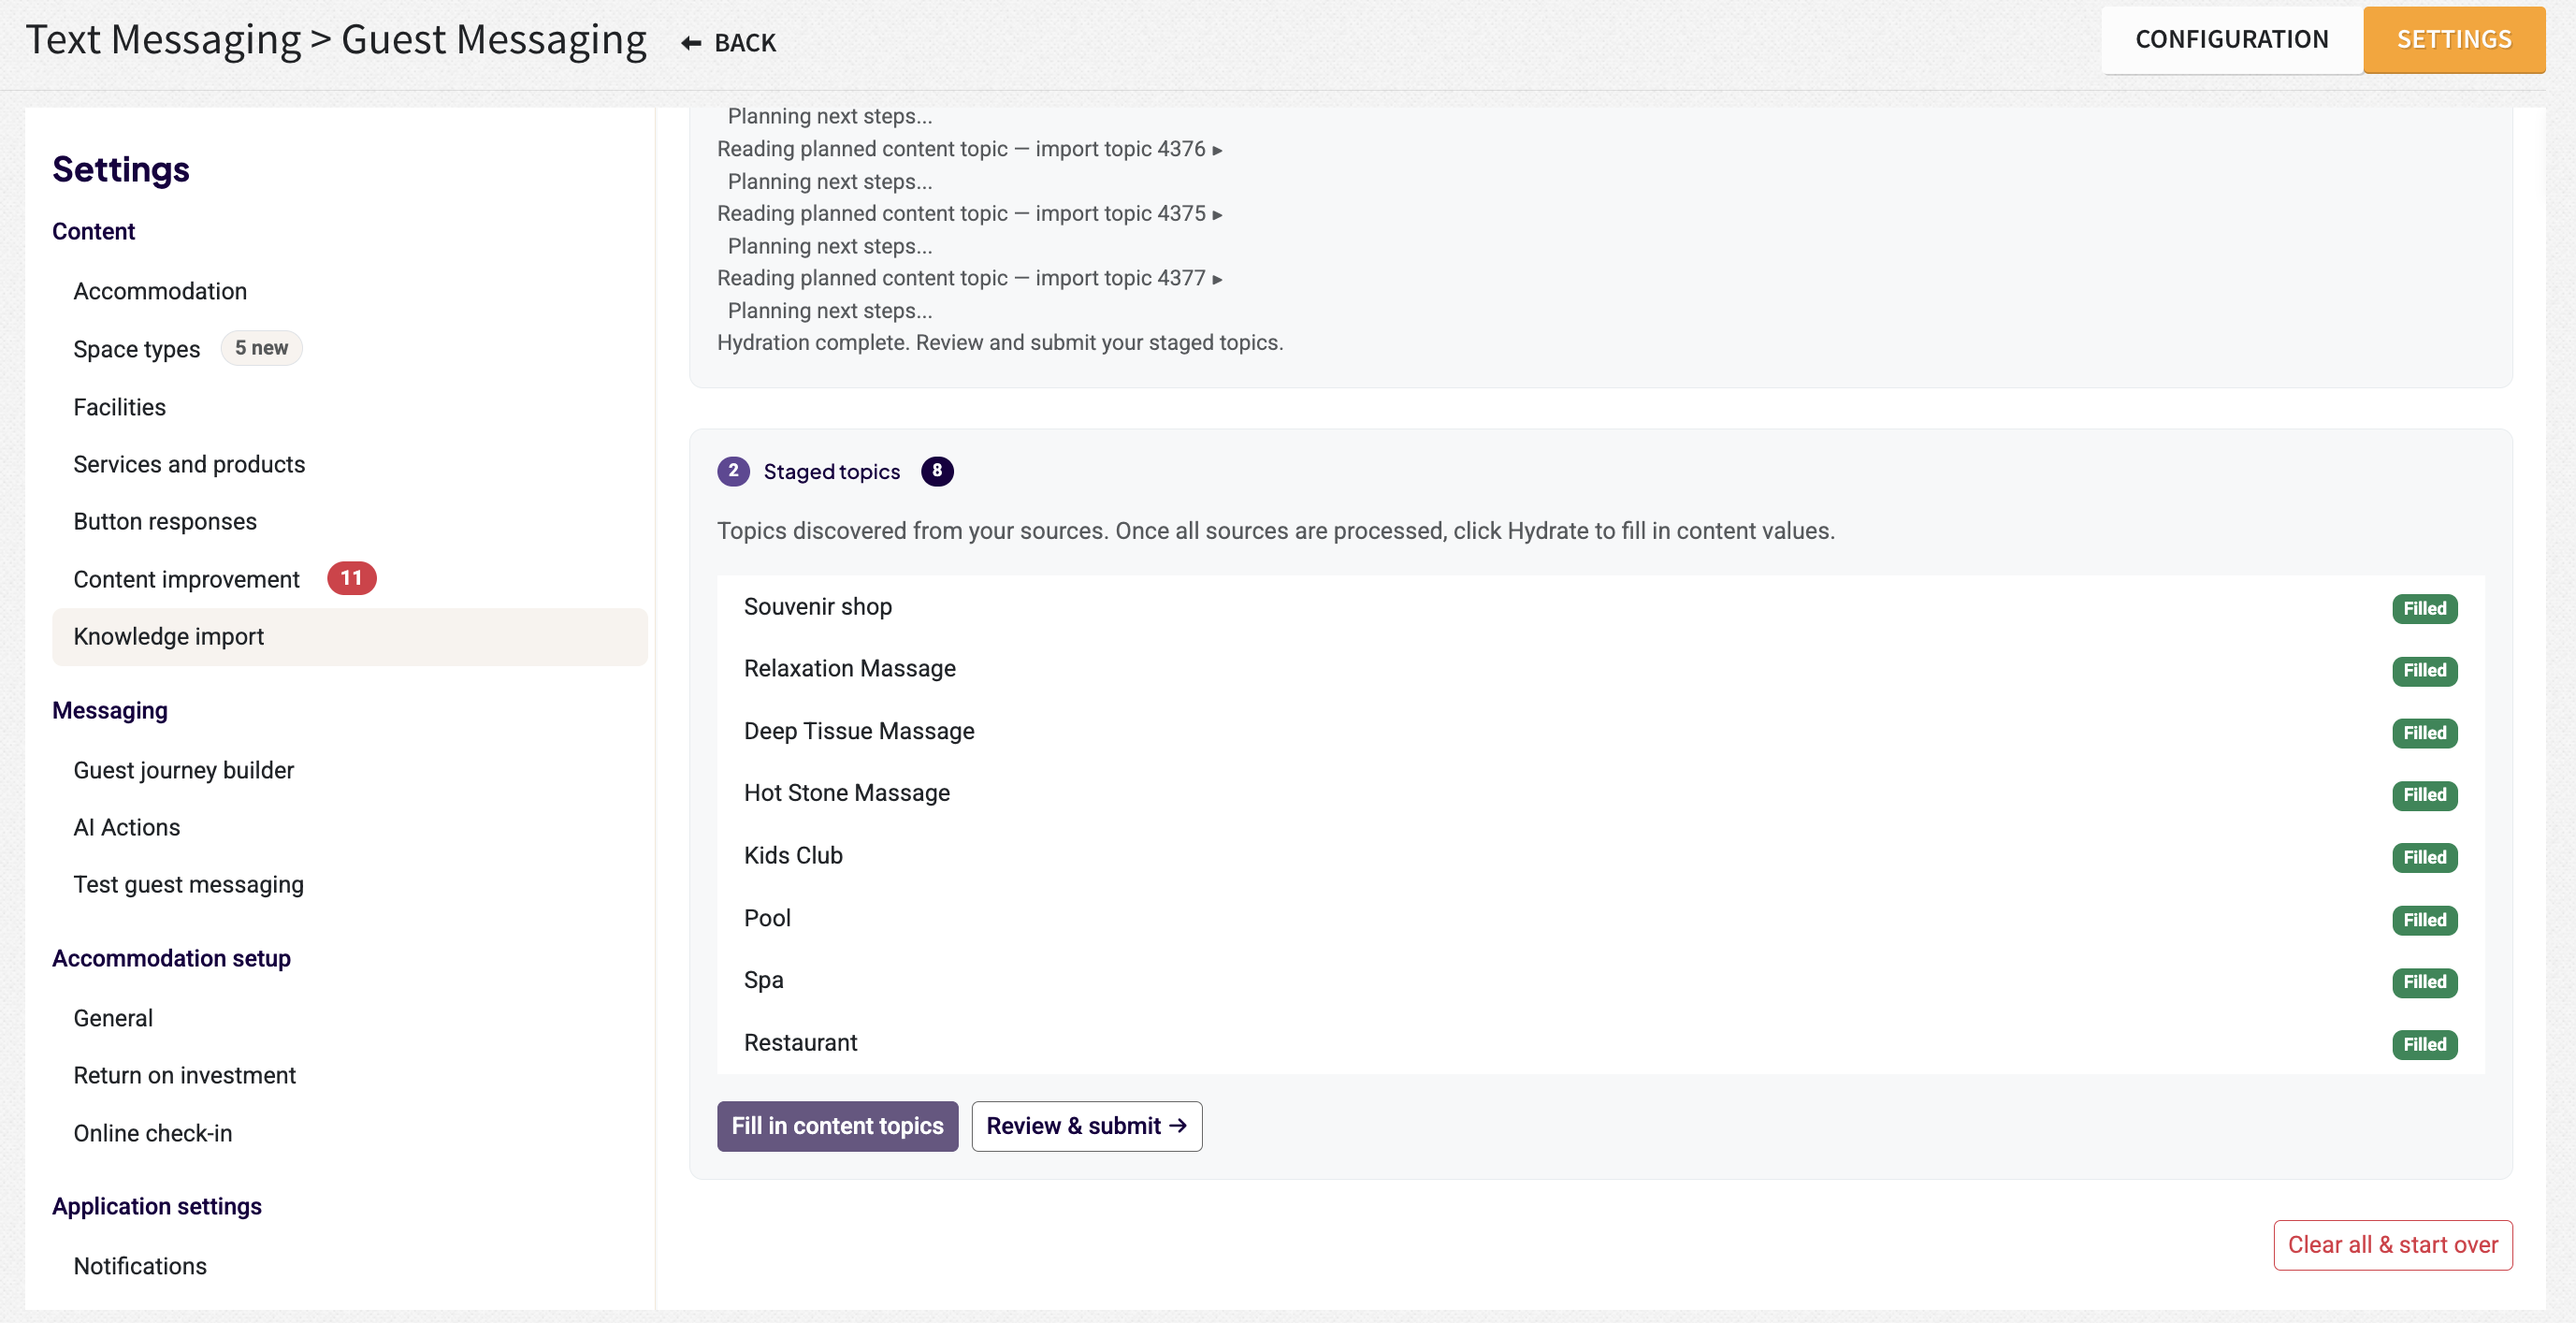
- Generate Content – Once the topics have been staged, click Fill in Content Topics to have AI generate content for each topic.
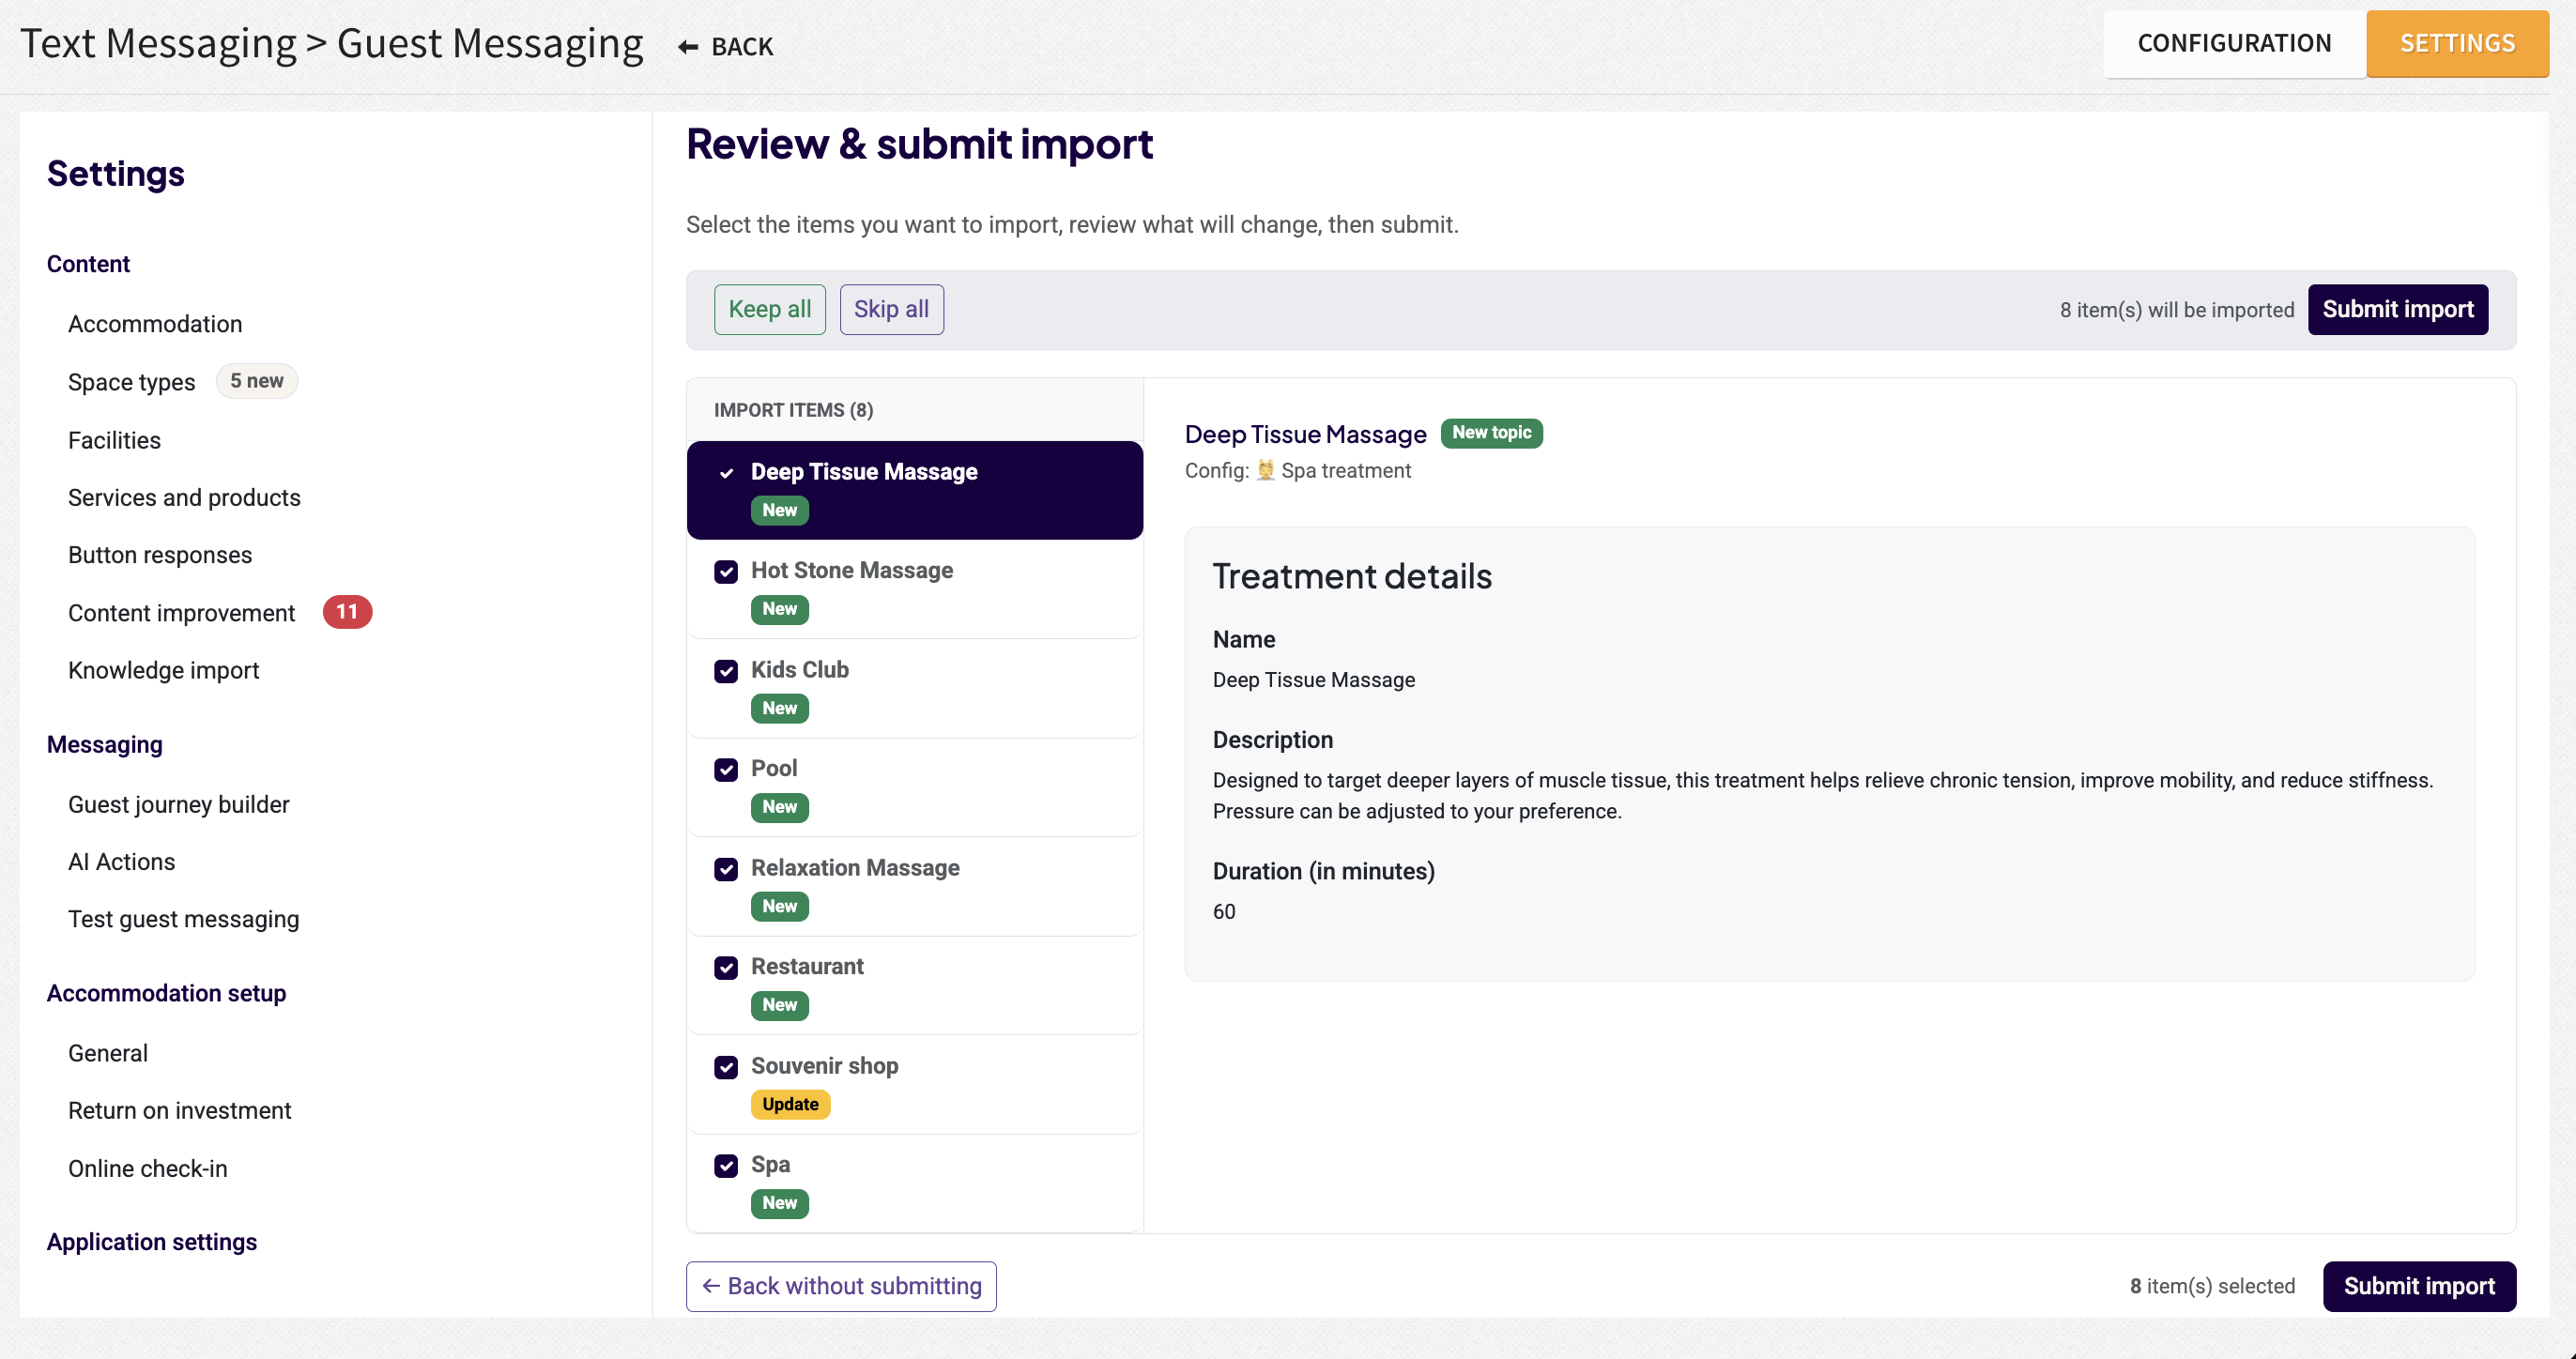
- Review & Submit – Click Review & Submit to review the generated content for each topic, decide which items to keep or skip, and click Submit import to apply your changes.
Step 2: Complete the Answer Library Content
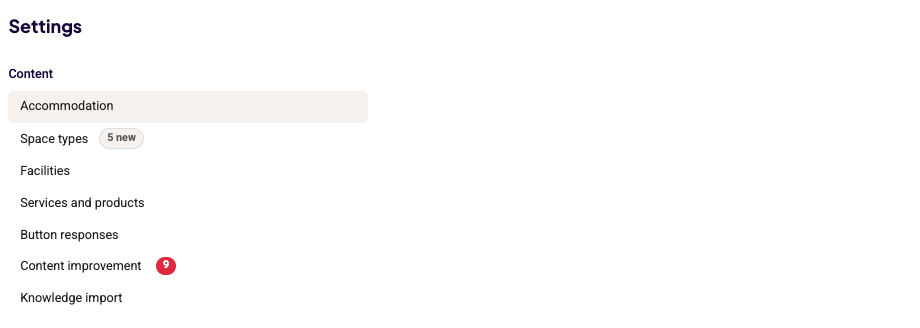
The completion of the content can be divided into 4 sections:
FAQs: Related to Accommodation Settings, Facilities, Services & Products
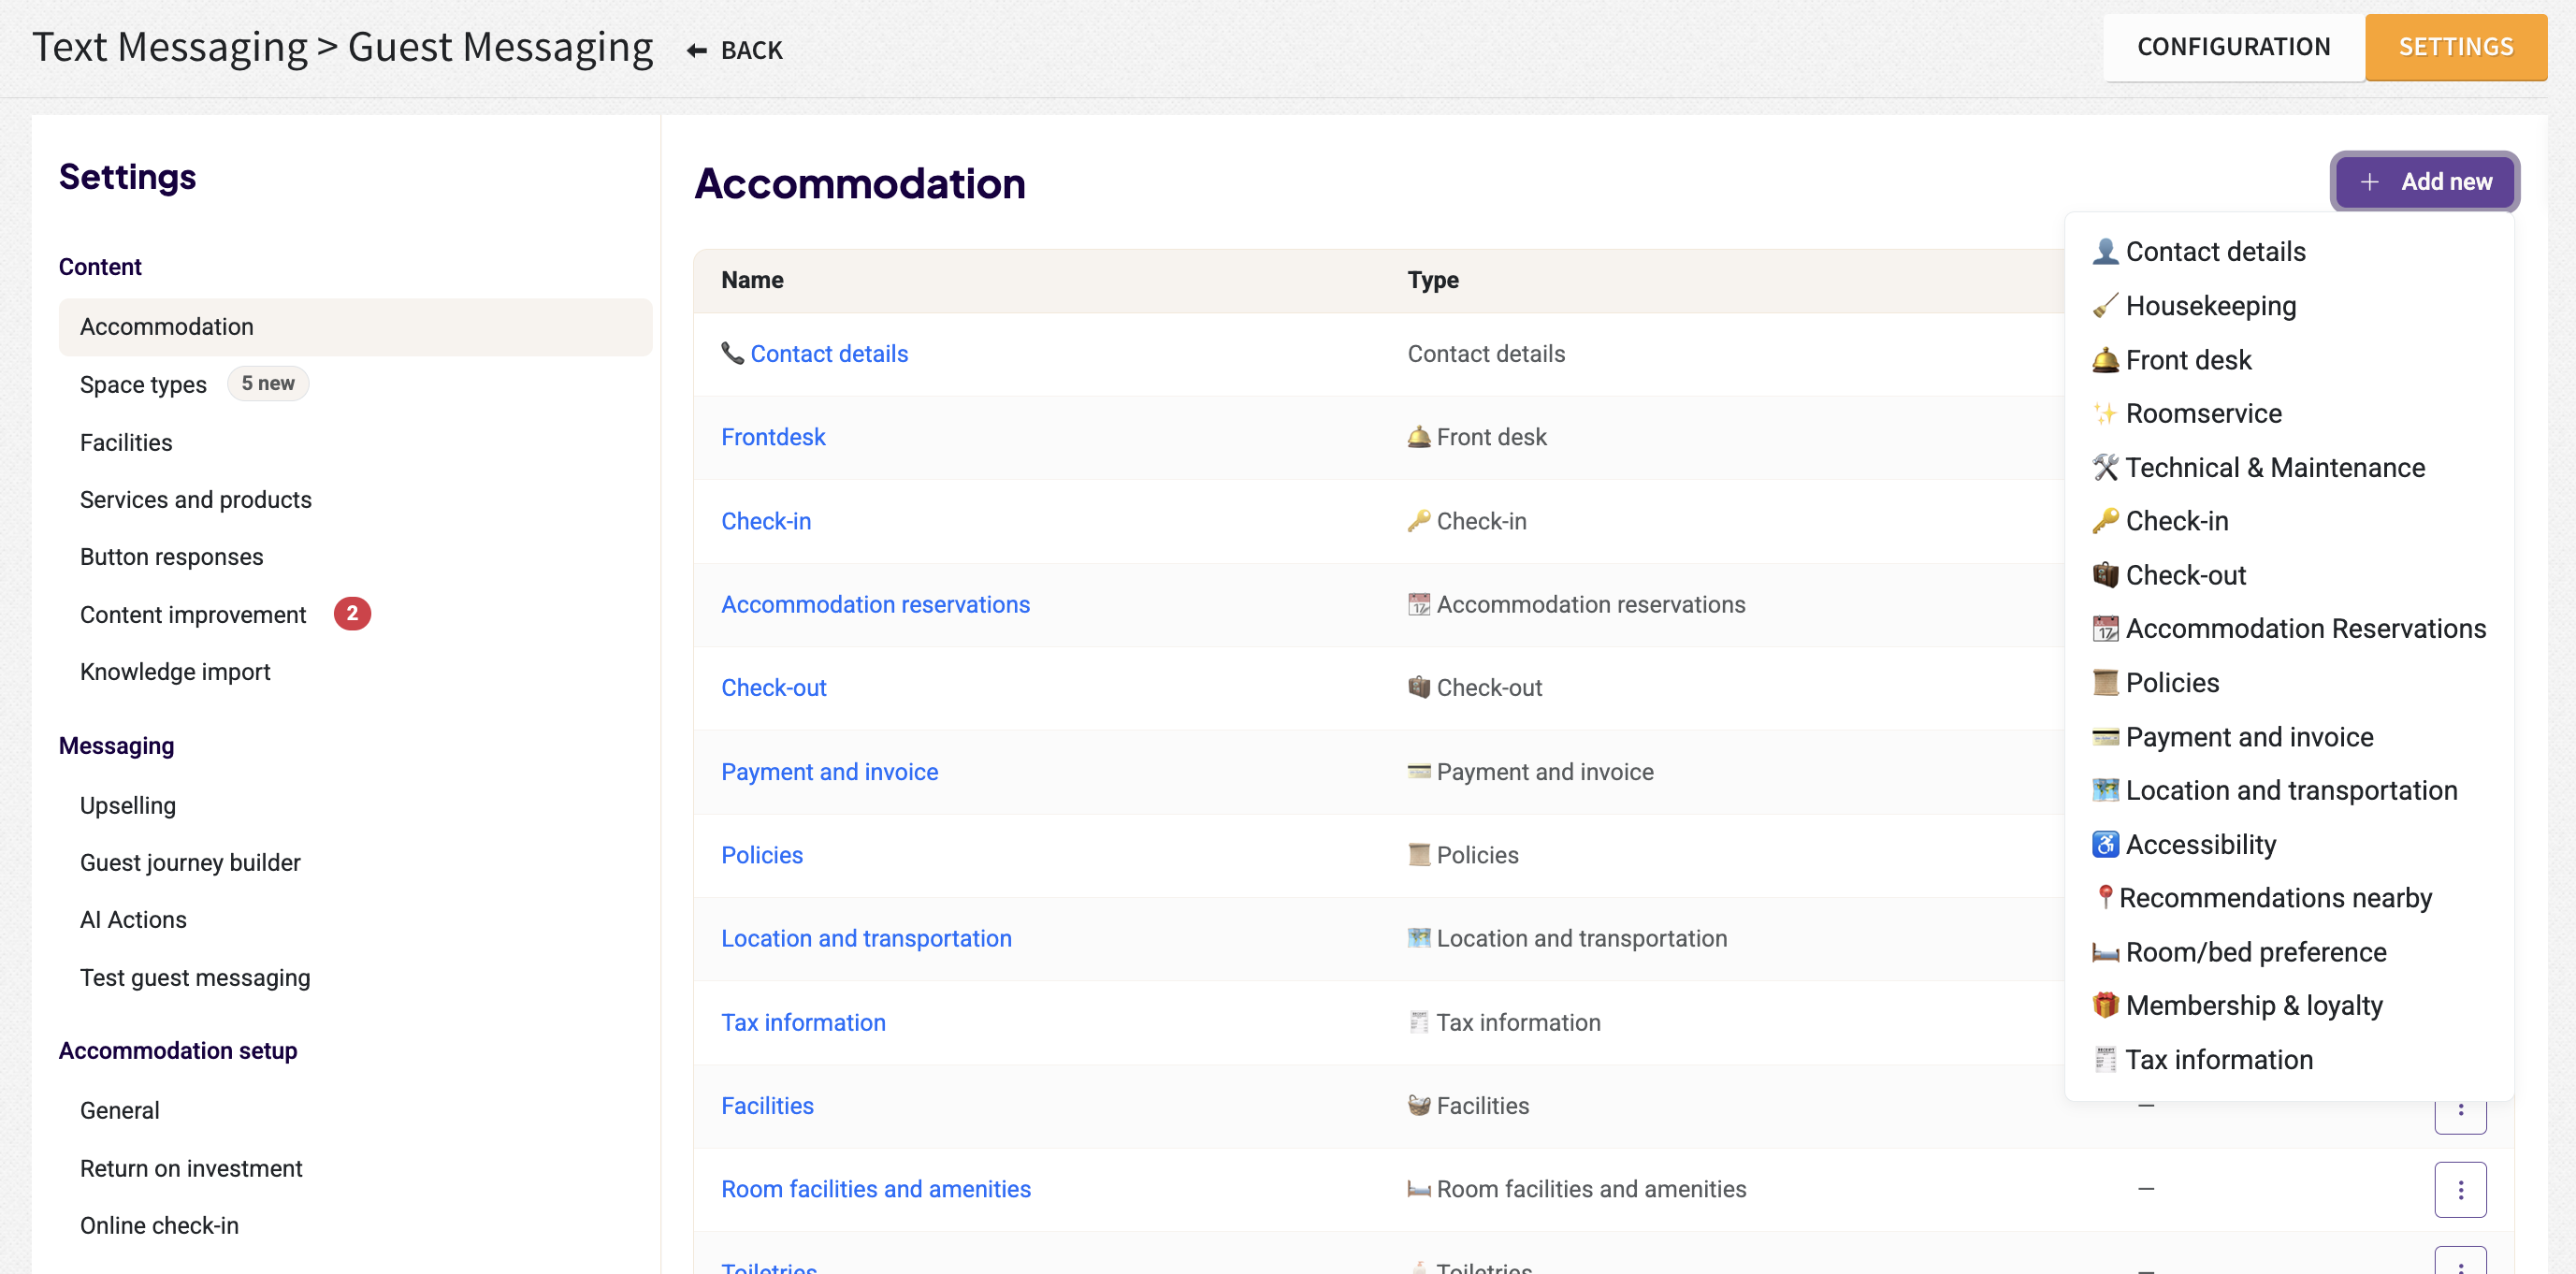
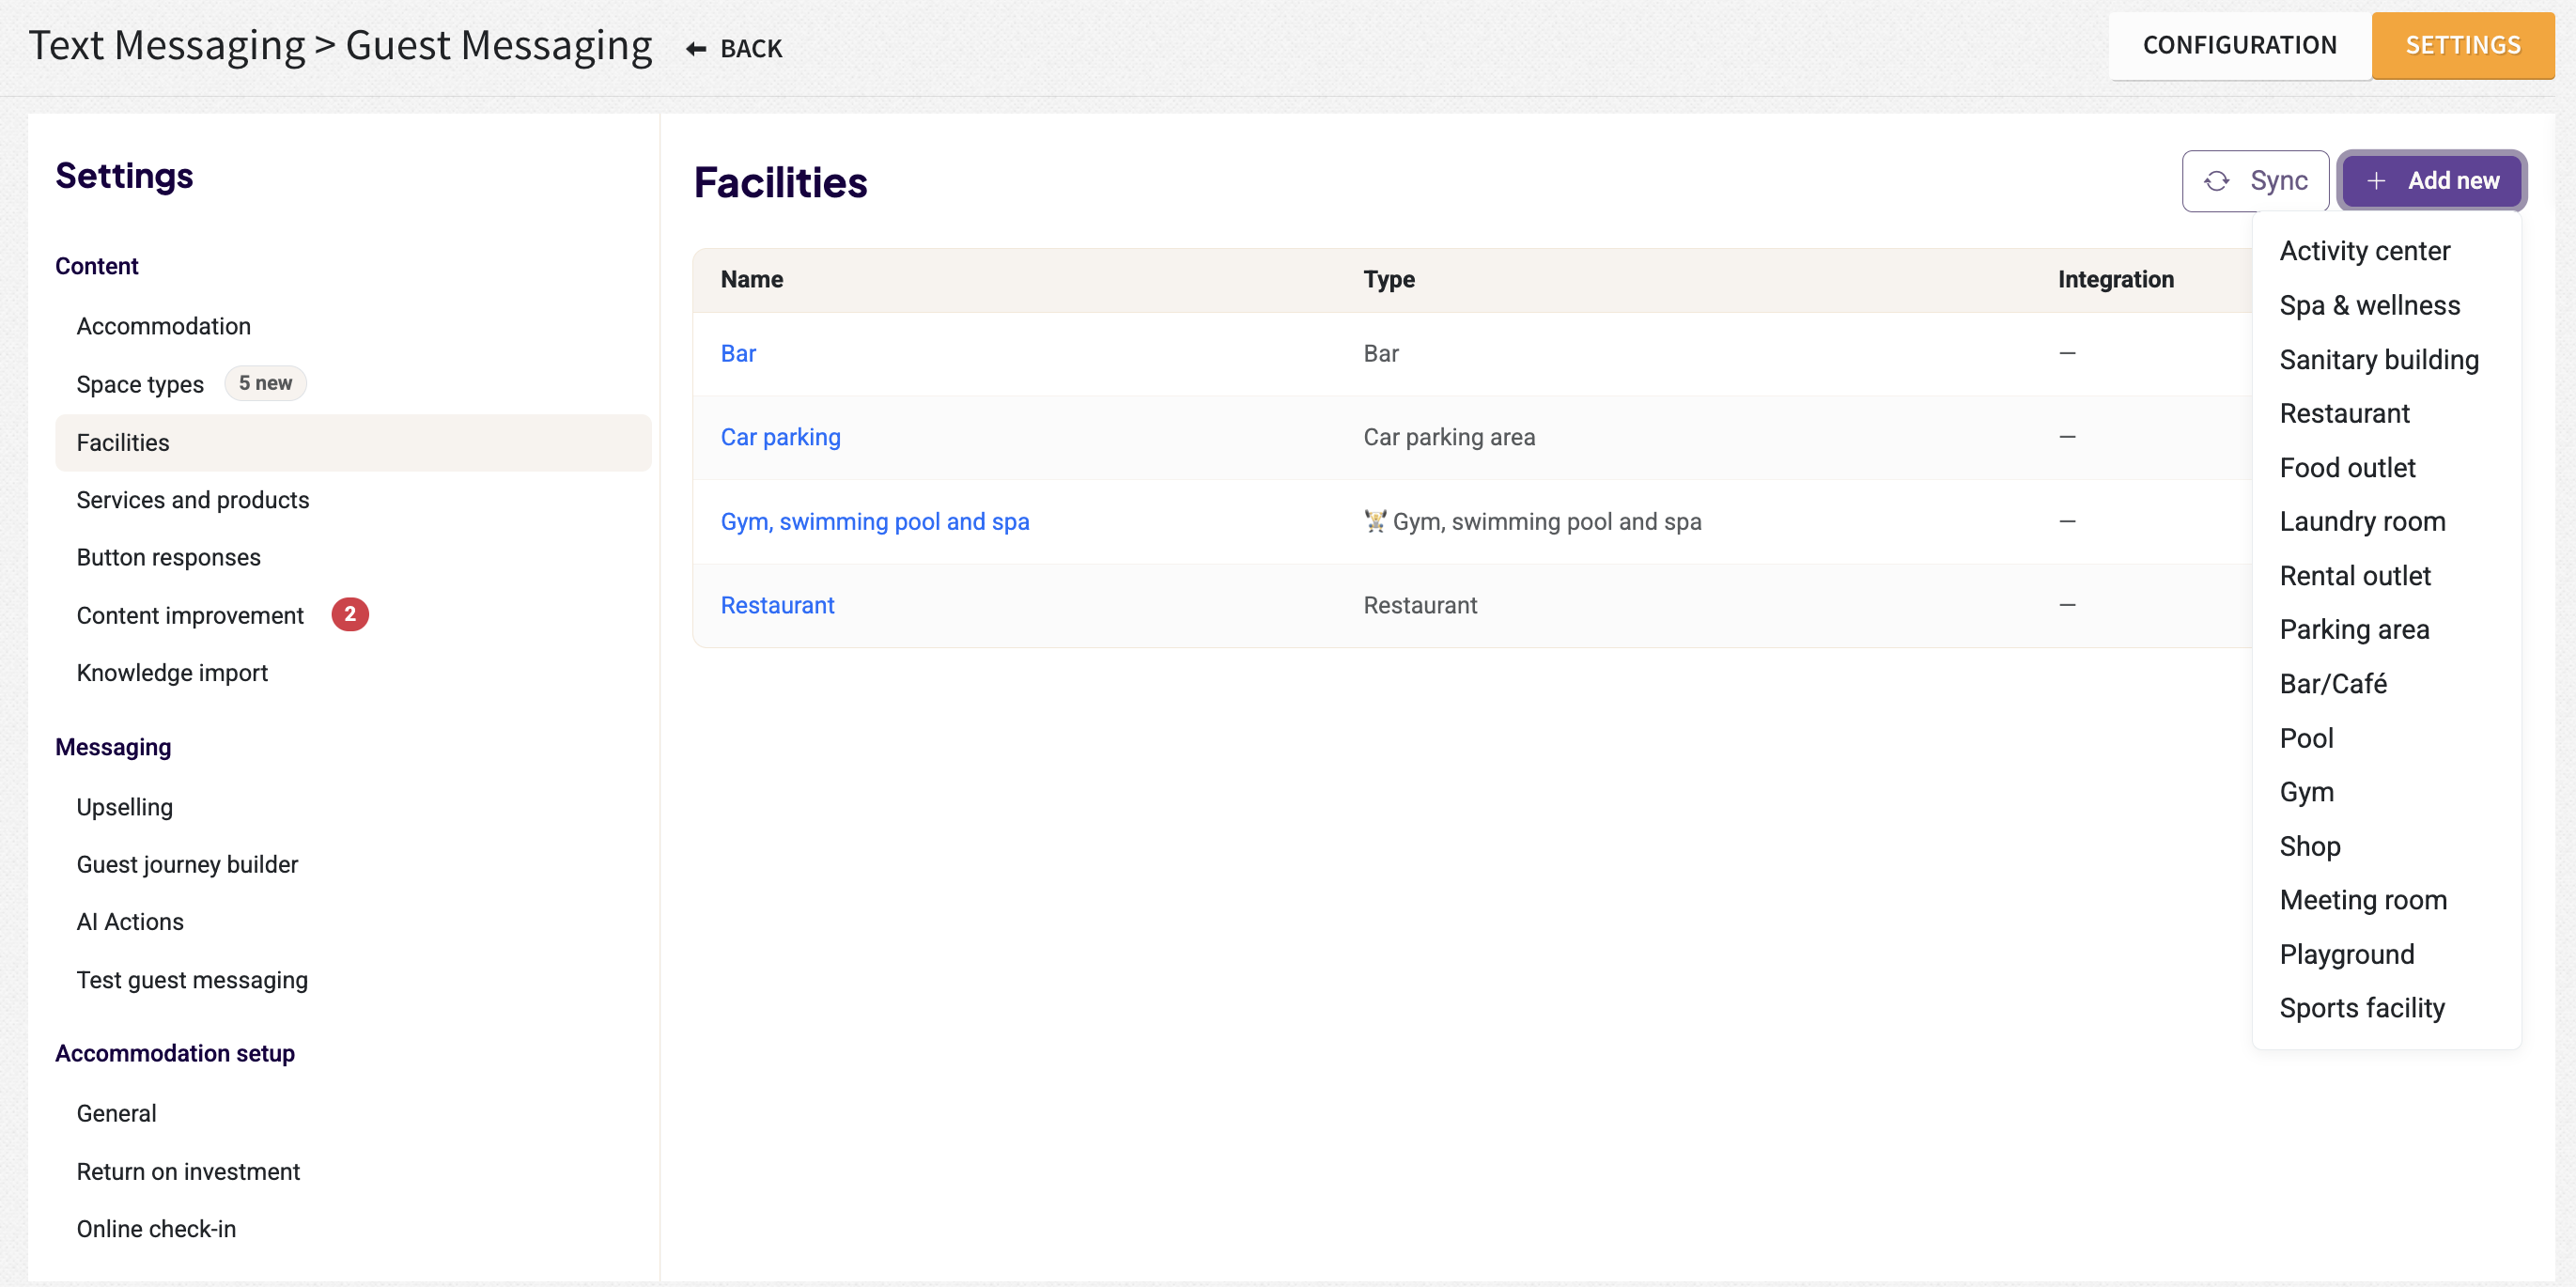
To ensure the AI provides accurate and professional responses, you must complete the sections below. This content serves as the "brain" for the AI.
Best Practices:
- Avoid Personal Pronouns: Do not use "we," "you," "I," or "our."
- Keep It Objective: Write in a dry, factual, and informational style.
- The "Who" Factor: Remember, you are communicating with the AI, not the guest. The AI does not understand who "we" or "us" refers to; it only understands data.
Example: Instead of: "We offer a delicious breakfast in our dining room from 7 AM." > Write: "Breakfast is served in the dining room from 07:00 to 10:00."
Services and Products: This section is synchronized with your PMS add-ons. You can enrich the imported services with additional information and merge duplicate services if needed.
The Services list shows:
- Whether the service is currently Active
- The associated Service Type
- Whether the service is linked to a PMS Add-On
To edit a service, click on the service name or select ⋮ > Edit.
Note: For services imported from your PMS add-ons, the Name, Description, and Charge Code are managed by the PMS and cannot be modified in Guest Messaging.
We recommend completing as much information as possible for each service. The more details you provide, the more effectively the AI can answer guest questions and automate responses.
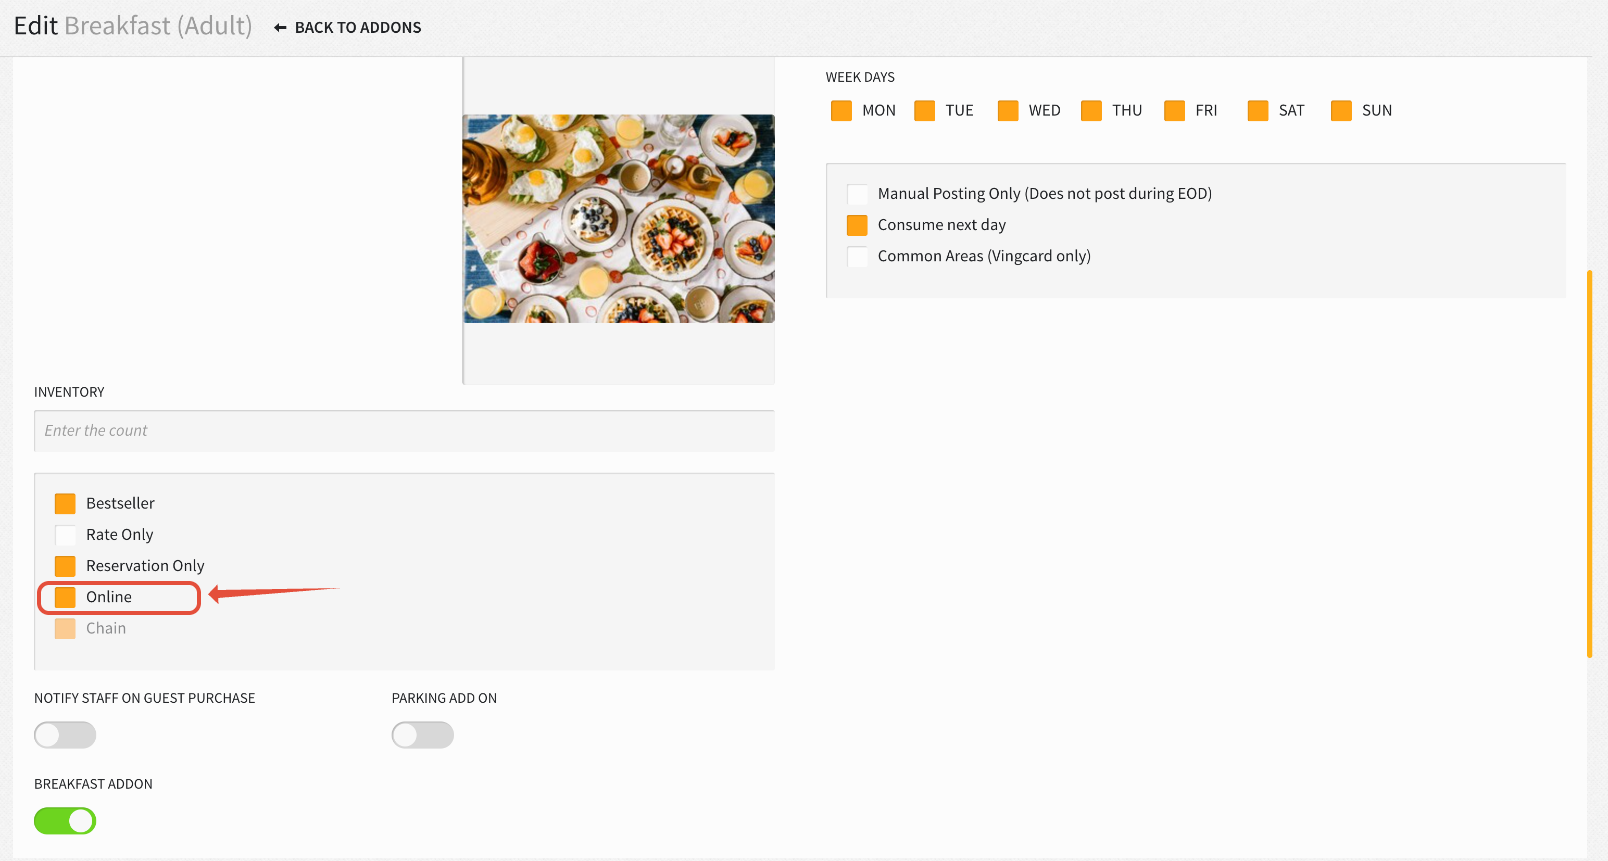
Purchased services can be automatically posted to the reservation as PMS Add-Ons, provided that the corresponding add-on is configured as Online in your PMS via Settings > Rates > Add-Ons. From here, locate the add-ons you want to use for upselling on Guest Messaging, and select the Online checkbox for each relevant add-on.
To allow Guest Messaging to automatically promote and sell a service, configure the following settings:
- Guest can book or purchase: Yes
- Requires staff approval: No
- Bookable until: Set the desired booking deadline
- Price: Add a price for the service (Service prices cannot be automatically synced with the PMS add-on price)
With these settings in place, guests can purchase the service directly through Guest Messaging, and it will be automatically added to their reservation (provided the PMS add-on is enabled for Online booking).
If you prefer not to allow automatic purchases, enable Requires staff approval = Yes.
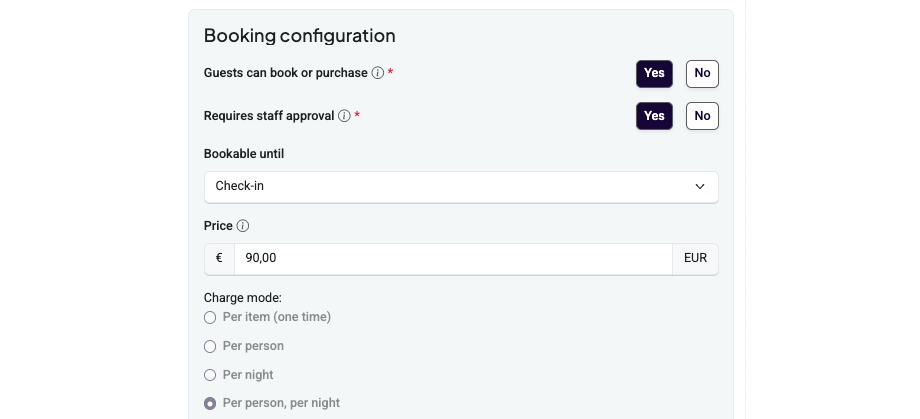
Once this is enabled, when a guest requests the service, a manual request is created for your team in Guest Messaging.
Once approved, the add-on is automatically posted to the reservation if the corresponding PMS add-on is configured as Online.
If the add-on is not configured for Online booking, it will need to be added to the reservation manually.
2. Space Type Configuration
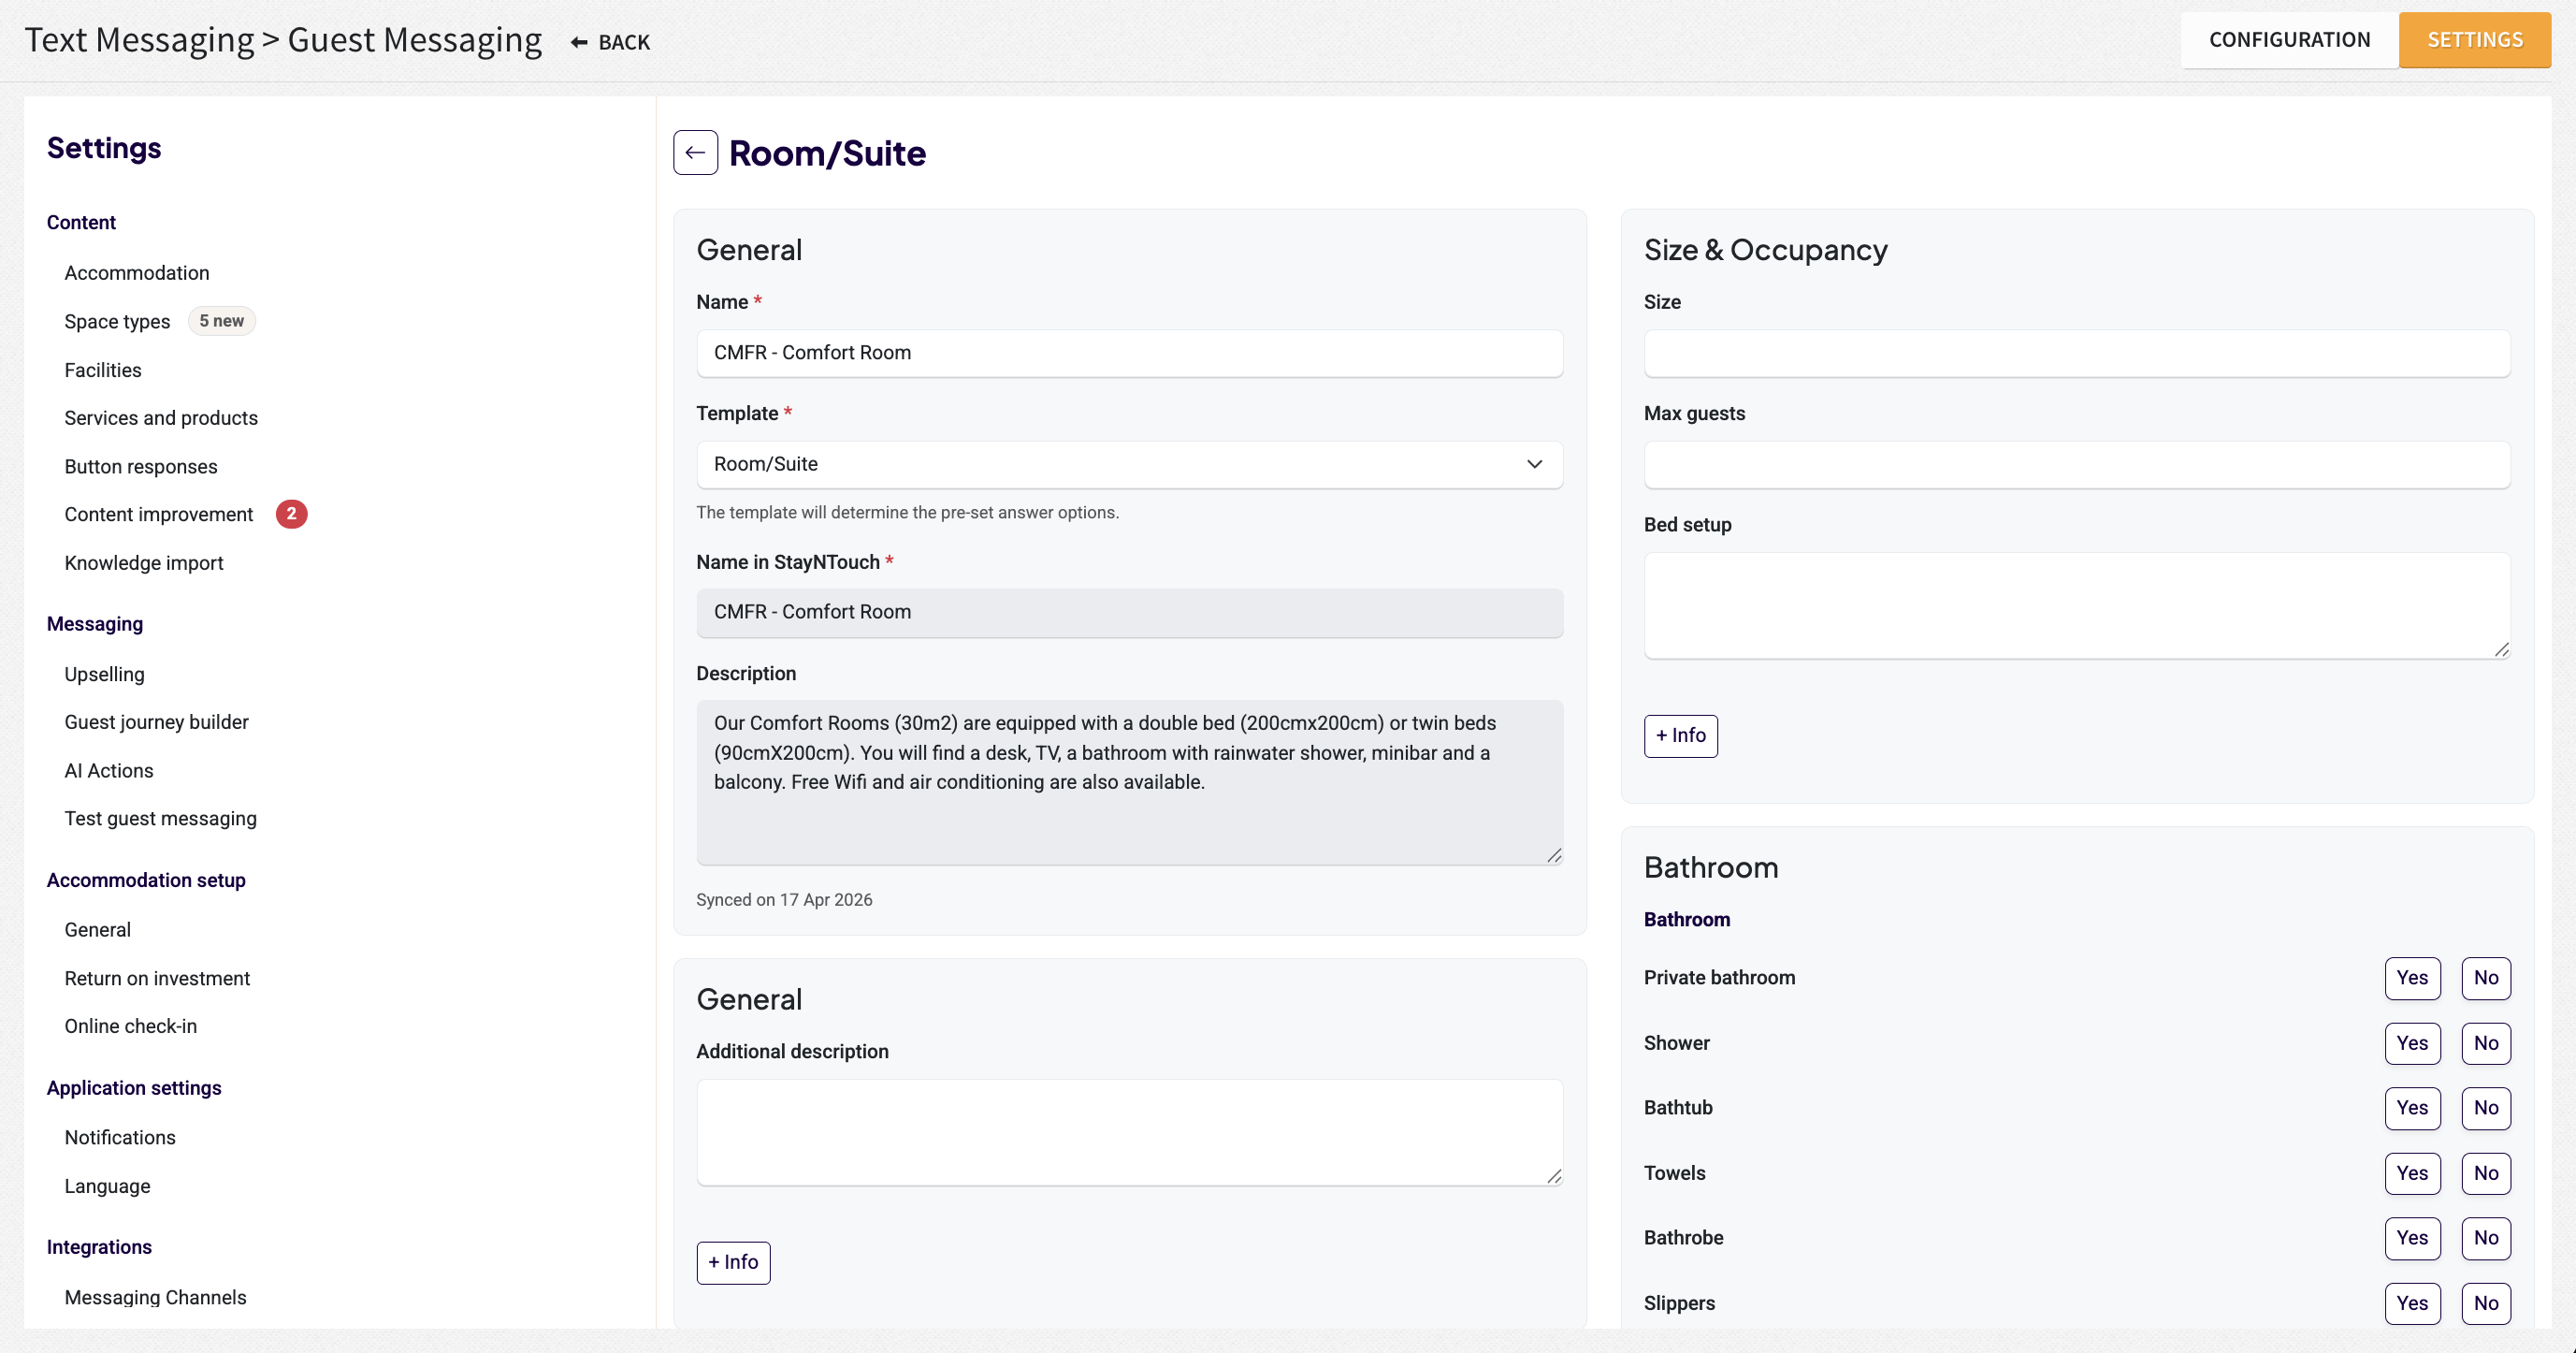
The Space Type section can be automatically synchronized with your Stayntouch settings. Even after synchronization, you retain full control to manually add or edit details to provide the AI with deeper context regarding your room types and amenities.
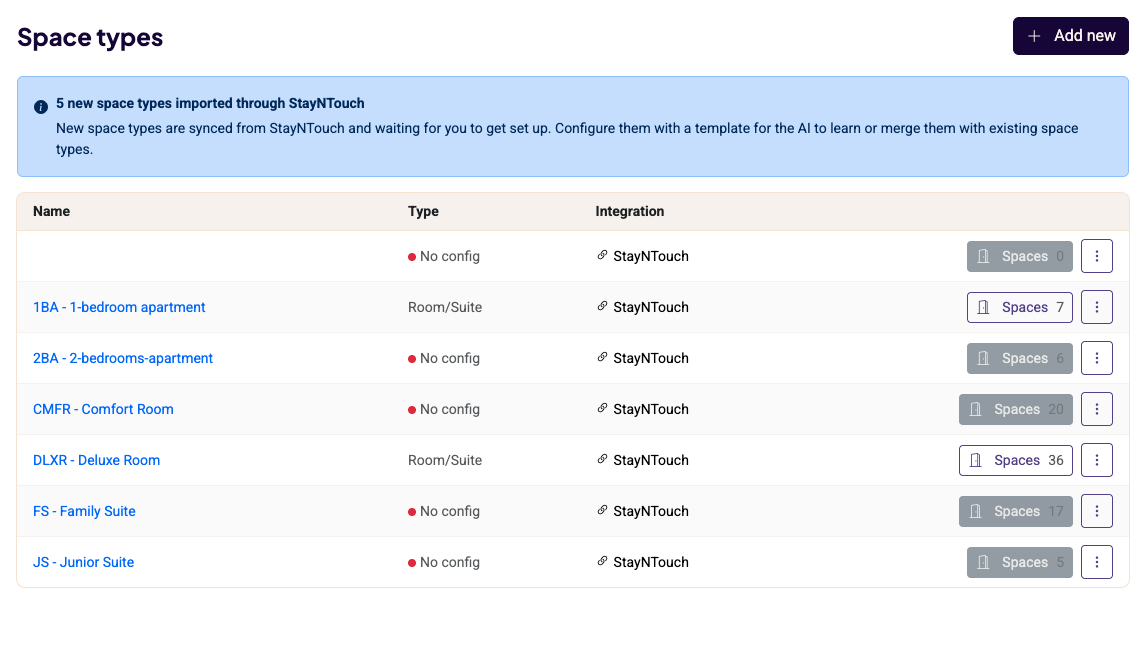
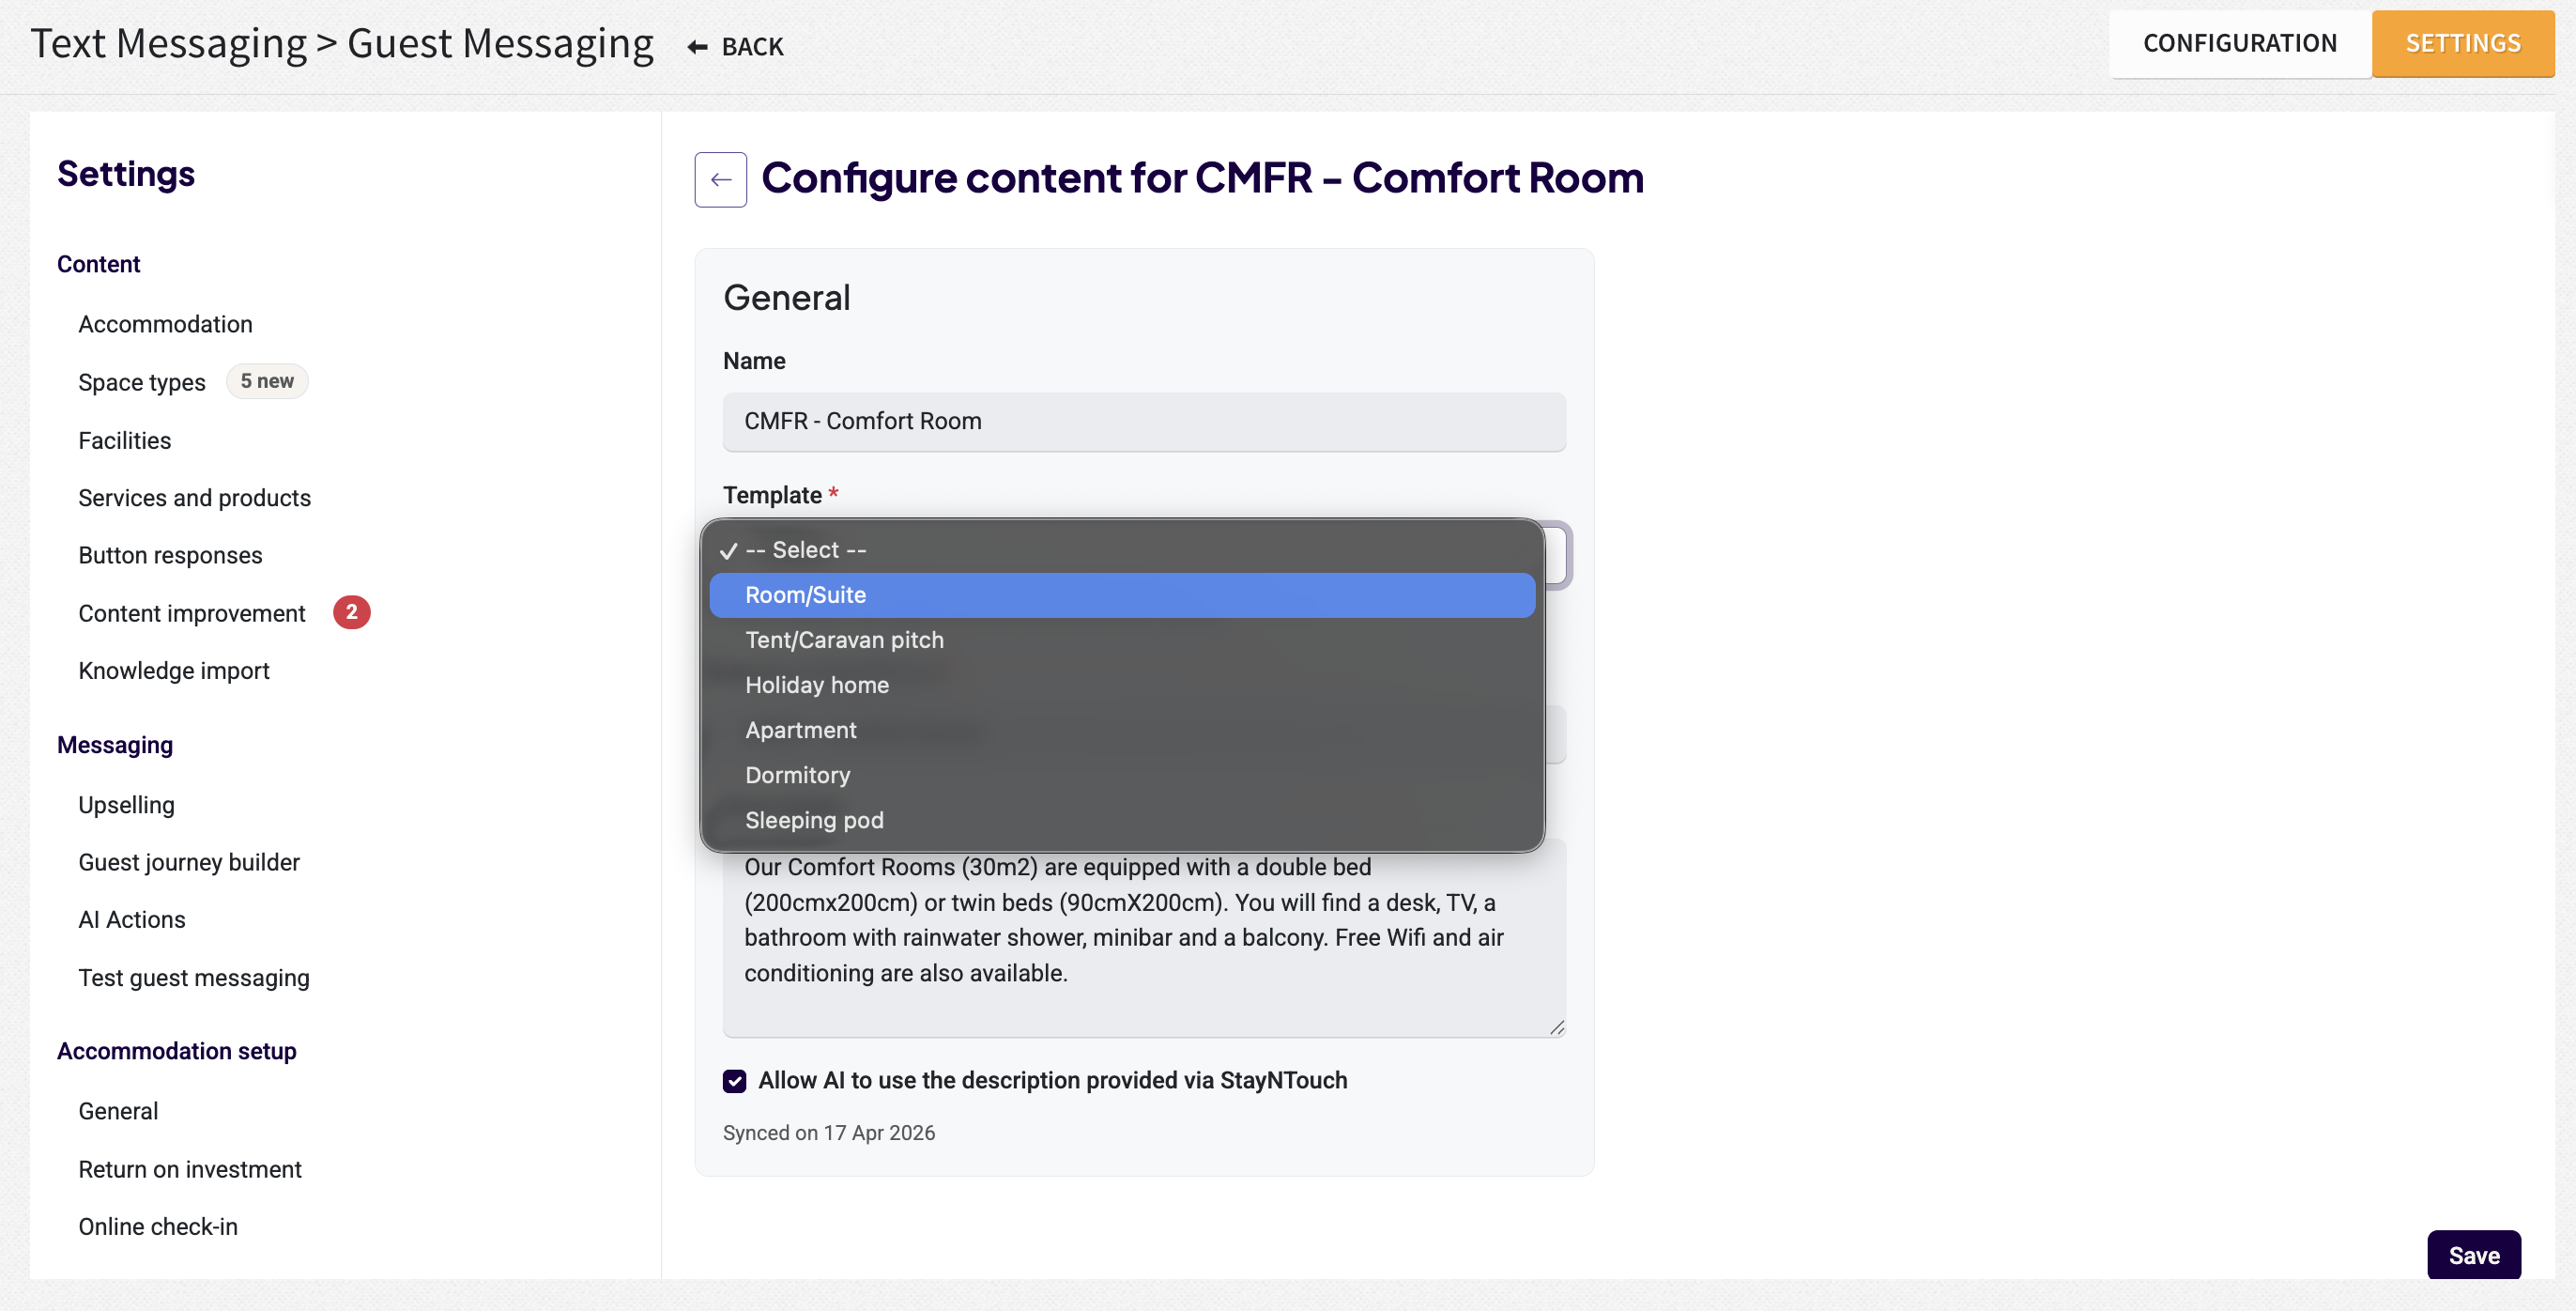
After selecting the Space Type, you can assign a Type Template to your Room Type. Once you save your changes, additional configuration options specific to the selected space type will become available.
Step 3: Set Up Your Guest Journey Templates for Automated Proactive Messages
The Guest Journey Builder provides a clear timeline of the automated, proactive messages Guest Messaging sends to your guests.
Proactive messages are sent automatically via SMS/WhatsApp/connected channels based on specific triggers that you can toggle on or off:
- Reservation: Sent immediately after a booking is completed to initiate the first contact.
- Night Before Check-In: Dispatched the day before arrival based on the property's local time zone. Please note, if mobile check-in is enabled, this message will include a pre-registration link.
- Day of Arrival: Can be scheduled on day of arrival
- After Check-In: Sent automatically right after the guest checks in.
- After the First Night: Triggered the morning after the first night, applicable only for stays of two nights or more.
- Before Check-Out: Delivered the day before the guest is scheduled to depart.
- After Check-Out: Sent 4 hours post-check-out. If a guest checks out late, the system automatically postpones the message until 10:00am the following day.
If you have completed your WhatsApp onboarding, you can customize the content of these message templates. Please do not begin customizing the templates until your WhatsApp onboarding has been completed. Any custom templates you create must be approved by Meta before they can be used. The approval process typically takes 24–48 hours.
For properties that are not using WhatsApp, the Onboarding team will enable this customization separately.
Best Practices:
- When updating your messages, draft them in English; our system automatically handles translations for all other supported languages.
- Messages (including translations) have a strict 1024-character limit.
- Messages cannot end with a dynamic field.
- Keep your English drafts concise to ensure translations do not accidentally exceed the character limit.
Templates vs. Journeys
The Guest Journey Builder is divided into two main tabs: Templates and Journeys.
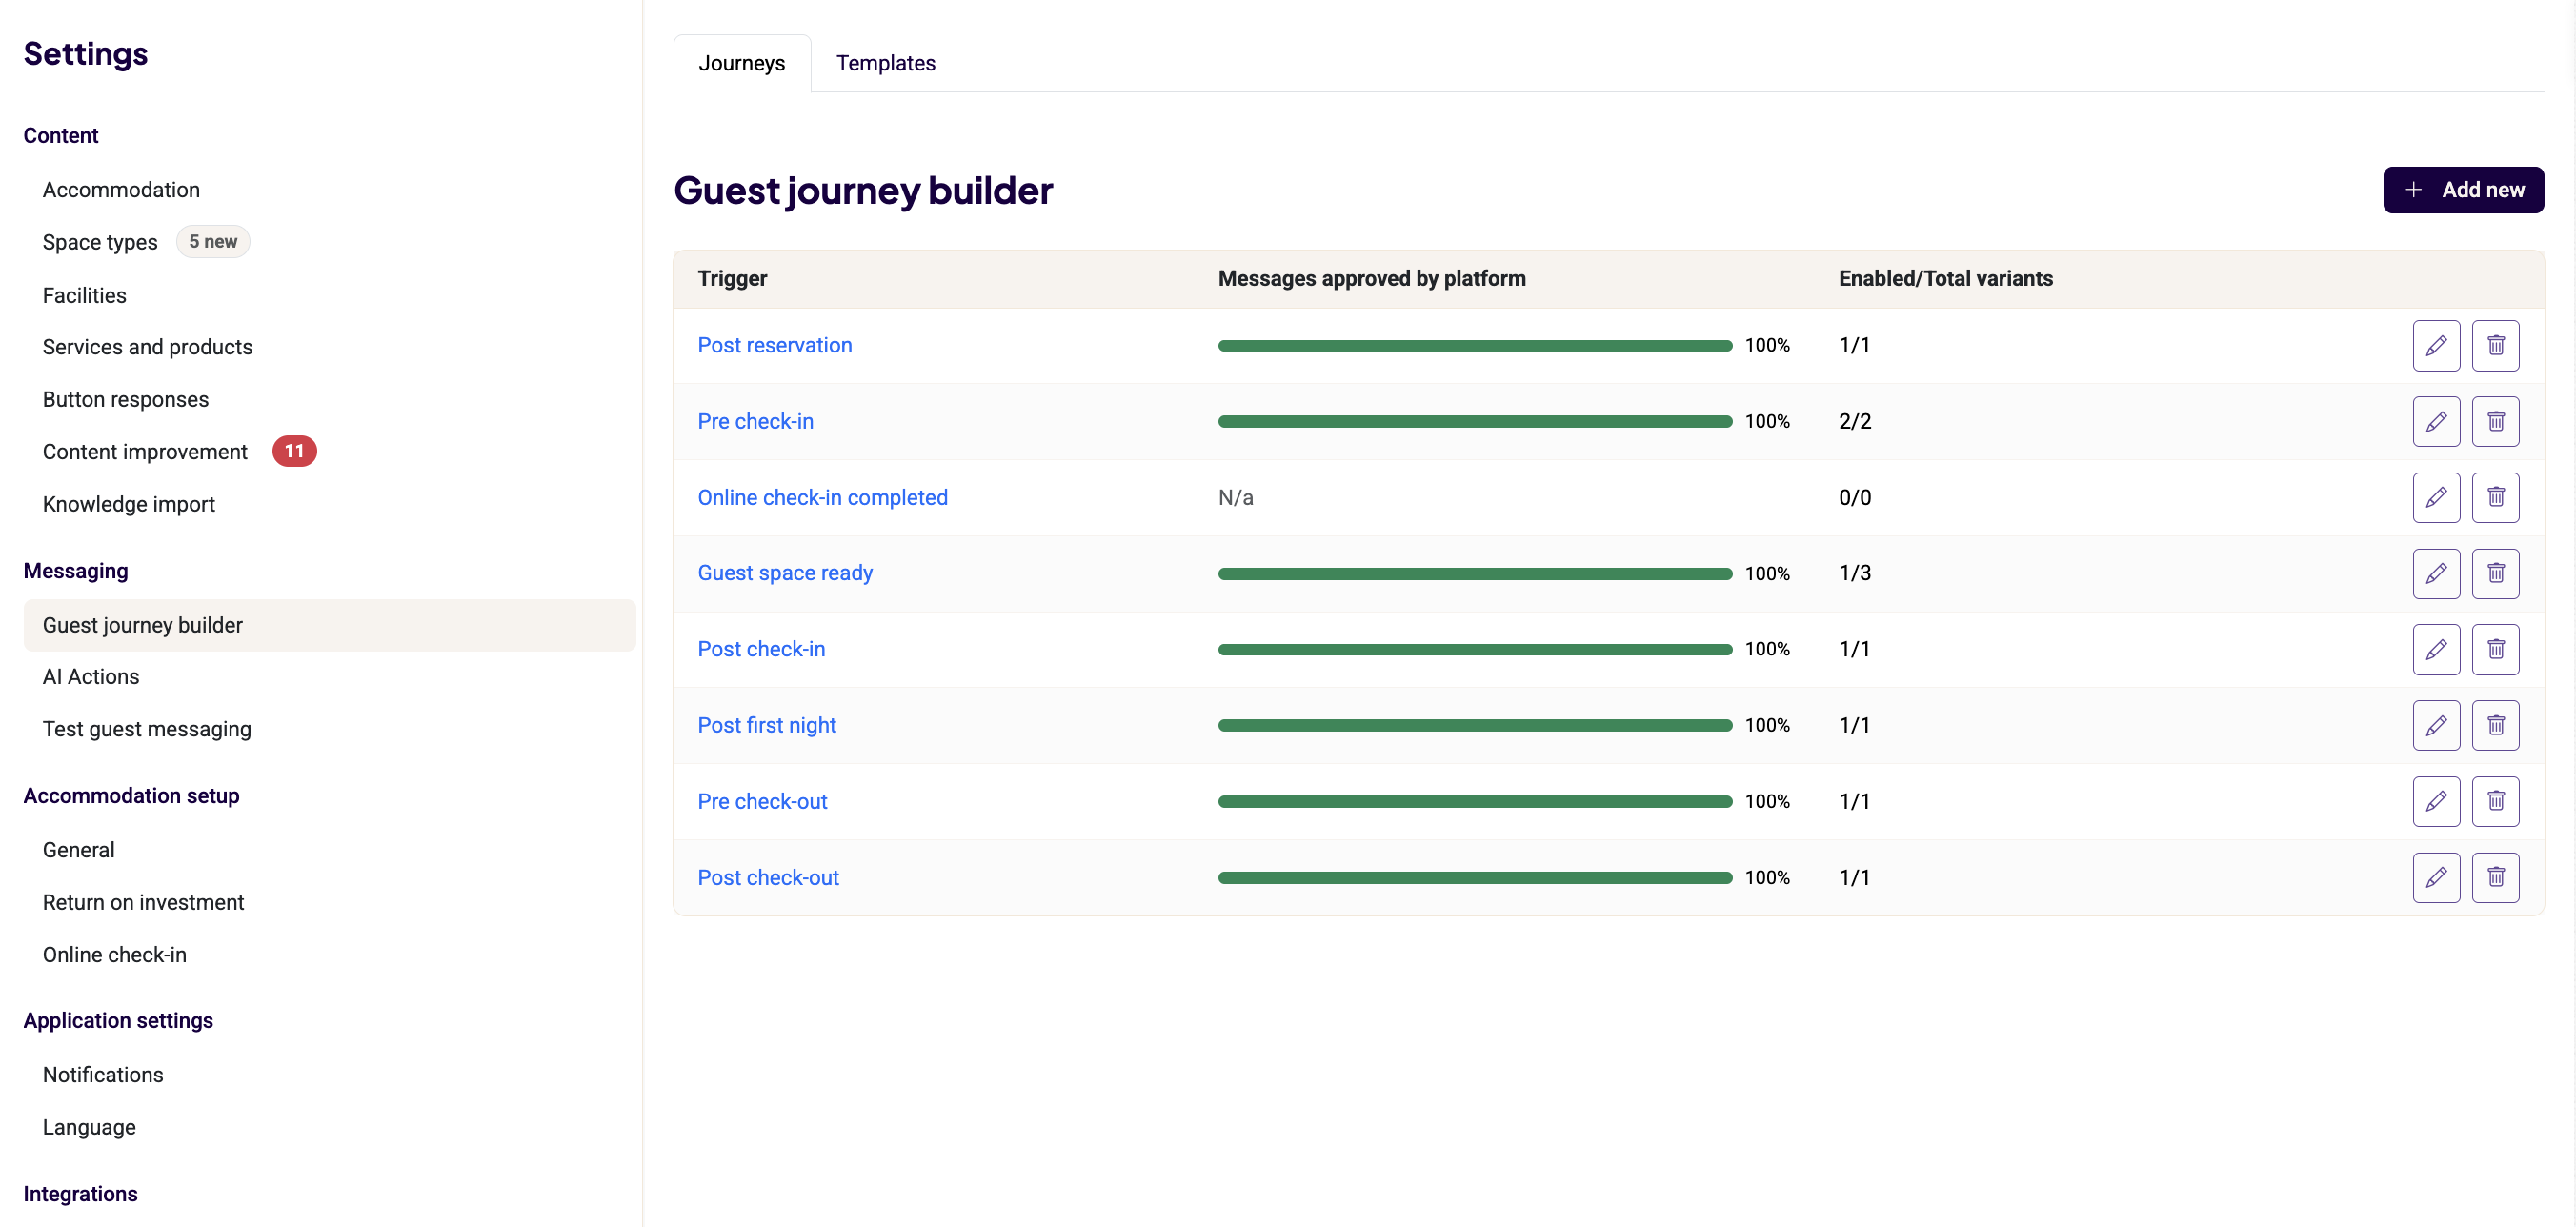
The Templates tab allows you to design and manage different versions of messages for each trigger. This flexibility lets you swap content seamlessly based on specific scenarios:
- Seasonal/Event Adjustments: If a major event is happening near your property, you can temporarily replace your "Default" template with an event-specific one, then switch it back afterward.
- Variants: Hotels can tailor messages to specific guest segments. For example, you can offer room upgrades to guests with eligible room bookings, by creating message variants based on Space Type, or target guests according to their reservation source (travel agent) or length of stay.
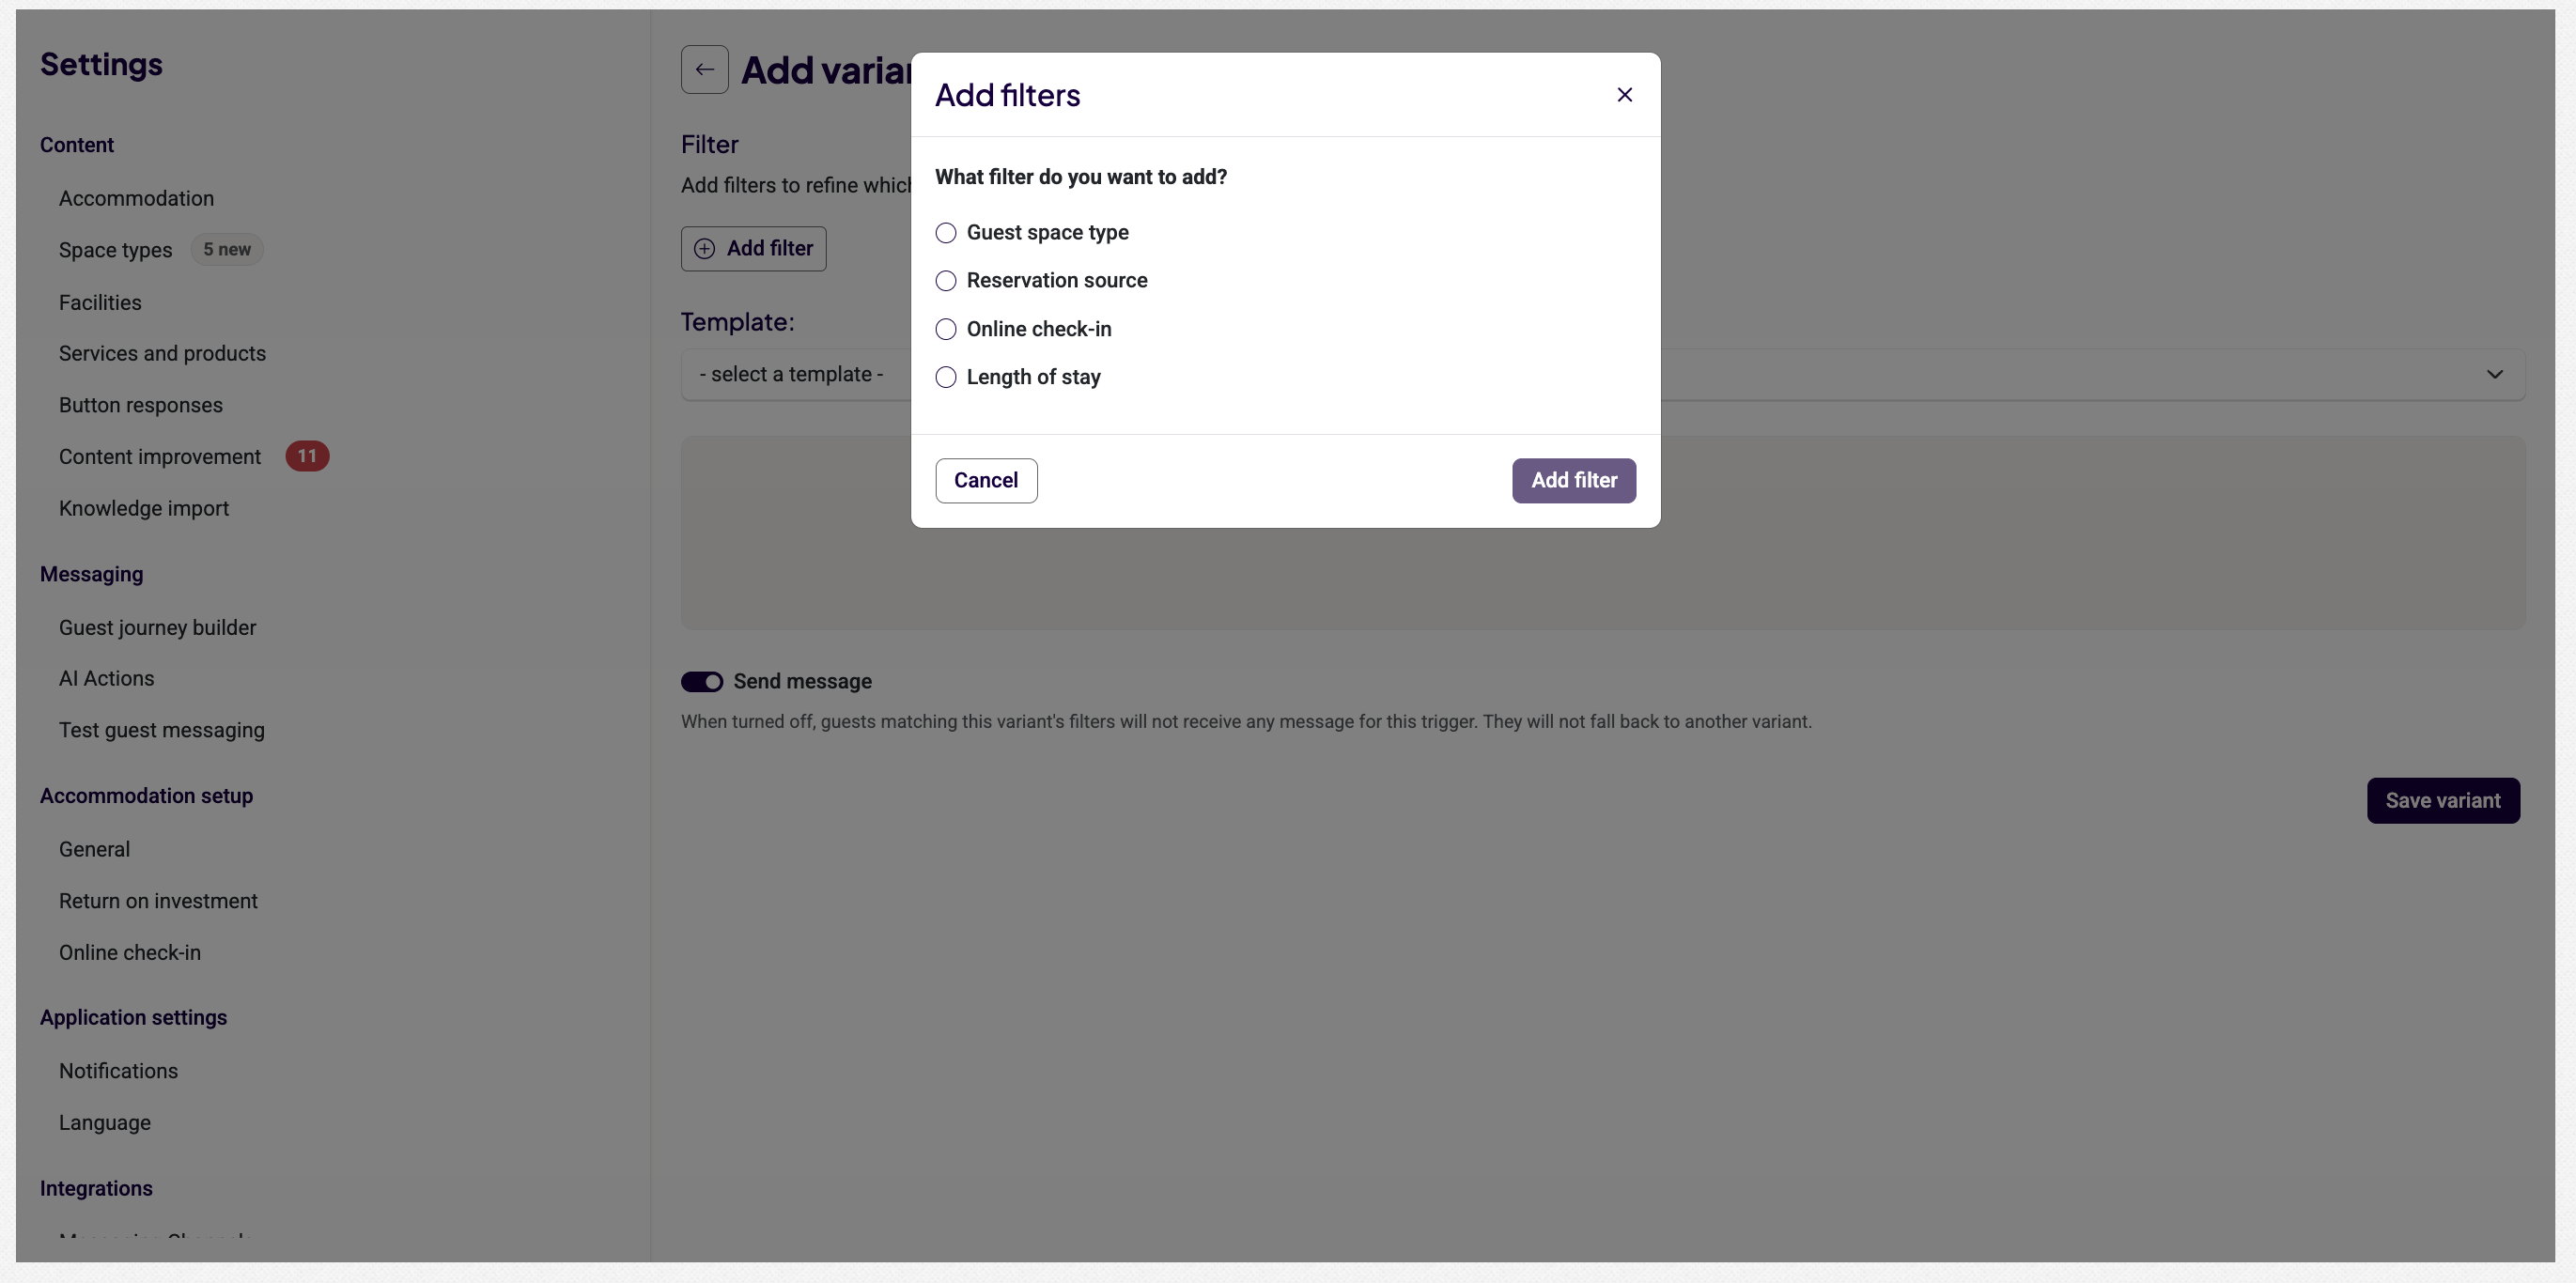
- Accommodation Typing: Hotels can target standard room bookings with a pre-check-in message offering paid room upgrades or target specific audiences by creating Variants based on Space Type.
- To set up a variant, first create your individual templates, then follow these steps:
- Select the base message you want to vary (e.g., the post-check-out message).
- Click Add variant with filters.
- Click Add filter and choose your criteria (Space Type, Reservation Source, Length of Stay).
- For example, if you're filtering by Space Type, select all applicable space types for this specific message.
- If filtering by Space Type, select all the applicable spaces for this specific message.
- Assign the corresponding template to this variant.
- Click Save and request approval.
When a trigger fires, Guest Messaging evaluates your variants from top to bottom:
- It checks if the guest matches the criteria for Variant 1. If yes, it sends that message.
- If not, it moves down to check Variant 2, and so forth.
- Any guest who does not match any specific filter criteria will automatically receive the Base Template located at the bottom of the screen.
AI Actions
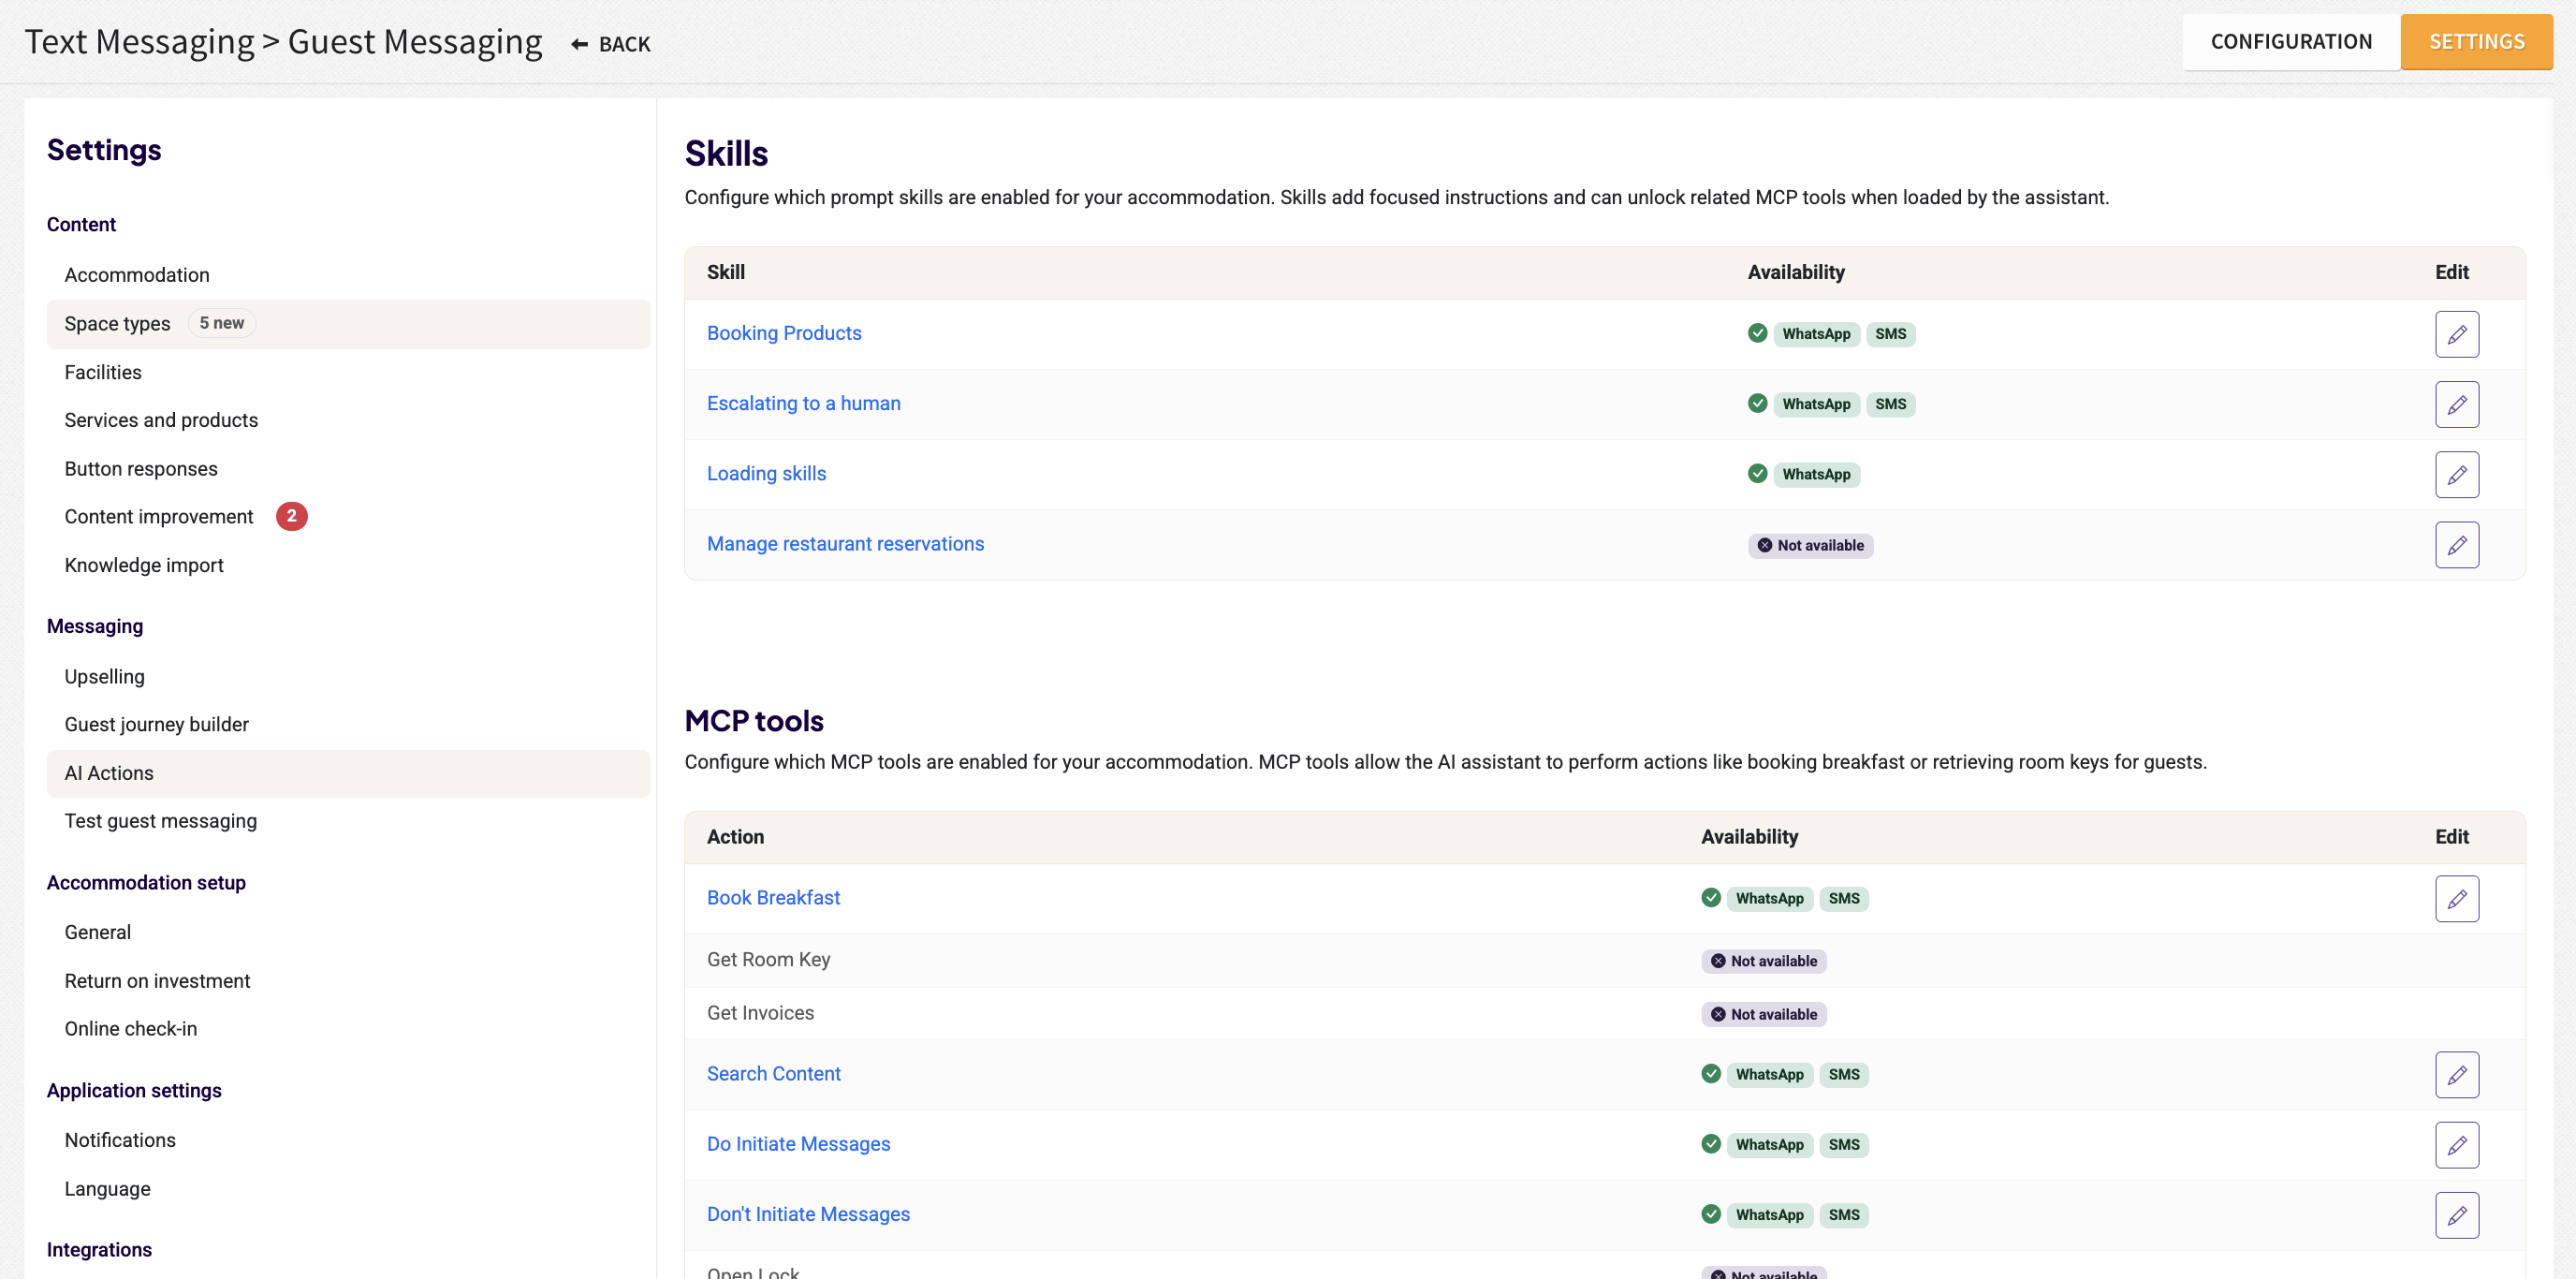
Under the AI Actions section, you can activate or deactivate the AI actions you would like to authorize for each connected channel.
3. Button Responses (Relevant for properties using WhatsApp)
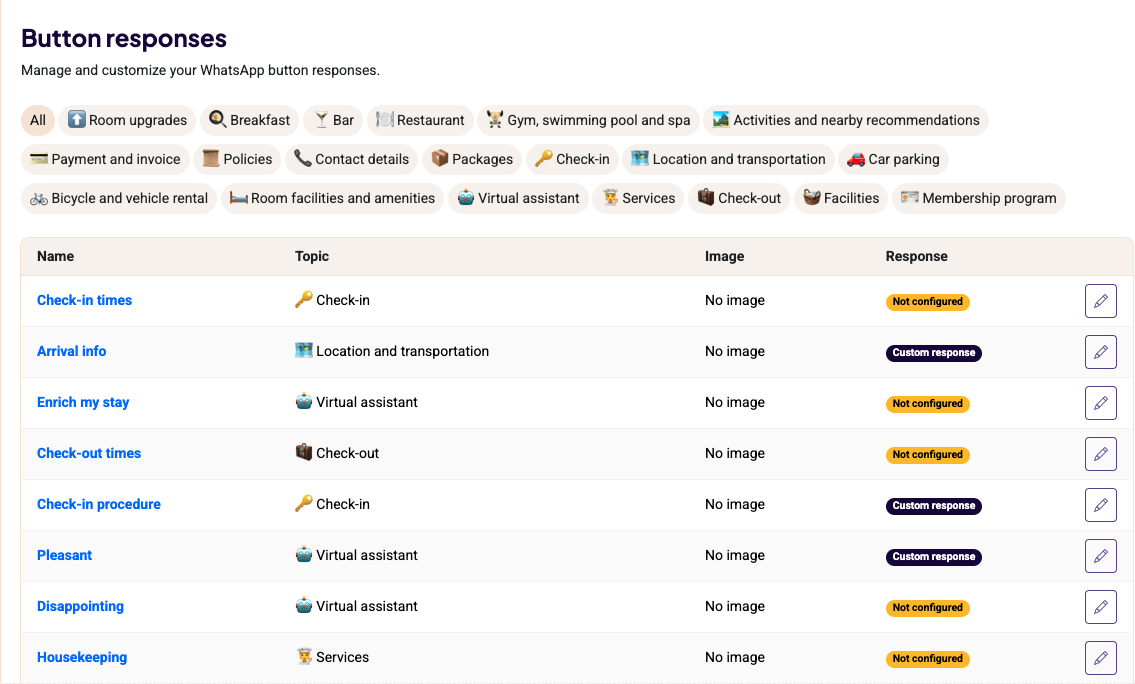
These are static buttons that give you full control over your guest interactions—the AI will not overwrite the content you set here.
For every button, you have the flexibility to:
- Choose the Response Type: Decide whether the reply should be AI-generated or a fully customized message.
- Add Visuals: Attach images to make your responses more engaging.
- Guide the Conversation: Select up to three follow-up buttons to appear after the initial reply.
You will notice that some buttons are pre-filled based on your property settings. However, we highly recommend clicking Set a custom response to personalize them.
Best Practice: When writing custom responses, use a personal tone with "we" and "you." Since these messages appear exactly as written, a warm, direct tone helps build a better connection with your guests.
Step 4: Complete the Accommodation Setup
The next part to complete is the Accommodation Setup, which is divided into four sections:
1. General:
The General section should already be prefilled with your logo and favicon. We recommend reviewing your property information, time zone, and date format to ensure all details are correct.
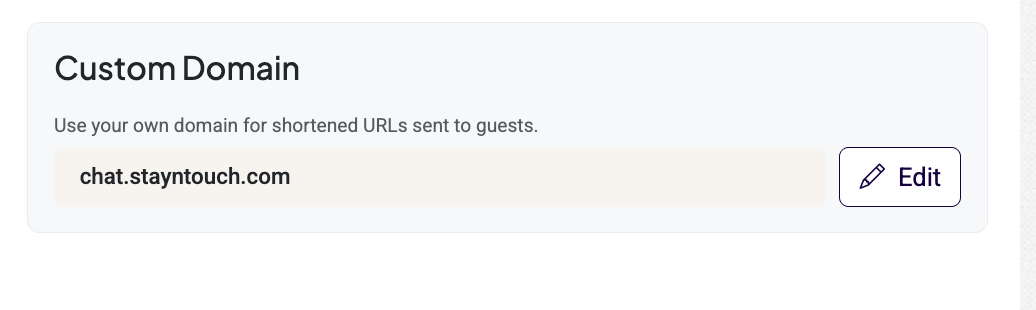
For stronger brand consistency, you can add a custom domain for your short links.
To add your custom domain, click the purple pencil icon, remove the default Stayntouch domain, and enter your property's domain. Once the custom domain has been added, your website provider will need to update the DNS records by adding the required CNAME record for the domain to be approved.
2. Return on Investment (ROI):
We provide ROI projections to help you quantify the value the Guest Messaging delivers.
On this page, you can set the estimated average value for each type of request you receive. The results of the Return on Investment (ROI) calculation are available in the Guest Messaging Report within the Stayntouch reports (Reports > New Report).
Enter the values for the listed products based on their booking value. These values may vary, as some products are booked for the entire stay, while others apply to a single use or a specific day or night.
Example of an estimated ROI calculation: Suppose the price of breakfast is $17.50. Your average length of stay is 2 nights, and the average occupancy is 1.5 guests. To estimate the average value, you would enter:
$ 17.50 × 2 × 1.5 = $ 52.50
In the dashboard, you will then see the total calculated value of all breakfast requests received during the selected period.
This information will not be used as input for the AI.
3. Online Check-In:
Currently the static Guest Mobility direct link is supported. The PMS check-in section will be added in the future.
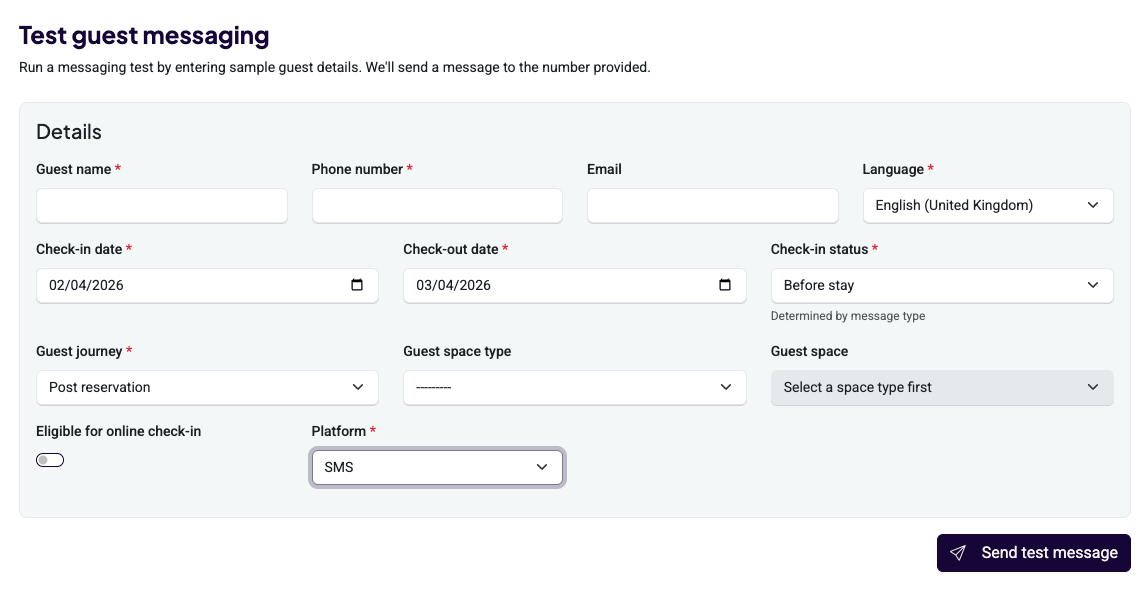
4. Test Guest Messaging:
This section allows users to send themselves a test message to WhatsApp/SMS to test the guest experience before going live. This will be active once your 10DLC number is approved for SMS and once the WhatsApp account is onboarded for WhatsApp messaging test.
Step 5: Configure Application Settings
The last area to complete is the Application Settings, which is divided into two sections.
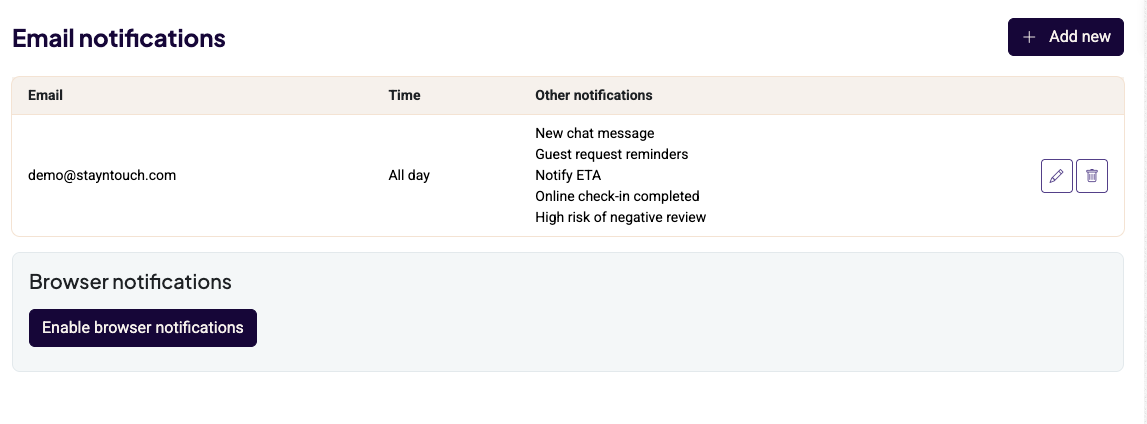
1. Notifications:
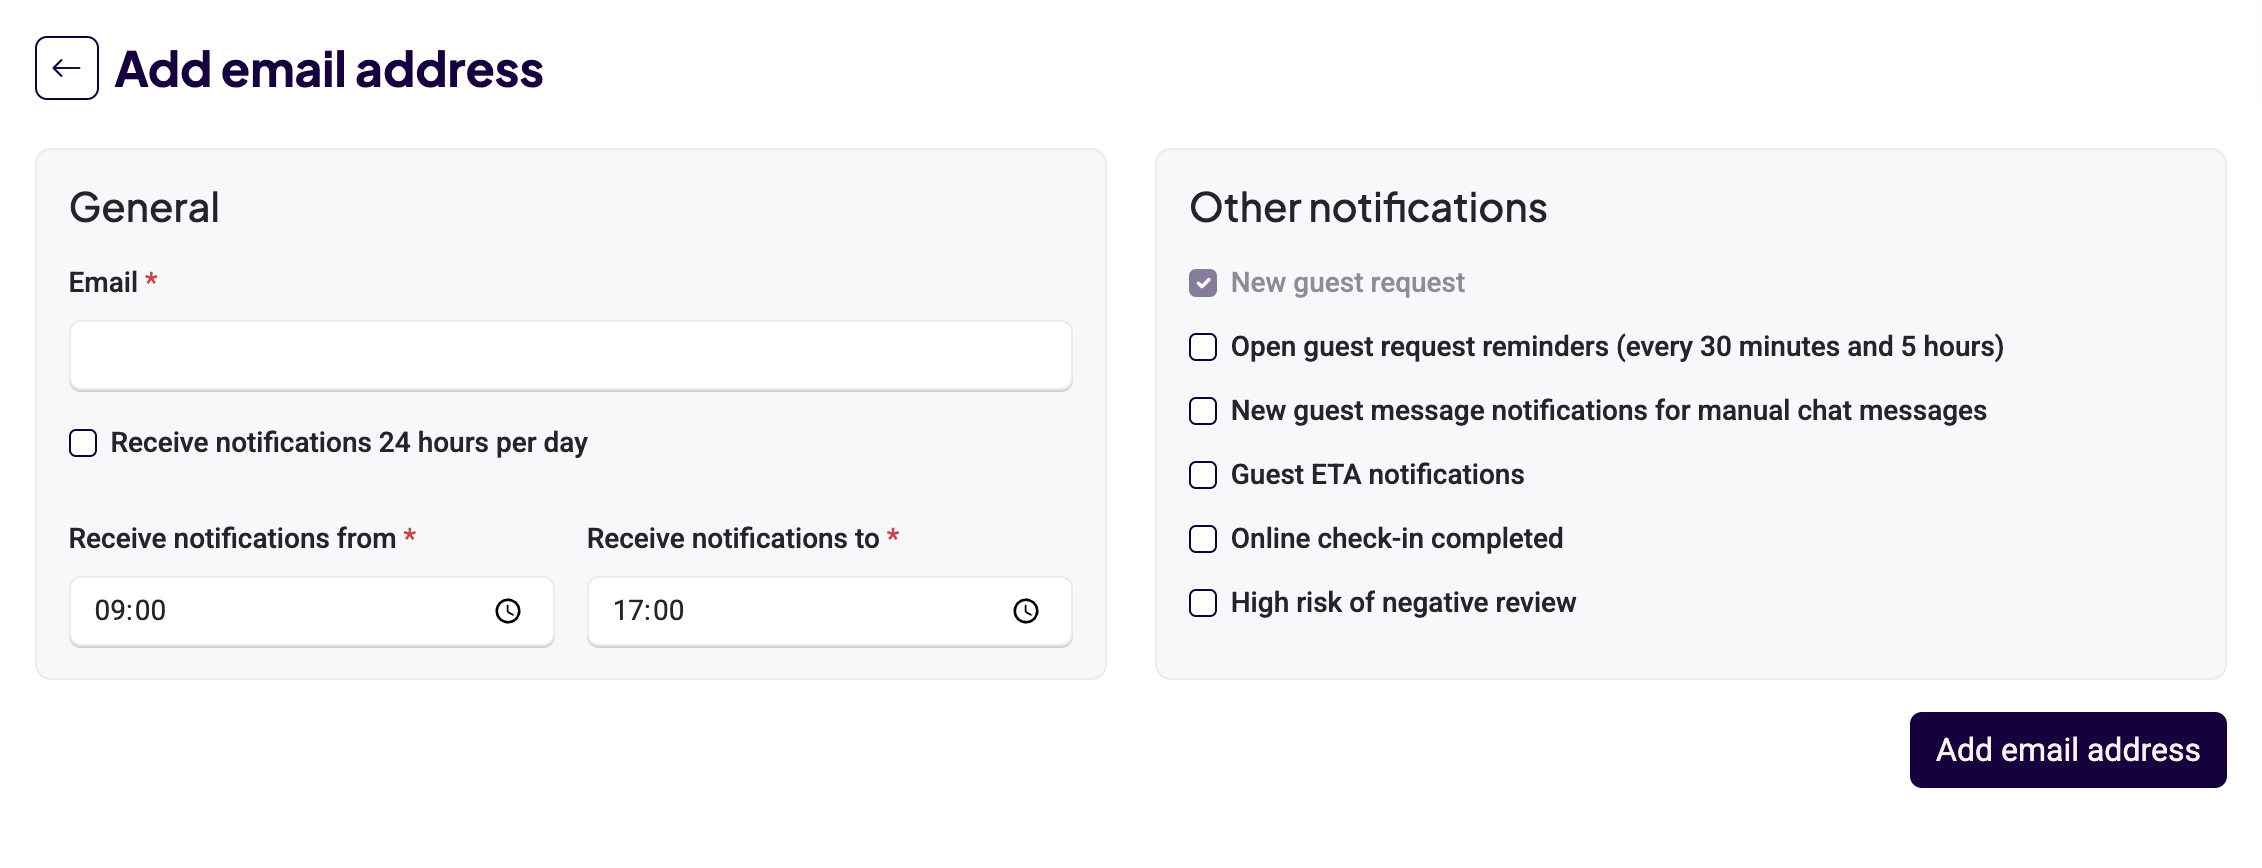
You can toggle to activate or deactivate specific notifications here. You can also allow browser notifications. Fill in the email address to which guest request notifications can be sent. You can turn on/off notifications for specific topics. We recommend keeping everything switched on. Please note, each guest request will also be highlighted in the inbox.
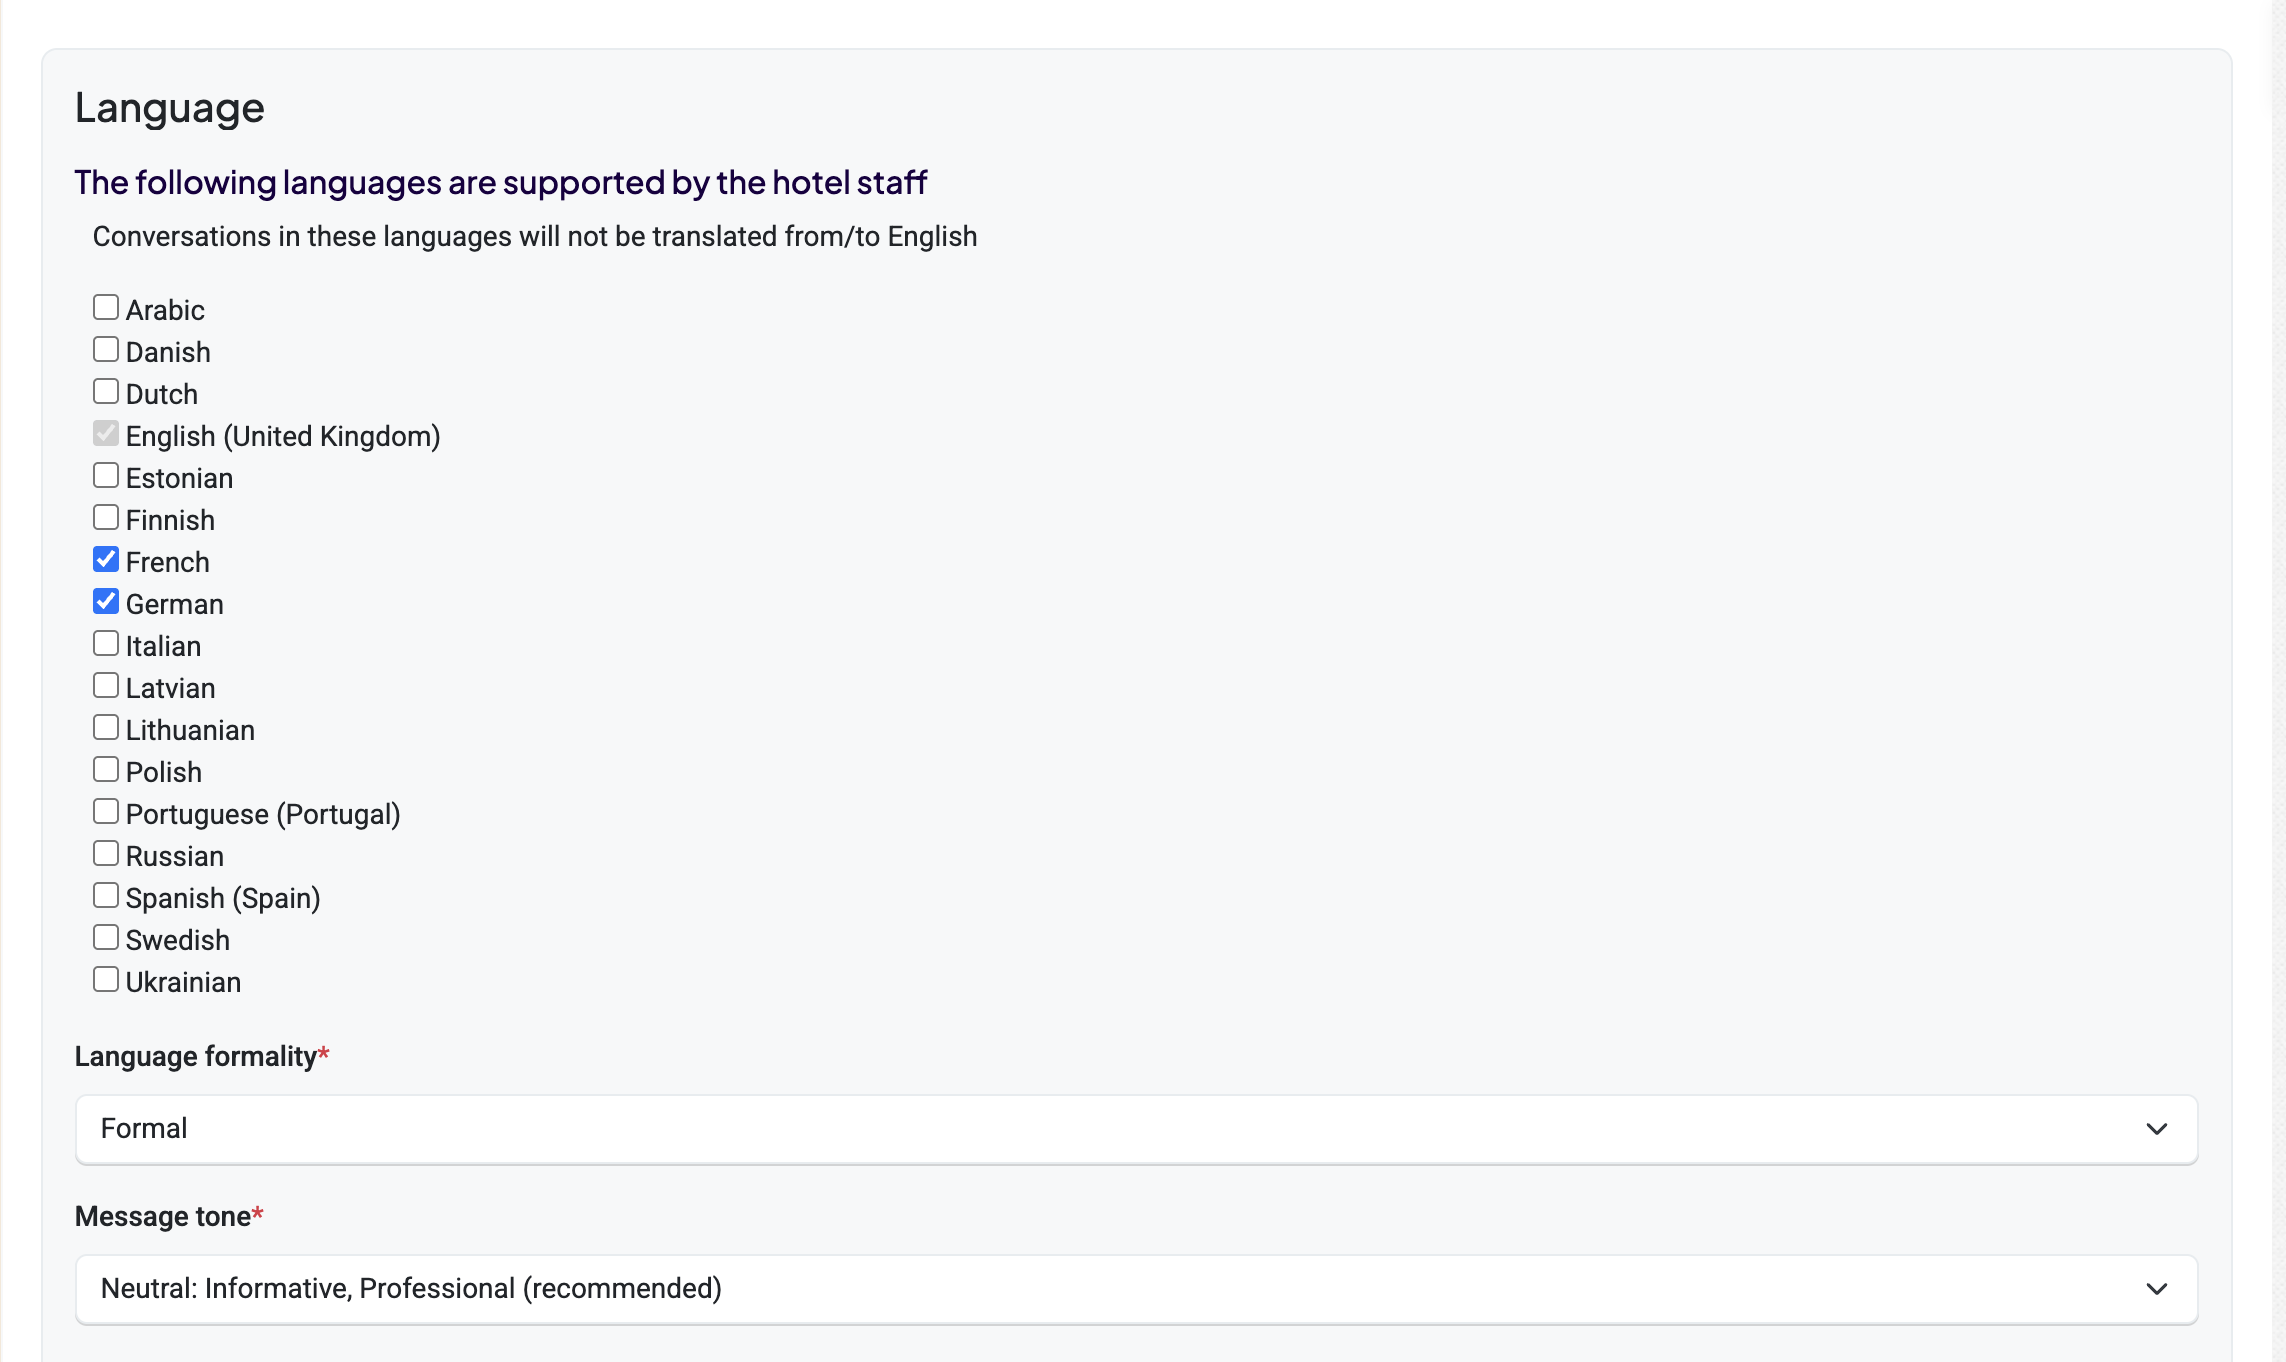
2. Languages:
You can choose which languages you do not want to have translated into English. In addition, you can choose the formality and the tone of voice of the AI.
Step 6: Finalizing Your Messaging Channels & Connectivity
Before your property goes live, follow these steps to integrate your preferred messaging platforms and ensure a smooth communication flow with your guests.
1. Messaging Channel Integration
Connect your various OTA inboxes to centralize your guest communication.
Important information: The Booking.com, Expedia, and Airbnb inbox channels can be added at any time. Once you have added them on your side, please contact the Onboarding team to complete the setup on our end. Once the setup is complete, conversations from these channels will automatically start appearing in your messaging screen. However, the AI will only begin responding once your property has been set to Live.
Booking.com Inbox: To sync your messages, first activate Runnr.ai within the Booking.com Marketplace. Please note, your Guest Messaging account must be fully active for this integration to function.
Airbnb Messenger: Follow the authorization link provided in your Settings menu to securely connect your Airbnb account.
Expedia Inbox: Once connected and live, the AI will automatically respond to incoming messages via Expedia. To connect to Expedia, please complete the following steps:
- Sign into Expedia Partner Central.
- Open Connectivity Settings, located under Rooms and Rates in the side menu.
- Select Add a provider, and then search for Runnr.ai B.V.
- Grant authorization to Runnr.ai and ensure that Messaging services are activated.
- Have your administrator enter the Expedia Property ID and property name in Stayntouch under the Guest Messaging Channels by choosing Add Expedia Messenger connection.
Webchat: The webchat functionality offers two options:
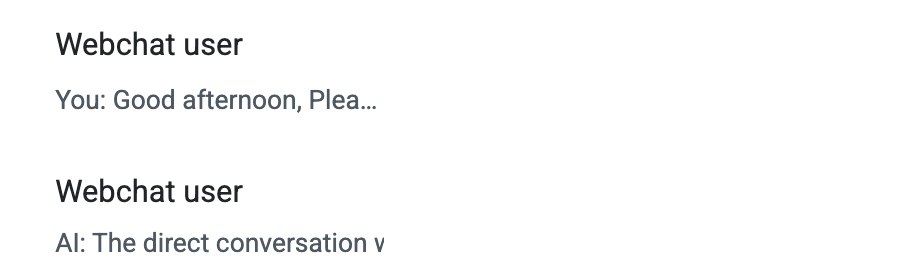
- For properties without an associated WhatsApp account, a web chat can be added to the website to enable anonymous conversations. The AI can respond to all inquiries except room-specific questions, and conversations will appear under the name “Webchat User.”
- For properties onboarding to WhatsApp or using WhatsApp redirection, they can choose between implementing the anonymous web chat or using the click-to-chat feature (https://faq.whatsapp.com/5913398998672934). The click-to-chat option allows guest details to be captured, so the guest’s name can be displayed in the conversation.
A detailed step-by-step guide can be found in the Guest Messaging Channel Settings. In general, to Manage Webchat Connection (Quick Guide) you’ll need to:
- Whitelist Domains: Share your website domain(s) (e.g., your-domain.com, app.your-domain.com).
- Add Script: Insert the chat widget script before the closing </body> tag.
- Customize (Optional): Adjust title and colors in the script.
- Go Live: The widget activates once your property is set to “live.”
- Test: Check functionality across devices and browsers.
2. WhatsApp Integration
To link your WhatsApp account, the property must have a verified Meta Business Account (Facebook Business).
First-Time Users: Ensure all information in your Meta Business Suite is complete and up to date. A verified account significantly expedites the WhatsApp onboarding process.
Existing Users (Migration): If you are currently using another guest messaging tool with WhatsApp, please notify us. Both Stayntouch Guest Messaging and the property must coordinate to initiate the migration process.
Going Live
Once all configuration is verified, Stayntouch will switch your property to "Live" status.
Important: This is when your outbound messages (automated check-in instructions, welcome notes, etc.) will begin triggering and sending to your guests.
OTA Channel Mapping
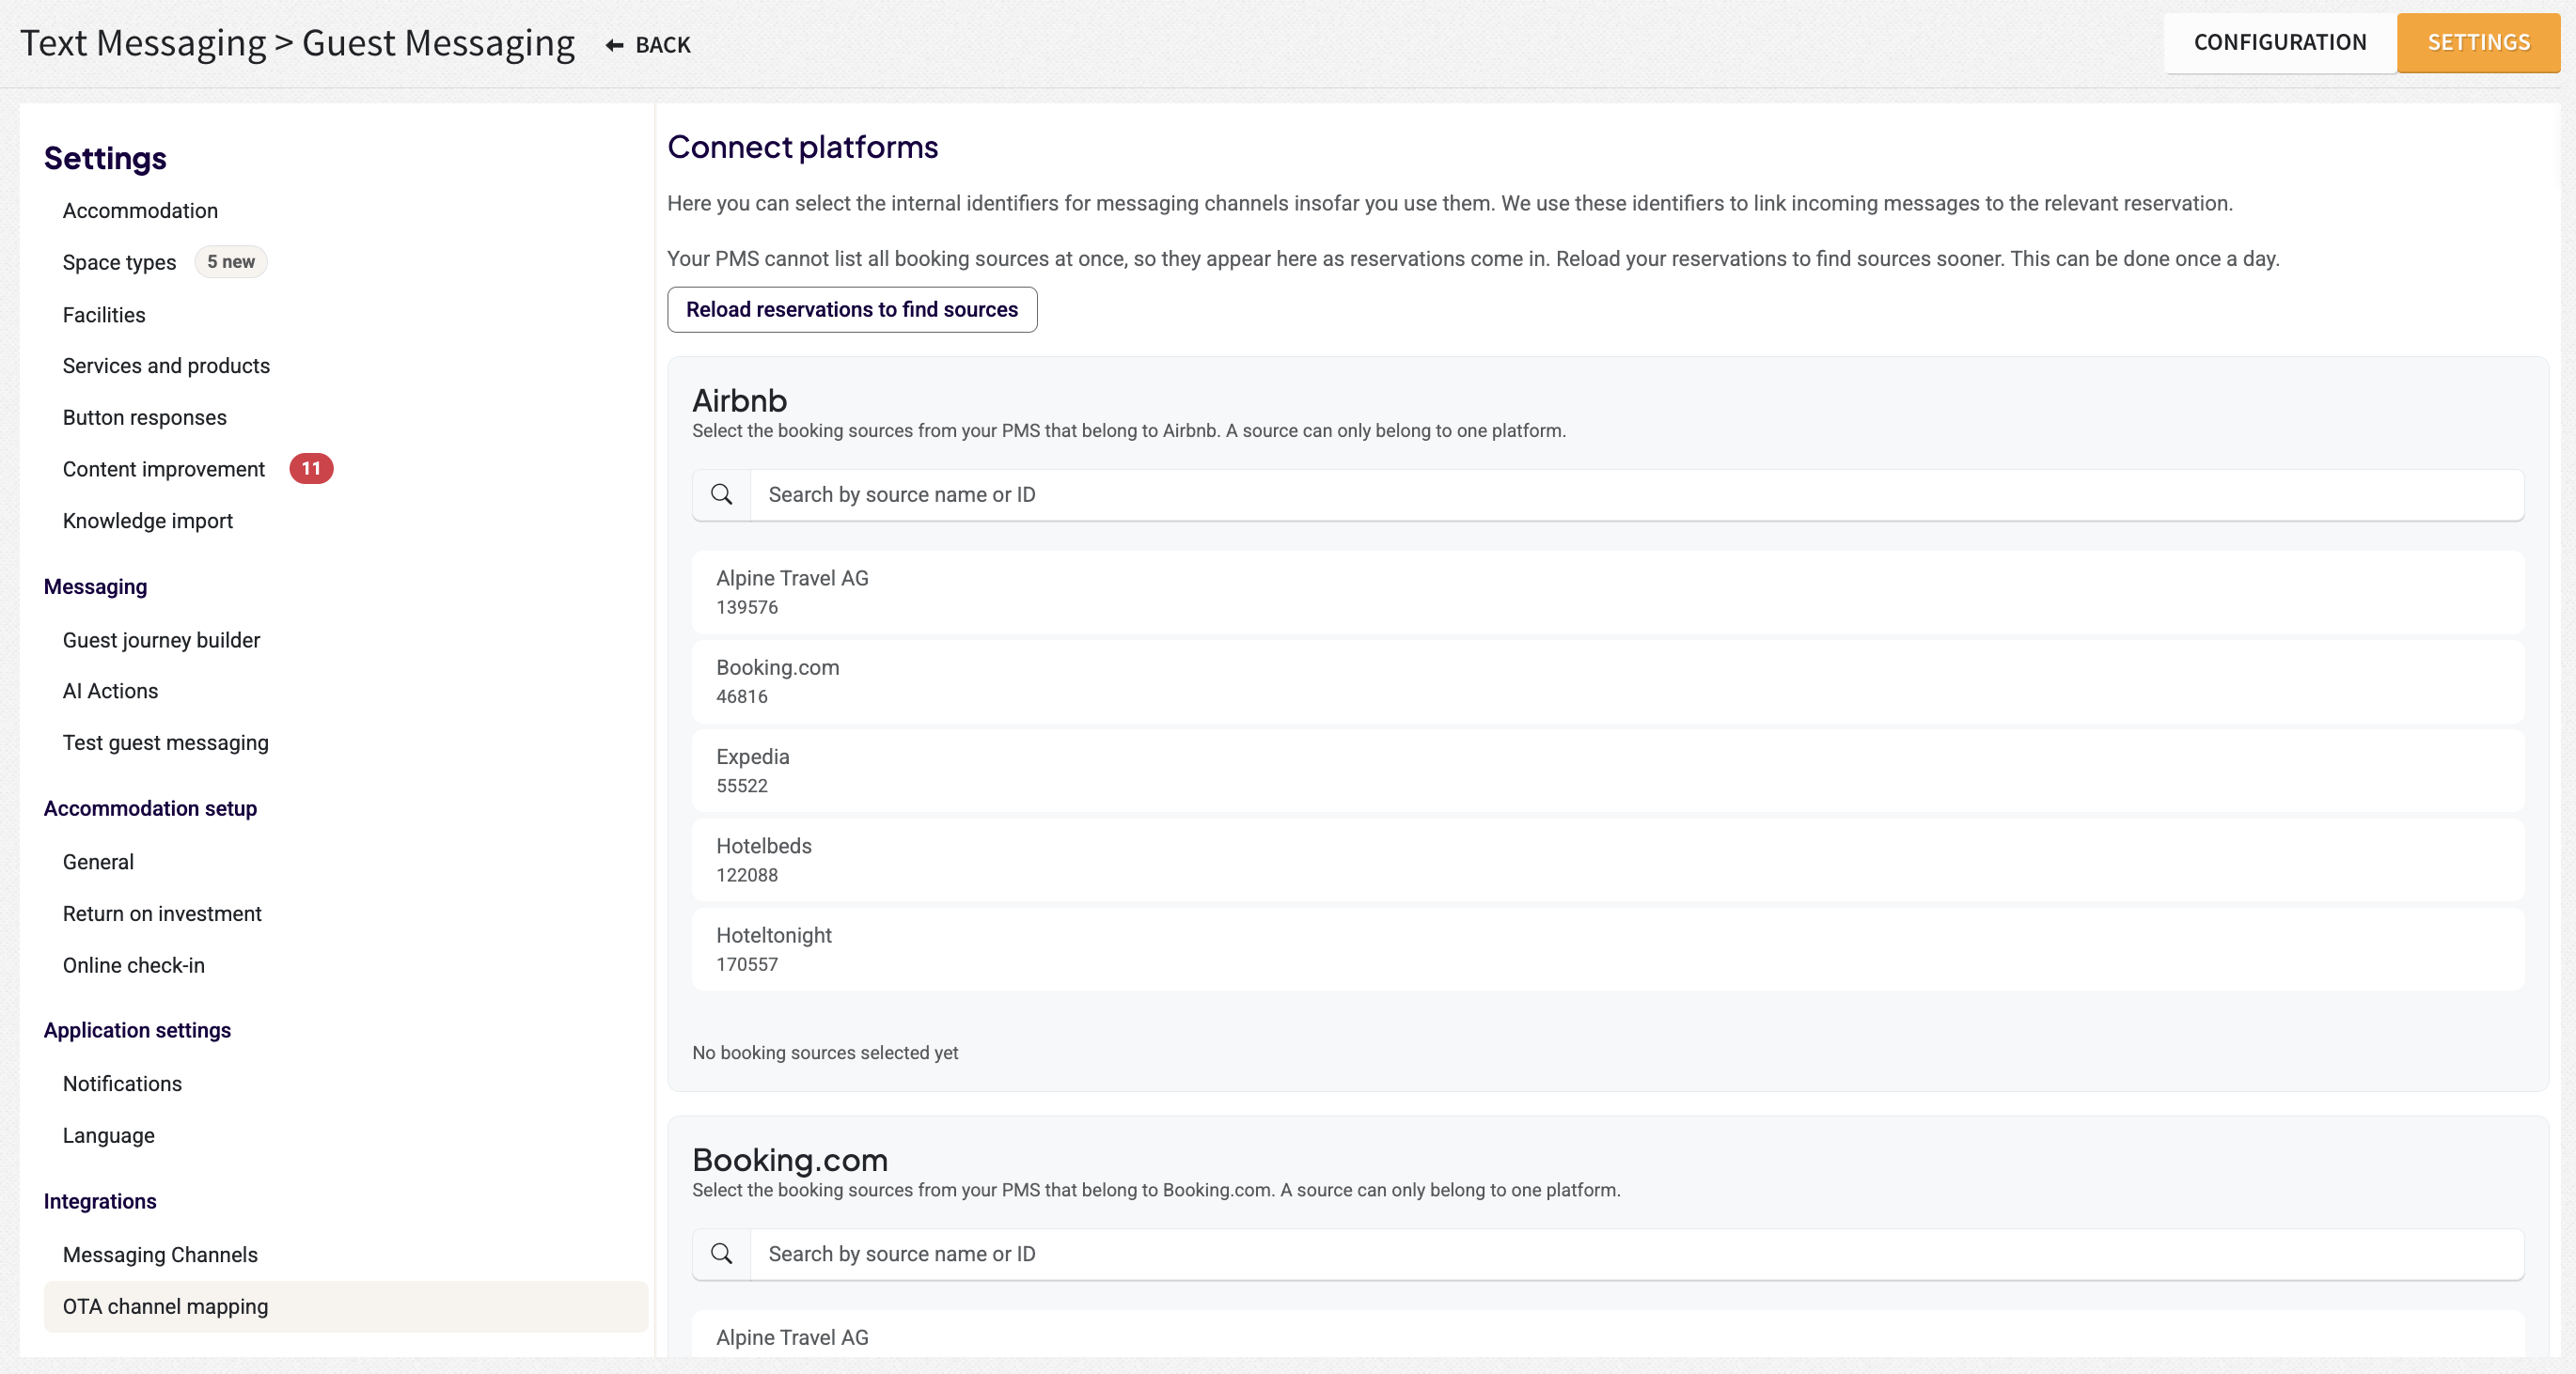
This section allows you to map your connected messaging channels to the corresponding Travel Agents in Stayntouch. Once mapped, guest names will be displayed for Booking.com, Expedia, and Airbnb conversations in the Messaging Inbox instead of booking references. It also enables outbound messages to be sent through these channels, provided this is supported and enabled in the channel's messaging settings.
To retrieve the latest Travel Agents from your reservations, click Reload Reservation Sources. The list will display all Travel Agents found in your current reservations.
If a Travel Agent does not appear in the list, it simply means there are no reservations recorded with that source yet.
After completing the mapping, click Save to apply your changes.
Post Go Live Follow-Up
We will conduct a dedicated Q&A session to discuss potential improvements and address any questions.