 Stayntouch PMS
 Rate Manager: Rates
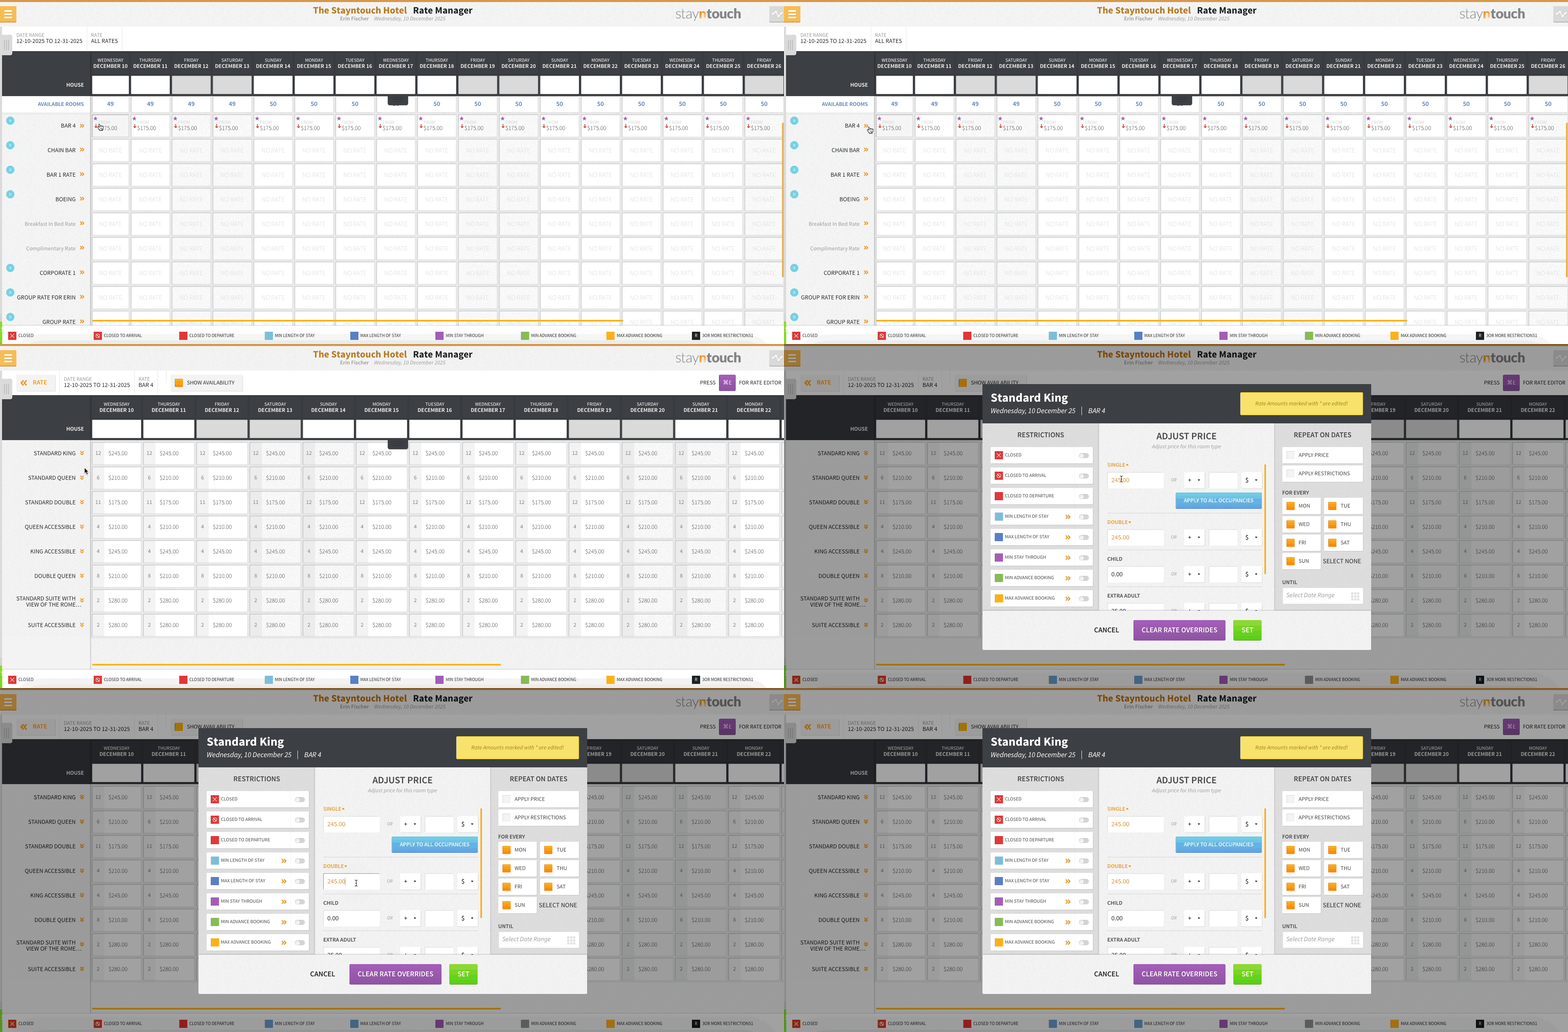
To manage rates from the Rate Manager, navigate to Revenue Management > Rate Manager. From here, you can first select a date range. Upon selecting a "from" and "to" date, simply select SET RANGE to confirm the dates.

You can then add additional parameters, which include the following:
- ORDER BY: Indicates the order in which rates are shown
- SHOW: Show rates by RATE, RATE TYPES, or ROOM TYPES.
- FILTER INDIVIDUAL RATE(S): Filter by a particular rate type and rate.
To leave rate types and rates open, leave the FILTER INDIVIDUAL RATE(S) field empty and select the green SHOW ALL RATES button.


From here, you'll find all of the rates you've built in your system. If you click on a rate from the left side of the screen, you can change the rates for that particular rate by any of the rate values. You can then increase or decrease the original rate price. If you wish to apply the rate to all occupancies select the blue APPLY TO ALL OCCUPANCIES button and then click the green SET button.


If you want these rate changes to repeat on certain dates until a specified date, you can select the APPLY PRICE checkbox, select a day or days of the week from the FOR EVERY field, and then select an UNTIL date for which the rate would be active. Upon clicking the green SET button, the adjusted rate will appear in orange with a star to the top left of the rate value.

If you then click on the rate value again, you can select CLEAR RATE OVERRIDES to reverse all adjustments to the rate. You'll then see that the rate returns to its original value.

RATE EDITOR
From Revenue Management > Rate Manager, you can also access the Rate Editor by clicking the left-facing chevron arrows next to a rate in the Rate Manager to pull up that rate and begin editing.

You’ll then see a purple button at the top of the screen that says PRESS ⌘ + E FOR RATE EDITOR (for Mac) or PRESS CTRL + E FOR RATE EDITOR (for PC). You can either use your keyboard to enter that function, or you can click the purple button.

This will open a new screen that you can navigate through using the arrow keys on your keyboard or a mouse. By default, the top left cell will be selected when this screen is opened. The current cell and the appropriate date and room type will be highlighted.

You can only update one cell at a time. When you’ve entered a new value in a cell, you can click the tab key on your keyboard to move horizontally to the next cell, or you can use the arrow keys on your keyboard to navigate up and down or left and right. Leaving the cell will automatically save the updated value.


Users can navigate and change values using a keyboard. Here is an overview of how to use your keyboard to navigate through the Rate Editor:
- Pressing tab or → moves you one cell to the right.
- Pressing shift + tab or ← moves you one cell to the left.
- Pressing return or ↓ moves you to the same cell in the row below.
- Pressing shift+ return or ↑ moves you to the same cell in the row above.
- Pressing esc or the CLOSE EDITOR button closes the Rate Editor.
- Pressing ⌘ + ? (for Mac) or CTRL + ? (for PC) opens keyboard shortcuts. You can also click the gray button that says ⌘? OPEN KEYBOARD SHORTCUTS (for Mac) or CTRL? OPEN KEYBOARD SHORTCUTS (for PC) to pull up a list of keyboard shortcuts.


STAYNTOUCH RATE STRATEGY: RATE MANAGER DISPLAY
Identify Stayntouch Rate Strategy updates at a glance! Rates updated via Stayntouch Rate Strategy (or RMS integrations) appear in the Rate Manager in a distinct color and show a purple star. Select a rate to see clear up/down arrows indicating whether it increased or decreased.

The above article explains how to use the rate manager with a focus on rates. For more information, view this video or contact Customer Support.
