Stayntouch PMS
Release Notes (v5.48)
Effective: 19 January 2022
TABLE OF CONTENTS
- Groups: Custom Rate by Day/Date
- Custom Add-Ons
- Allowances: Overview of Functionality (In Pilot Phase)
- Accompanying Guest Details Displayed on Housekeeping Room Details Guest Tab
- Batch Registration Card Print: Choose Sort Order for Printed Registration Cards (Arrivals & Groups)
- Internal QR Code: Updates to Invoices
- Budgets on Charge Codes and Market Codes for Calendar Year
- Adyen E-Commerce Integration
- Shift4 Integration
- DATEV Back Office Export Enhancements
- Windsurfer: Define Rates
- Pegasus
- “Show” Filter Added to Accounts Receivable Screen
- Exclude Inactive Cashiers From Cashier Dropdown Menu
PRODUCT ENHANCEMENTS
This is a comprehensive release that includes the introduction of three highly requested and significant enhancements to Stayntouch PMS. These enhancements include the following:
Group Custom Rates
Custom Add-Ons
Allowances
Groups: Custom Rate by Day/Date
You can now store custom group rates by day/date, which means a room type/rate value combination exists for each date. The rate value can be different for each date. When you save the custom rate configuration, a record for each date of the group is created with the rate values configured for each room type and occupancy.
We’ve introduced a new ROOMS/RATES toggle on the Room Block Details tab for groups. From here, you can switch to the RATES view to change the rate values for individual days by editing the rate amount in the rate field, or for date ranges using the arrow (>) button to copy the rate value up until the selected date.


If you click the ROOMS & RATES button of the Room Block Details tab of a group (if rooms and rates have not already been configured for the group), a popup will appear, where you can configure room types and rate values; however, once a rate is created, you cannot edit the rate values upon opening this popup again. Instead, you must switch to the RATES view on the Room Block Details tab. The only exception is if you add a new room type. In that case, you can click the + ADD NEW button to enter the initial rate values for the new room type.


If a group uses a configured rate instead of a custom rate, the rates by day will also display in the new RATES view; however, you will not be able to update the rates.
Custom Add-Ons
You can now create custom add-ons by selecting a POST TYPE of Nightly and then selecting/deselecting which days of the week the add-on can post on. To do so, the Add-Ons Custom Posting toggle must be enabled from Stayntouch Admin. When this toggle is turned ON, the PMS will allow advance add-on setup; however, if turned OFF, only the standard add-on setup will be available.
If you then navigate to Settings > Rates > Add-Ons > + ADD NEW, and select a POST TYPE of Nightly, you will see the days of the week for which this add-on is applicable. By default, all of the days of the week will be selected (meaning each selected day will be posted). Only the selected days of the week will be customizable from the reservations custom add-ons screen. See the example below.

As part of the custom posting schedule for advanced add-ons, you can configure a Last Night post type for add-ons. The Last Night post type will be posted the day before the departure date for add-ons, and will be posted on the departure date for allowances.
Reservation Creation
- When creating a reservation, the PMS will only display available add-ons based on the post type and occupancy type and active dates.
- When nightly add-ons are selected, you can customize the post dates and active dates.
- The add-on charges will be posted only for the selected dates.

Stay Card
- From the stay card, you can customize the add-on posting schedules any time during the stay.
- Select add-ons.
- Click an existing add-on.
- Customize days of the week selections matching the configuration of the add-on with a POST TYPE of Nightly. (The days not configured will be disabled; SELECT ALL only enables items not disabled.)
- If all days are deselected, you will be prompted to remove the add-on.
- Updates will reflect on the DEPOSIT/BALANCE screen.
- Changes to add-ons will reflect in the GUEST TO PAY balance and on the ProForma Invoice.
- All further postings will be based on the latest settings.

Groups
- You can configure a group add-on that is set up with a POST TYPE of Nightly and a custom posting schedule, so the group can have reservation add-ons matching availability of the hotel.
- Edit group add-on.
- Navigate to a group card.
- Select add-ons.
- Click an existing add-on.
- Customize days of the week selections matching the configuration of the add-on with a POST TYPE of Nightly.
- A change to group add-on day selection will result in updates to group potential revenue.
- A change to group add-on day selection will result in updates to the group ProForma Invoice on the Transactions tab.
- A change to group add-on day selection will result in updates to balances on the group Account tab under Balance/Status.
- A change to group add-on day selection will result in updates to add-ons for every existing reservation on the Rooming List tab.
Allowances: Overview of Functionality (In Pilot Phase)
Add-Ons with Activated Allowance Functionality
Allowances are used to support smooth operations and offer hotels above price value, especially in F&B outlets. Allowances enable hotels to work with two separate fundamentals—add-on price and add-on value. The add-on price is the actual cost of the add-on that will be split to the revenue stream selected within a charge code. The add-on value is the maximum amount that can be consumed by a guest at a hotel’s expense.
Main Use Cases in Hospitality
A F&B item where there is a difference in price and value
Example: A breakfast add-on is priced at $10.00, but the retail value is $15.00. In a F&B outlet, the full value of $15.00 is still entered in the POS. There is no need for manual print-outs to check breakfast inclusive guests, etc. The PMS absorbs the difference between the price and the value.
An F&B item with an attached credit
Example: A guest buys a $50.00 bar credit with a value of $100.00. The PMS will automatically absorb all corresponding charges set up within the allowance add-on for the value of up to $100.00. The guest is to pay $50.00 (in case the add-on is not included in a rate). Anything above $100.00 will be posted as a guest-facing charge utilizing the allowance charge code attached in the allowance add-on.
Allowance functionality can be used in many other revenue streams such as spa, laundry, or an overall F&B credit.
Consume on the Same Business Date
In the screenshot below, Consume next day is not selected in add-on setup, and the add-on is not included in the rate.

All associated allowances are loaded to the Guest Bill based on the post type. If the POST TYPE is Last night or Consume next day, it will not be loaded upon check-in. The charges will be displayed upon clicking the ALLOWANCE button. The initial allowance load will be a negative amount. All consumable charges will be posted against the allowance load as long as the consumable amount is lower than the allowance value.

The allowance load can also be found from Financials > Journal, including its tax breakdown.

During the end of day process the allowance loss/unused allowance calculation will be performed and then displayed in the internal breakdown section as well as in the Journal.
Allowance loss is posted for any amount that is more than the allowance price but less than allowance value. Allowance loss is posted as a negative amount.
a.
Allowance Price = $20.00
Allowance Value = $25.00
Consumed = $25.00
Allowance Loss = -$5.00 ($20.00 - $25.00)
b.
Allowance Price = $20.00
Allowance Value = $25.00
Consumed = $20.00
Allowance Loss = Nil ($20.00 - $20.00 = $0.00)


Within Financials > Journal, you will also notice that a counter posting to the allowance load has been added. Allowance load is only a holding charge code that will ensure that all consumable charge codes are calculated correctly. The charge code in itself should always be at $0.00 value at the end of the day. The counter posting is not seen on the allowance button intentionally.
Unused allowance is posted for any amount that is less than the allowance price. Unused allowance is posted as a positive value.
a.
Allowance Price = $20.00
Allowance Value = $25.00
Consumed = $10.00
Unused Allowance = $10.00 ($20.00 - $10.00)
b.
Allowance Price = $20.00
Allowance Value = $25.00
Consumed = $0.00
Unused Allowance = $20.00 ($20.00 - $0.00)

The ALLOWANCE button will not show the allowance loss/unused allowance tax breakdown. This can only be found in Financials > Journal.

Allowance overage is posted in the event a guest consumed more than the allowance value. The remaining amount will be posted to the guest’s bill.
a.
Allowance Price = $20.00
Allowance Value = $25.00
Consumed = $35.00
Allowance Overage = $10.00 ($35.00 - $25.00)
A value of $25.00 is absorbed by the allowance, and the overage value of $10.00 is posted against the guest bill using the respective consumable charge code.

The guest bill will show the below allowance overage.

Above is an overview of the allowances functionality. For more information, please refer to this article.
Accompanying Guest Details Displayed on Housekeeping Room Details Guest Tab
From the GUEST tab in Housekeeping > Room Status > Select Room > Room Details, we now display both the primary guest and accompanying guest details. Both the primary and accompanying guest details include the guest name and guest avatar.

Batch Registration Card Print: Choose Sort Order for Printed Registration Cards (Arrivals & Groups)
Printed registration cards are now sorted by either ROOM NUMBER ASC, ROOM NUMBER DESC, LAST NAME ASC, or LAST NAME DESC during the Arrivals and Groups batch printing processes. Upon selecting the print button, you can choose to SORT BY either ROOM NUMBER ASC, ROOM NUMBER DESC, LAST NAME ASC, or LAST NAME DESC.
Arrivals


Group Rooming List


Please note, if you choose to sort by room number (either ascending or descending), reservations with no room number assigned will print either before or after the reservations with assigned room numbers.
Furthermore, if you choose to sort by last name (either ascending or descending), reservations with no name present (i.e., pending group reservations) will print either before or after the reservations with names present.
Internal QR Code: Updates to Invoices
When the internal QR code functionality is enabled for a property, the PMS will print a QR code with the Hotel Tax ID and Hotel VAT Registration Number; however, if the property does not want to print the hotel address details on their invoices and switches OFF the SHOW HOTEL ADDRESS toggle in Settings > Hotel & Staff > Stationery > Invoices, the Hotel Tax ID and Hotel VAT Registration Number will not appear along with the QR code. This applies to print and email invoices.


Furthermore, when invoices are generated from Financials > Accounts Receivable, the QR code will now include the A/R Invoice/Folio Number.
When manual invoices are settled, the QR code will also show the relevant information. If SHOW HOTEL ADDRESS is enabled from Settings > Hotel & Staff > Stationery > Invoices, this will include Hotel Name, Hotel Tax ID, and Hotel VAT Registration Number.
Finally, for account void bills, the Company or Travel Agent Name and Tax ID are now present in the QR code.
Budgets on Charge Codes and Market Codes for Calendar Year
We’ve implemented the ability to add budget numbers by year/month for each market code and/or charge code that is marked as revenue. From Settings > Financials > Financial Settings, we’ve added a new BUDGETS toggle that can be turned ON/OFF as desired.

When the BUDGETS toggle is turned ON and the Financials Budgets permission is assigned from Settings > Hotel & Staff > Permissions, a new menu item will appear in Financials called Budgets.


From Financials > Budgets, users will have the ability to select the year they want to add budgets for charges codes and markets. Budgets for the current year +/- 2 years will be displayed. Whereas budgets for the current year +/- 2 years will be displayed, only future dates can be updated. So, for example, if the current year is 2021, you will see budgets for 2019, 2020, 2021, 2022, and 2023. You can then enter a budget by month and charge code/market.


Furthermore, you can add numbers per month and charge code/market or apply a budget to multiple months and charge codes/markets by selecting the green ADD BUDGET button. If applying a budget to multiple months and charge codes/markets, you can click SAVE REVENUE BUDGET once complete, or you can click SAVE AND ADD ANOTHER to add another budget.


Once the budgets are entered on a month by month basis, you’ll be able to view the budget per day by clicking on the month. You can modify the budget per month or per day, as long as the budget day is the current business day +1. Past day budgets and current day budgets cannot be modified.


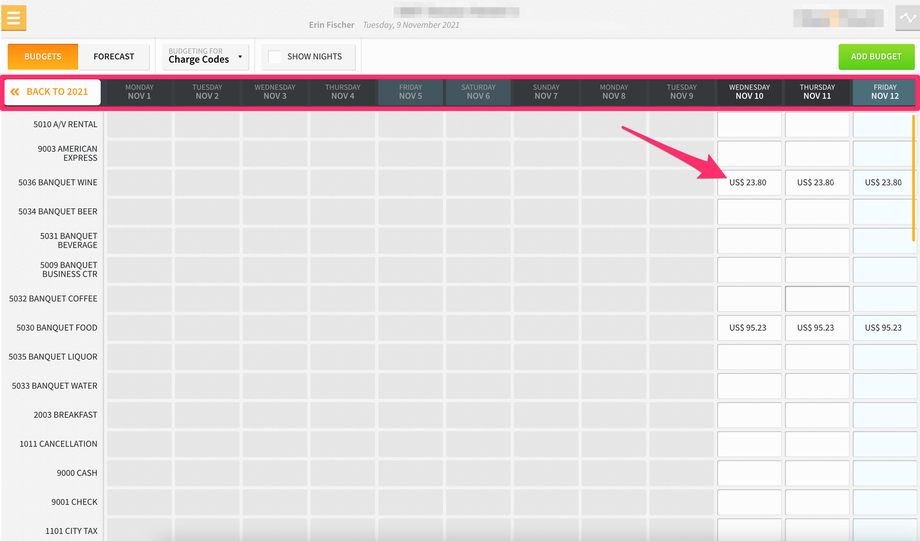

Furthermore, if you select the SHOW NIGHTS checkbox at the top of the screen, you can set budgets for projected nights for each market/charge code.


Adyen E-Commerce Integration
We have added Adyen E-Commerce to our current payment partners. This supports integrations with online transactions, card not present transactions, and MOTO transactions.
Shift4 Integration
We have added Shift4 to our current payment partners. This supports integrations with in-store transactions, online transactions, card not present transactions, and MOTO transactions.
DATEV Back Office Export Enhancements
We have added the possibility to exclude the Vienna tax from the DATEV Back Office Export. From Settings > Integrations > Back Office > DATEV > Charge Codes, you can select which charge code(s) to exclude.

You can also export summarized revenue for charge codes by mapping them against a rollup code. You can set up roll up codes (minimum 4 characters) from Settings > Integrations > Back Office > DATEV > Rollup Codes. Please note, the ACTIVATE/INACTIVATE toggle must be turned ON for DATEV in order to add rollup codes.


You can then map them against the charge codes you want to summarize in the export from Settings > Integrations > Back Office > DATEV > MAPPINGS Tab.

This will produce one line in the DATEV Back Office Export, which summarizes the revenue from these charge codes mapped against the same rollup code.
Windsurfer: Define Rates
For Windsurfer, we have added the option to define if rates are sent and received including or excluding taxes. This can be configured from Settings > Integrations > Central Reservation System > Windsurfer.

Pegasus
We now support Pegasus CRS integrations. Pegasus is a flexible and robust CRS with connections to global GDS, OTA, metasearch, and direct channels. Please see below for supported features.
Communication | 2-Way |
|---|---|
| Feature/Function | |
| Download Reservation (CRS to PMS) | YES |
| Upload Reservation (PMS to CRS) | YES |
| Upload Inventory | YES |
| Upload Rate | YES |
| Upload Restriction | YES |
| Upload Group Block (PMS to CRS) | YES |
| External Mappings | |
| CC/Payment Type | YES |
| Market Segment | YES |
| Source Code | YES |
| Add-On Codes (Packages) | YES |
| Can Sync Individual Message Types vs. Bulk | YES |
| Message Type Sync: Rate | YES |
| Message Type Sync: Inventory | YES |
| Message Type Sync: Restriction | YES |
| Message Type Sync: Reservation | YES |
| Message Type Sync: Group | YES |
| Defaults | |
| Default Rate Code | YES |
| Default Payment Method | YES |
| Default Booking Origin | NO |
| Default Room Type | YES |
| Rate Type Amount to Use on Reservation Import (Before/After Tax) | YES |
| Rate Calculation (Before/After Tax) | NO |
| Restrictions | |
| Closed | YES |
| Closed to Arrival | YES |
| Closed to Departure | YES |
| Min LOS | YES |
| Max LOS | YES |
| Min Stay Through | YES |
| Min Advance Booking | NO |
| Max Advance Booking | NO |
| Hierarchy Restrictions | YES |
| House Restrictions | YES |
| Room Type Restrictions | NO |
| Rate Restrictions | YES |
| Rate Type Restrictions | NO |
| Sell Limits | NO |
| Existing Reservation Data Push from CRS to PMS | YES |
| Sync Company Profiles (Allows defaulting of billing instructions for Expedia virtual cards, etc.) | NO |
| Custom Daily Group Rates | NO |
YOU ASK… WE LISTEN

“Show” Filter Added to Accounts Receivable Screen
We’ve added a SHOW filter to Financials > Accounts Receivable, which allows users to show All accounts, Zero Balance Only accounts, or Open Balance Only accounts. By default, All will be selected, which includes both open and zero balance accounts. Filtering all open accounts or all zero balance accounts will return only those accounts that match.


Exclude Inactive Cashiers From Cashier Dropdown Menu
You can now exclude inactive cashiers from the CASHIER dropdown menu in Front Desk > Cashier. By default, you will only see Active cashiers indicated from the dropdown menu. However, if you want to show inactive cashiers, you can click the dropdown bar in the center of the screen and click the Inactive Cashiers checkbox, which will then include Inactive cashiers.


