Stayntouch PMS
Release Notes (v5.4)
Effective: 13 March 2019
TABLE OF CONTENTS
- Accompanying Guests Show in Group Rooming List
- Check-in Not Allowed for Rooms Set to Out of Service
- Currency Conversion Table Added to Financials
- Currency Conversion Added to All Invoice Stationery
- Use Invoice Search to Locate Invoices Without Folio Numbers
- Admin Charge Code Setup—No Manual Postings
- Archival Transfer Setup
- Deposit Due Date Changed from an Individual Use Case to a Generic Use Case
- Stayntouch Guest Mobility: Reservations with Routing
- Existing Interfaces Have Moved
- ID COLLECTION
- PMS—ID Collection—Setting
- PMS—ID Collection—Check-in
- PMS—ID Scan—Check-in on iPad
- PMS and Stayntouch Guest Kiosk—Check-in with ID Scan Using External Webcam
- ID Collection via Stayntouch Guest Kiosk—Admin Configuration
- Stayntouch Guest Kiosk—ID Collection Flow (iPad Only)
- Stayntouch Guest Kiosk—ID Collection—Facial Recognition
- Stayntouch Guest Kiosk: Remove/Suspend Guest from Reservation to Complete Check-in
- ID Collection Through Stayntouch Guest Mobility—Admin Configuration
- Stayntouch Guest Mobility—ID Collection Flow—Check-in
- Stayntouch Guest Mobility—ID Collection—Facial Recognition
- Stayntouch Guest Mobility—Check-in Completed Upon ID Verification
- Use Scanned Images from Photo ID as a Guest Card Icon
- Storage for Scanned IDs
PRODUCT ENHANCEMENTS
Accompanying Guests Show in Group Rooming List
On the group rooming list screen, accompanying guests now show as a separate reservation record the same way they do on the reservation search screen. The avatar for these reservations indicates they are accompanying guests, and the reservation details for these records are the same as the primary guest.

The room number assigned for these reservations shows as assigned for all guests attached to a reservation. When navigating to the stay card from the accompanying guest card, the user will be directed to the guest card of the primary guest. The guest card screen for the accompanying guest will be the same as the guest card for the primary guest, and any changes to either guest are reflected on the stay card.

When sorting by guest name, all primary and accompanying guests are listed.
Check-in Not Allowed for Rooms Set to Out of Service
Previously, there was no restriction against checking in a room when in Out of Service status. Under new functionality, check-in is not allowed for Out of Service rooms. An error message now displays (as with Out of Order rooms) when attempting to check in an Out of Service room.

Currency Conversion Table Added to Financials
We have added a currency conversion table that, when switched ON, allows users to open a small table from Financials > Currency Exchange that can be used to display exchange rates for today and in the future.


Users are unable to edit past exchange rates.

Fast track entry automatically copies values to proceeding cells.

To enable:
Settings > Hotel & Staff > Settings & Parameters > Toggle ENABLE MULTIPLE CURRENCIES to ON/OFF

Currency Conversion Added to All Invoice Stationery
A converted currency is now displayed along with the current amount listed on the folio. The currency displayed is the currency selected as the HOTEL INVOICE CURRENCY in Settings > Hotel & Staff > Settings & Parameters.

This converts each posting as well as the totals to the set invoice currency based on the exchange rate for that business day. The invoice will show transactions in both currencies.

Once the original invoice has been created, the converted currency is stored with the invoice. This ensures copies of the invoice use the previous conversion rate instead of converting with the new exchange rate. Please note, currency conversions are only visible from the invoice.
Use Invoice Search to Locate Invoices Without Folio Numbers
We have implemented a checkbox to search for invoices without folio numbers.
To enable:
Financials > Invoice Search


The No Folio Number search works together with the main search criteria.
Admin Charge Code Setup—No Manual Postings
We have added a toggle for hotel admin to disable manual postings on guest bills, accounts, groups, and A/R transactions—or anywhere else users are able to add a charge.
To enable:
Settings > Financials > Charge Codes
Open a charge code
Under Charge Code Details, we have added an ALLOW MANUAL POSTINGS toggle

Archival Transfer Setup
Hotels can now enable an archival transfer for scanned Guest IDs to comply with archival or other legal requirements of retention of such information. Archival transfer creates an unencrypted archive of the information selected on your Google Drive, S3 bucket by AWS, or Dropbox. Support for OneDrive cannot be provided at this time but is in evaluation.
To enable, go to Settings > Hotel & Staff > Archival Transfer. Once the Activate/Inactivate toggle is set to ON, follow the prompts. A disclaimer must be acknowledged to proceed with the transfer. Prior to activating, you should have selected a cloud storage provider.


Upon selecting and verifying Google Drive as the archival location, an Access Token populates. Select Continue to finalize archival transfer setup.

If you choose the S3 bucket as your archival transfer, you will be asked to configure an AWS Access Key ID with permission to update the AWS console and bucket creation automatically. Upon doing so, an AWS Secret Access Key is generated. As before, select Continue to finalize archival transfer setup.

Finally, if you select Dropbox as your archival transfer, you will be asked to configure an Access Token. Upon entering an Access Token, select Continue to finalize archival transfer setup.

For further details about setting up archival transfer through Google Drive, S3, and/or Dropbox (including information about access tokens/keys), you can view their formal documentation at the links below:
Google Drive: https://support.google.com/drive/?hl=en
Dropbox: https://www.dropbox.com/help
As part of the archival transfer framework, you may also select types of information to be archived. With this initial release, Scanned IDs is available for selection. Other information types may be added in future releases.

Deposit Due Date Changed from an Individual Use Case to a Generic Use Case
Multiple deposit rules can now be scheduled for the same due date and are automatically cumulated for processing. Deposit rules that compute a due date prior to the reservation creation are now due on the reservation date.
Stayntouch Guest Mobility: Reservations with Routing
This improvement applies only to Overlay mode with OPERA where reservations with routing instructions are excluded from web check-in. Guests attempting to check in, but received an invitation email before the routing instructions were added in OPERA and received in Stayntouch PMS, are now redirected accordingly with the following message:

Existing Interfaces Have Moved
If you previously found an existing interface under Settings > Interfaces > External Mappings, check the broader Interfaces Setup, as some interfaces have been moved here.

ID COLLECTION
We now offer a variety of settings that enable ID collection for guests prior to and at check-in. ID scanning is available for Stayntouch PMS, Stayntouch Guest Kiosk, and Stayntouch Guest Mobility. Below you will find the complete documentation of features related to the ID scanning functionality. Please note, ID collection must be enabled by Stayntouch Admin. Those who are interested can contact their sales rep to complete a separate monthly service agreement. For any questions about implementing these features at your hotel, please contact Customer Support.
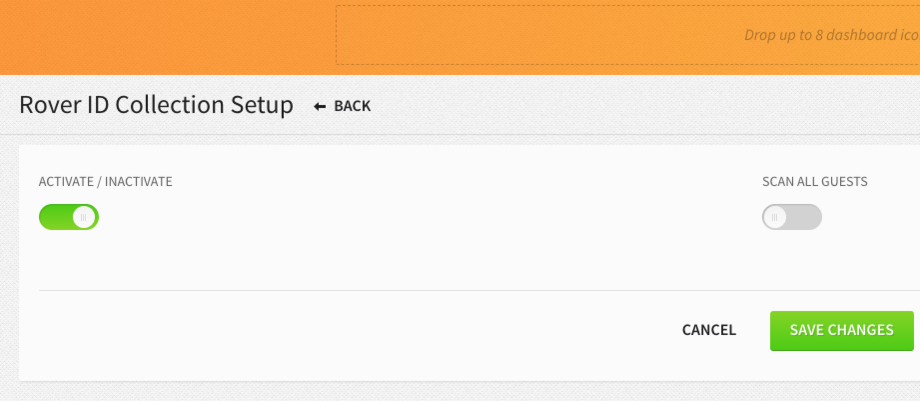
PMS—ID Collection—Setting
Admin can now enable and configure ID collection during check-in for Stayntouch PMS.
To enable: Settings > Hotel & Staff > ID Collection > Rover PMS
From here, admin can add a toggle to enable ID collection during check-in.
When toggled on, ID collection becomes mandatory in order to check in; staff or guests will be unable to bypass this step for check-in. If queue is enabled, a pre-check-in may be performed without fulfilling any of the required ID scans.
Admin can also enable the SCAN ALL GUESTS toggle. When activated, all members of a reservation with multiple guests need to scan their ID before the check-in can be performed.
Please note, scanned photo IDs and extracted information are retained in Stayntouch PMS until 30 days after check-out. For longer retention, please refer to archival transfer.
PMS—ID Collection—Check-in
Completion of ID collection is now enforced in order to proceed with check-in. When ID collection is enabled for check-in, complete the following steps:
Staff clicks on check-in/queue room (Advanced Queue).
After each step, the application checks if all guests’ ID information has been successfully collected.
When all guests’ IDs have been collected, agents may proceed with check-in.
The Continue to Check-in button will not be active if all ID scan requirements are not met. Requirements are based on the settings below:
Scan ID for All Guests is ON > Button remains inactive until all guest IDs have been collected
Scan ID for All Guests is OFF > Button remains inactive until the primary guest’s ID has been scanned
After all required ID scanning has been completed and is valid, the Continue to Check-in button becomes active:

PMS—ID Scan—Check-in on iPad
PMS check-in with ID scan is now possible on iPads.
The flow is the same as ID check-in via desktop.
The iPad’s rear camera is used for scanning.
ID scan is completed by clicking the camera icon on the iPad.
ID details are extracted from the scanned image.
Staff are able to retake each side as necessary.

PMS and Stayntouch Guest Kiosk—Check-in with ID Scan Using External Webcam
PMS and Stayntouch Guest Kiosk offer the ability to scan guests’ IDs using an external webcam. As with the built-in camera, staff are prompted to capture the photo IDs. For driver’s licenses or national IDs, both sides of the ID card need to be scanned to proceed. Passports only require scanning of the identity page. Positioning of the camera and appropriate lighting conditions may affect the quality of images taken and accuracy of extracted information.
Optimal images were captured using this device: https://store.ipevo.com/IPEVO-VZ-R-HDMIUSB-Dual-Mode-8MP-Document-Camera_p_13.html
Good results were obtained using this device: https://store.ipevo.com/IPEVO-V4K-Ultra-High-Definition-USB-Document-Camera_p_14.html
ID Collection via Stayntouch Guest Kiosk—Admin Configuration
Admin can enable and configure ID Collection for Stayntouch Guest Kiosk.
To enable: Settings > Hotel & Staff > ID Collection > Zest Station
From here, admin can add a toggle to enable ID collection during check-in.
Admin can select the type of verification that best fits their hotel’s legal environment, policies, and desired guest interaction:
ID Scan (Validation, But No Verification)
ID Scan with Staff Verification: After capturing the guests’ IDs, staff are required to verify the accuracy and match of the identification used.
ID Scan with Facial Recognition: Uses Facial Recognition to verify ID match. If Facial Recognition fails to match the guest with photo ID, this step may be repeated, or staff may be called to verify ID.
ID Staff Verification Only (No Scan): No ID upload; staff verifies ID.
Scanning of all the reservation’s guests’ IDs may be made mandatory to proceed with check-in.
Admin may enable a bell sound for staff verification.


Stayntouch Guest Kiosk—ID Collection Flow (iPad Only)
The following applies when ID collection is active:
After retrieval of the reservation, a page appears indicating that the guests need to scan ID(s) to proceed with check-in.
Guests are then directed to present ID to the rear webcam.
If an ID card type is detected, the guest will be prompted to also scan the back of the card. For passports, only the identity page needs to be scanned.
Once scanning is completed, the extracted data is displayed with the image of the photo ID.
Guests may Accept or Rescan the captured ID if the extracted information is inaccurate. If the guest selects Rescan, repeat steps 2-4.
Once completed, the photo ID and information is stored in the ID module on the stay card; ID type and number are populated in the guest card fields.


Stayntouch Guest Kiosk—ID Collection—Facial Recognition
Once enabled in Stayntouch Guest Kiosk, Facial Recognition is used to verify the scanned photo ID and will proceed as follows:
After ID scanning is completed, guests are prompted to take a headshot using the front-facing camera. The guest will then click the Continue button to see an image preview on screen. As soon as a face is detected, a countdown to trigger capture of the image begins, and an image is taken automatically.
After the image has been taken, its biometric information is compared with the image of the scanned ID.
If the match is successful, and all required guest IDs have been successfully validated and verified, guests may proceed and complete check-in.
If the match is not successful, the guest will see a notification that their photo ID did not match. The guest may retake an image or call a staff member for assistance.
To retake an image, guests are prompted to repeat steps 1-3.
When staff is contacted, Facial Recognition may be bypassed. Instead, staff are required to verify the photo ID.
Stayntouch Guest Kiosk: Remove/Suspend Guest from Reservation to Complete Check-in
Stayntouch Guest Kiosk offers the option for guests to detach a guest card from a reservation. Below is the self check-in process with the new guest card detachment functionalities in bold:
Guest selects their guest record to proceed with ID scanning flow.
Once ID scanning is complete, the guest record status changes to Success.
This process is repeated until all guest records are in Success status.
A Next button becomes visible to access ID verification.
Once the guest selects the Next button, a verification page opens, where, depending on configuration, the guest may call for staff or will be prompted for Facial Recognition.
As soon as at least one guest ID scan was completed, beside the Next button at bottom of the page, an Ask for Help button now displays.
If the guest selects the Ask for Help button, staff is called, and the staff authentication page displays.
After authentication, hotel staff may suspend any guest records that are not in Success status. To suspend a record, staff must select a reason from the following options: Will Not Be Arriving, Arriving Separately, Booking Error, or Other. Staff may also select one of the following actions: Cancel, Modify Dates, Create Separate Card, or Follow Up. Suspended guest records will be removed from the stay card.
Staff may also enter a note into a memo field for instructions or any other communication or information needed.
When all remaining guests’ ID statuses are successful, they may move to the next page for ID verification and proceed with check-in.

ID Collection Through Stayntouch Guest Mobility—Admin Configuration
Admin can now enable and configure ID Collection for Stayntouch Guest Mobility.
To enable: Settings > Hotel & Staff > ID Collection > Z
When the toggle is enabled, a Mandatory toggle becomes visible. When set to mandatory, guests may only proceed with check-in if all required ID scans have been completed. When ID collection is set to mandatory, and guests do not have the required documents to complete ID scanning at hand, they may bypass this step and complete a pre-check-in. The missing ID scans can then be performed at the hotel.
Admin may also force a Scan All Guests option by setting the toggle to YES (default NO [inactive]).

Stayntouch Guest Mobility—ID Collection Flow—Check-in
Please note, ID scanning with Stayntouch Guest Mobility requires a mobile device. When opening Stayntouch Guest Mobility on a desktop, guests are informed that they may proceed to pre-check-in (but they cannot finalize the check-in) or open the link using a smartphone. After scanning photo ID on a mobile device, guests can complete check-in via mobile device. There are two scenarios:
1. Stayntouch Guest Mobility Flow with ID Scan: Optional (Mandatory Toggle is Inactive)
Before the end of check-in flow, before the user gets the check-in confirmation screen, the guest may opt to scan their ID using their mobile device.
Guests will receive a message that reads, “Skip the long lines and upload a picture of your state-issued ID! Remember, if you opt out now, you will still be required to submit it to staff before you can check in.”
If the guest opts no:
They are taken to the check-in confirmation page.
In the staff check-in notification email, staff are notified that the ID was not submitted.
2. Stayntouch Guest Mobility Flow with ID Scan: Mandatory (Mandatory Toggle is Active)
On the ID collection screen in Stayntouch Guest Mobility, the guest will proceed as follows:
On tapping the upload button, the rear camera is enabled, and the guest will see a preview of the ID. Please note, Android devices will activate the last used camera, front or back. Guests may use either or flip to the inactive camera from the capture screen.
On tapping the camera button, an image of the ID will be taken and processed.
If the photo ID detected is a driver’s license or national ID card, the guest will be prompted to scan the back of the card. Passports only require the identity page to be scanned.
 |  |  |
The screen then displays the captured images with the extracted data and prompts the guest to accept or restart the ID scanning process.
If information is missing or incorrect, the guest may rescan. Depending on the settings, the guest may proceed with pre-check-in.
If the guest opts to retake, repeat steps 1-5.
If ID cannot be validated or is not a match, and the guest opts to continue with the pre-check-in process, the confirmation page will include a message to see staff upon arrival at the property.
If all IDs required for check-in are valid and verified, the guest may proceed with check-in flow as per other configuration (pre-check-in or complete check-in).
Stayntouch Guest Mobility—ID Collection—Facial Recognition
If Facial Recognition is active in Stayntouch Guest Mobility, and ID has been scanned, Facial Recognition will proceed as follows:
The guest is prompted to take a selfie.
The guest takes a photo of him/herself by clicking the camera icon.
If the return is a match, the ID status on the guest card becomes “ID verified.”
If the return is not a match, the guest is given the option to retry or alert staff that ID needs to be verified. If the guest selects the second option, they will receive the message, “Check-in will need to be completed at the front desk.”
Stayntouch Guest Mobility—Check-in Completed Upon ID Verification
Upon ID verification, guests may complete the check-in process. There are two potential scenarios for this:
If all of the guests’ photo IDs were not verified successfully, guests may proceed with pre-check-in.

If all guests’ photo ID scans were successfully completed, guests may proceed with check-in flow as per all other settings.
Use Scanned Images from Photo ID as a Guest Card Icon
We now have the option to upload guest images to use as the guest card icon. Two options appear when completing ID scans:
Use guest image on stay card > Default: OFF
Delete guest image on stay card > Default: ON
If option 1 is turned ON:
Captured image is downsized and populates on the guest card.

If option 1 was turned ON and is then turned OFF:
The user is asked, “Do you want to remove existing guest card icons?”
They then select YES or NO:
YES: All guest card images will be removed from all guest cards that are NOT shared with other properties where option 1 remains ON.
NO: No action will be taken.
If option 2 is turned ON (default):
When the captured photo ID information and image are purged, the image is also removed from the guest card.
If option 2 is turned OFF:
The image remains on the guest card.
Storage for Scanned IDs
Due to regulations regarding personally identifiable information, scanned ID information is now:
Retained for the shortest reasonable duration: ID information is stored in Stayntouch PMS until 30 days after check-out. Hotels looking to enable, or those that require longer-term storage (as per countries’ regulations and laws pertaining to the archiving of business records), may transfer unencrypted ID information to an external cloud storage of their choosing.
Protected from unauthorized access: ID information can only be accessed by authorized users, and each file is encrypted using the same level of encryption as payment card information. To retrieve or view ID information, files must be decrypted by authorized users.